dmatt
-
Posts
4 -
Joined
-
Last visited
dmatt's Achievements
NPORA Newbie (1/5)
3
Reputation
-
Where are Blower Motor Fuses & Relay 03 pathfinder SE?
dmatt replied to dmatt's topic in 96-2004 R50 Pathfinders
I think I found it. Same place behind the pull out change compartment on driver side fue box. 3 relays, with the middle being the blower motor from what I found. I ended up replacing that relay and fuses but it didn't help. I purchased a $20 blower motor resister on Amazon and that didn't fix it. Then I purchased a new blower motor from AutoZone and that got the air running again. Put everything back together and then it kept blowing after I turned it off. So I had to take it apart again and put the new resistor back in. I had put the old one back in because I thought it was just the blower motor. So it ended up being the resistor AND the blower motor. $170 in parts and back in business. -
Hello All My kid has an 03 Pathfinder SE. No air is coming out of the vents for hot or AC. Nothing. I figure I should start with fuses and relays first. I think I found 2 fuses in the interior driver side compartment and they both looked fine. My question is, is there a relay anywhere that needs to be tested as well? If so where is it located and labeled as? Thanks
-
Honestly I can't say much about the quality because we just put it in. Check back in a year We did spray paint it with a black rust oleum paint to hopefully keep it from rusting.
-
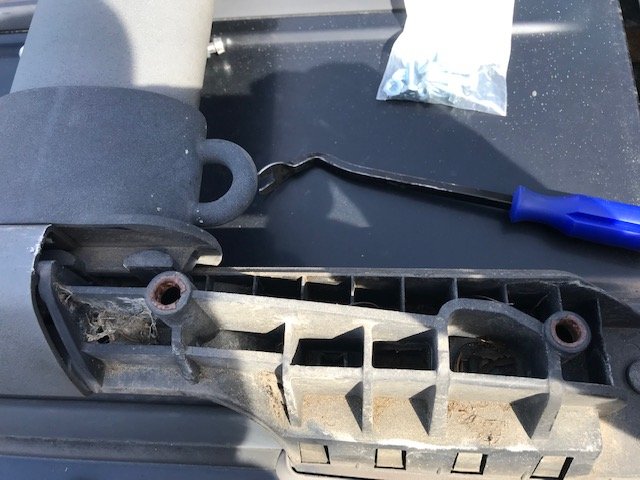
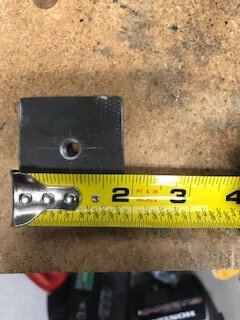
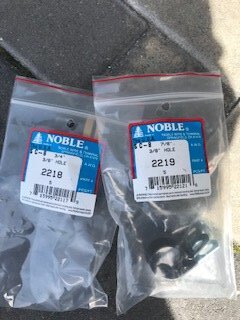
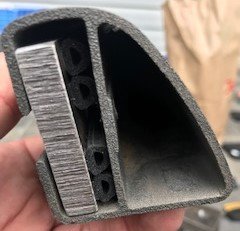
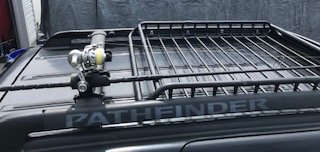
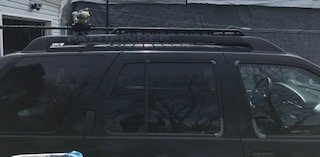
I recently went about putting a roof cargo basket on my kids 2003 SE R50 and I thought I would document it due to the fact I have seen a number of threads which were good but perhaps missing information or pictures which would help. Here goes. The project started with 3 goals: 1) put a cheap cargo basket in between the raised roof rails, 2) Have somewhere to put an LED light bar 3) Keep roof rail to attach fishing rod rack. The $99 Haul-Master basket at Harbor Freight is what we purchased because it looked like it might fit and it was cheaper than name brands. Here is the link to one we used. 150 Lb. Capacity Roof-Mounted Steel Cargo Carrier (harborfreight.com) We didn't want to simply put the roof basket on top of the existing rails because we didn't like the look having it stacked that high and we wanted to keep the roof rail(s) to attach things like fishing rod holder. I started with a trip to a scrap yard and stripped the roof rack assembly off 2 R50's. One was the flat roof rack and one was the raised rails like we already have. For $75 each it helped to learn how to remove the components and plus we had extra rails and other components to experiment with. The PATHFINDER logo was gone off our current raised rails and the ones we picked still have it on. So for people who are looking to do something like this with the raised rails here are some steps with pictures. 1. You have to remove the caps and support at the back or front of the raised rails. To do this you have to pry up the caps with a screwdriver or a pry bar. You have to be careful doing this as if your R50 is 20 years old and these haven't been taken off before they are in there pretty solid and might crack. The guy at the scrap yard who removed the one we purchased cracked one and we cracked one a little. My advice is to do it when its warm. Plastic cracks easier when its cold. Also you can try pushing up from the gap in the rail. Take your time and be careful. Basically there are 2 plastic feet that go into a circle and you are trying to pry them up. See picture below. Once you get that off you just remove 2 screws from the base and one screw that holds the rail to the base on the side. I think they are T25 heads. 2. After that is off now I had to figure out how to attach the basket to the raised rails. My solution was threaded steel. I'm not a welder so I went to a shop and they made me 8 2x2 plates threaded with a 3/8 hole. See picture below. For securing the plate I used 3/8-16 x 1inch hex head cap screws and then some clamps. Also I attached some weatherstripping to the back of the plate to keep it somewhat level when sliding it through the rails. Then its just a matter of sliding the plates in and securing the basket with the bolts and clamps. I used 4 on each side for a total of 8 plates/bolts/clamps 3. I might add that I removed one of the rails all together in the end. I kept 1 in the back to mount my fishing rod holder. I pushed the rack up front as far as possible. Then you put everything back together by connecting the side rail to the end base with 1 screw and then putting 2 screws back from the base to the roof. The next part of the project will probably be to find an LED bar to attach either to the rack OR the bolts under the wind fairing. There are a couple bolts there that can be used with brackets I think.