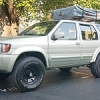
Gspeed151 Posted February 2, 2017 Share Posted February 2, 2017 I have been asking around, buying stuff from members on NPORA and after amassing a nice collection of parts I am almost ready to roll up my sleeves and get to work on some of the major projects for this build. I have already done some major work to bring you up to speed I bought this QX4 for a get around car for my mom and then she ended up giving it back after she drove it for a year in that year I put in a new T-bet and water pump, the previous owner told me that he had a shop put in a bone yard engine so it was about 100k miles on it. I had to put a new a new battery and since I work at a dealership I slapped a new Nissan power source. I have the exhaust tacked up for the time being and after the 3rd attempt the valve covers and plenum gaskets are now replaced and not leaking. For the modifications so far I have upgraded the sound system to a kenwood DDX23BT and then I installed a CrimeStopper RS4-G4 remote start system over Christmas. I have a stockpile of suspension parts and other goodies I bought from RockAuto and other online stores; CV axles, struts, ball joints, rear trailing arms uppers and lowers and million other pieces I have some in the paint shop being painted white others I rattled black for extra rust protection. I normally go with all OEM but for this project I am mixing in China knock offs and OEM for the critical pieces. I have installed a JWT pop charger I got from big_johnson on NPORA parts for sale and I have ready for install a set of Mile Marker locking hubs I got from NOCOJay on there too, thanks guys. I just picked up a set of new Bilstein 5125s to keep the rear down. I took out the front turn signals and installed a set of generic LED fogs. For my lift I have a set of OME HD up front and OME MD for the rear waiting for install. I ordered from Fleurys a set of 1in strut spacers but some AS*HOLE decided to swipe the package from my mail room so its setting me back a few weeks till I can get another set ordered. I work at a Nissan dealership and have a condo so its best for me to do it with an experienced tech after hours so we have the facilities to get this job done fast. I think I have enough to get this project rolling the only thing I am debating is getting extended brake line, if anybody know what the part #s are I read somewhere W21 or Frontier lines are longer and direct fit..not sure but if anybody has info it would be great. I am just waiting for the top coil seat to be able to put my struts together so its an easier install and I have it preloaded I only found one vender online and I didnt want to go through Nissan even with a discount they were $$$ its just going to take a week ro so to get but I did go OEM for the strut mount plates and bearings. I am planning on taking pics of the progression and also making a video, suggestions encouraged...thanks! I have been asking around, buying stuff from members on NPORA and after amassing a nice collection of parts I am almost ready to roll up my sleeves and get to work on some of the major projects for this build. I have already done some major work to bring you up to speed I bought this QX4 for a get around car for my mom and then she ended up giving it back after she drove it for a year in that year I put in a new T-bet and water pump, the previous owner told me that he had a shop put in a bone yard engine so it was about 100k miles on it. I had to put a new a new battery and since I work at a dealership I slapped a new Nissan power source. I have the exhaust tacked up for the time being and after the 3 attempt the valve covers and plenum gaskets are now replaced and not leaking. For the modifications so far I have upgraded the sound system to a kenwood DDX23BT and then I installed a CrimeStopper RS4-G4 remote start system over Christmas. I have a stockpile of suspension parts and other goodies I bought from RockAuto and other online stores; CV axles, struts, ball joints, rear trailing arms uppers and lowers and million other pieces I have some in the paint shop being painted white others I rattled black for extra rust protection, I normally go with OEM but for this project I am mixing in China knock offs and OEM for the critical pieces. I have installed a JWT pop charger I got from big_johnson on NPORA parts for sale and I have ready for install a set of Mile Marker locking hubs I got from NOCOJay on there too, thanks guys. I just picked up a set of new Bilstein 5125s to keep the rear down. For my lift it raise it up I have a set of OME HD up front and OME MD for the rear waiting for install. I ordered from Fleurys a set of 1in strut spacers but some AS*HOLE decided to swipe the package from my mail room so its setting me back a few weeks till I can get another set ordered. I work at a Nissan dealership and have a condo so its best for me to do it with an experienced tech after hours so we have the facilities to get this job done fast. I think I have enough to get this project rolling the only thing I am debating is getting extended brake line, if anybody know what the part #s are I read somewhere W21 lines are longer and direct fit..not sure but if anybody has info it would be great. I am just waiting for the top coil seat to be able to put my struts together so its an easier install and I have it preloaded I only found one vender online and I didnt want to go through Nissan even with a discount they were$$$ its just going to take a week to get but I did go OEM for the strut mount plates and bearings. I am planning on taking pics of the progression and also making a video, suggestions encouraged...thanks Link to comment Share on other sites More sharing options...
jtchal Posted February 2, 2017 Share Posted February 2, 2017 Nice work.I'm rocking the same rig but the Japanese diesel version. So I'll be keen to see how you get on with the lift kit from fleurys and the manual hubs. Theses are probably the two mods I'm looking at doing. Oh and please don't hesitate to upload pictures Are you able to take a picture of your centre console/gear lever area please? I want to see if it's similar to the jap version. Cheers Link to comment Share on other sites More sharing options...
mjotrainbrain Posted February 2, 2017 Share Posted February 2, 2017 Darn, I wish I knew what the part number for the rear was! It's the rear brake line for a D22 Frontier, that much I remember. Good luck with the build! Link to comment Share on other sites More sharing options...
fleurys Posted February 2, 2017 Share Posted February 2, 2017 When I installed my 33" with 3+ inches of lift, I installed these from goodridge : Goodridge G-Stop Brake Lines - 4-22082 4" Extended Brake Line Kit - For Trucks with Lifts Link to comment Share on other sites More sharing options...
Gspeed151 Posted February 2, 2017 Author Share Posted February 2, 2017 Nice work. I'm rocking the same rig but the Japanese diesel version. So I'll be keen to see how you get on with the lift kit from fleurys and the manual hubs. Theses are probably the two mods I'm looking at doing. Oh and please don't hesitate to upload pictures Are you able to take a picture of your centre console/gear lever area please? I want to see if it's similar to the jap version. Cheers Link to comment Share on other sites More sharing options...
jtchal Posted February 6, 2017 Share Posted February 6, 2017 Thanks.It appears to be the same 2WD/AUTO/LOCK switch system with the Hi/Lo ratio lever. I think I might go ahead and order a set of Warn manual hubs. Looking forward to seeing pictures of the truck once the mods/upgrades are done. Link to comment Share on other sites More sharing options...
Gspeed151 Posted March 1, 2017 Author Share Posted March 1, 2017 Update:: I have had a few delays but this coming Sunday I should be ready to lift this thing, I did a quick parts check and found out I ordered a few duplicates but ohh well. Next step is to compress the springs and preload the struts so we can replace with ease. I have a set of ProComp 16in 3.75 BS steelies on order and should be here by this weekend and my Cooper Discoverer AT/3s 266/75/16 have been sitting in the shop waiting to be mounted. The last piece is ordering the rear brake line. Lots of new suspension parts I coated in epoxy suspension paint and I had the rear trailing arms painted to match the struts. 4 Link to comment Share on other sites More sharing options...
jtchal Posted March 7, 2017 Share Posted March 7, 2017 Eagerly waiting to see how you got on with these updates! Link to comment Share on other sites More sharing options...
Gspeed151 Posted March 7, 2017 Author Share Posted March 7, 2017 Another delay in the wheels but they are en route should be in Friday and Sunday install. Will be documenting it. 1 Link to comment Share on other sites More sharing options...
Gspeed151 Posted March 13, 2017 Author Share Posted March 13, 2017 UPDATE: After much delay I was able to get my hands dirty, we didn't finish everything we set off to do today but we accomplished a significant amount of work and ran into some issues but like in every build you can only plan so much and you have to figure it out as it comes. I started off with a car packed full of goodies and just to unbox everything took almost an hour. We put together the wheels and tires and started with the rear and right out of the gate we ran into some bolts on the rear lower links that were fused into in the shafts after going through countless cut-off wheels we got them cutoff but that set the tone for the day we fought just about every bold on this rig from the trailing links to the shocks they were are not giving up easily. We ended up getting the rear end pretty much buttoned up we only managed to put together one strut assembly. We are going to the finish up this week and hopefully next weekend I can take it on its maiden voyage. We had to put the stock wheels back on the roll it out of the shop but we got a view of it with the wheels and tires on and it was pretty exciting. Start of the day Putting together the wheels/tires I will update more pics. 2 Link to comment Share on other sites More sharing options...
Gspeed151 Posted March 13, 2017 Author Share Posted March 13, 2017 Removal of the old 1 Link to comment Share on other sites More sharing options...
Gspeed151 Posted March 13, 2017 Author Share Posted March 13, 2017 Installation of the new Wheels on Back on the ground I will update more this week. 2 Link to comment Share on other sites More sharing options...
Gspeed151 Posted April 12, 2017 Author Share Posted April 12, 2017 After more delays I finally got my rig out of the shop, its not quite finished but its very close. I need to go back in next weekend and finish the alignment but it tracks OK and I put a couple hundred miles on it to let the springs settle. I need the rear wheel caps installed, the longer bake line installed, I need to do some trimming of the fenders and bumpers and remove the the hideous running boards. It rides like a dream and I installed a Tepui roof top tent on a Thule roof rack and I cannot be happier with the progress and its all coming together. Looking ahead and searching for somebody local to build me custom bumpers and install some LED lights on the roof rails to create a halo for camping, with that maybe a AUX battery and I need to source a tow hitch. I will soon be posting more pics of it driving and actually being used...finally!! 6 months of planning and a ton of work I was very pleased taking the maiden voyage of about 200 miles with no major issues. Unpacking the tent Thule roof rack Installing the tent 1 Link to comment Share on other sites More sharing options...
Gspeed151 Posted April 12, 2017 Author Share Posted April 12, 2017 4 Link to comment Share on other sites More sharing options...
TowndawgR50 Posted April 12, 2017 Share Posted April 12, 2017 Looking good. Did you rent a space or work with the shop you hired to do the installation? Link to comment Share on other sites More sharing options...
fleurys Posted April 12, 2017 Share Posted April 12, 2017 The strut spacers are installed wrong... they go on top of the top plate..not in between... you run the danger of your strut nut to pop out the threads.... 1 Link to comment Share on other sites More sharing options...
Gspeed151 Posted April 12, 2017 Author Share Posted April 12, 2017 Oh shoot, good catch I was in a rush building it we were on a time crunch and I knew something was little off, we will tear into it next weekend and flip those around. I am not going to drive it this week anyways. Thanks!!!! The strut spacers are installed wrong... they go on top of the top plate..not in between... you run the danger of your strut nut to pop out the threads.... Link to comment Share on other sites More sharing options...
Gspeed151 Posted April 12, 2017 Author Share Posted April 12, 2017 We did it in the shop at Bellevue Nissan and I hired one of the techs to do most of the work but I ended up quitting and moving on to Maserati and he had a baby during this time so we had to get in done quickly, never have enough time! Those links were such a bitch to cut off. Looking good.Did you rent a space or work with the shop you hired to do the installation? Link to comment Share on other sites More sharing options...
TowndawgR50 Posted April 12, 2017 Share Posted April 12, 2017 Oh thats right, youre in my neck of the woods. Well fix those struts and lets take it out for some trail runs! Link to comment Share on other sites More sharing options...
Remus92 Posted April 13, 2017 Share Posted April 13, 2017 Very nice!!! Link to comment Share on other sites More sharing options...
RainGoat Posted July 10, 2017 Share Posted July 10, 2017 Nice meeting you at NWOR. I'm eager to see the WJ bumper you're working on. If it works for you, I'll take the cue and do it myself. I'm happy to join in putting on if you could use the hands! Also interested to see if the rear bumper plan works out. Link to comment Share on other sites More sharing options...
Gspeed151 Posted July 28, 2017 Author Share Posted July 28, 2017 So after the accident I have decided to get more toys, I am ordering a Tepui awning to match my RTT, I am going all black and ordering a black cover for the tent too. I have decided to forgo the custom rear bumper since I found a parts car and got a stock bumper the same color, I also scored a factory tow hitch which I am getting a Hitchmate for my spare and doing the 3 gal Rotax and high mount jack. For the front I am bouncing around the idea of a front hitch and using a cradle for a winch then having a custom tube front grill guard made down the road. The exhaust I have been debating but I think I am going to get some larger pipes from the cats back and a Magnaflow muffler. I was really hoping to enjoy this summer but this accident will probably take me off the road for the month of August since I have to do the repairs then get it inspected by the State Patrol since technically it was deemed a total loss from the insurance. I am still trying to figure out a different mounting system for my RTT and soon to be awning the Thule rack just sits WAY too high so I am bouncing around ideas. So many little project on my rig and just not enough TIME! I will post more trail pics later after I figure out how to post now the PB is crap. I have been out on FS roads every week and nothing major has broken...yet. 1 Link to comment Share on other sites More sharing options...
Gspeed151 Posted August 10, 2017 Author Share Posted August 10, 2017 (edited) Here are some pics of my process, I got my hands on a rear bumper and factory trailer hitch and then I got a used Hitchgate that we a little worn and rusty but I ended up painting and installing. Edited August 10, 2017 by Gspeed151 Link to comment Share on other sites More sharing options...
Gspeed151 Posted August 10, 2017 Author Share Posted August 10, 2017 20170801_154750 by gspeed151, on Flickr 20170801_154758 by gspeed151, on Flickr 20170801_165945 by gspeed151, on Flickr 20170802_154849 by gspeed151, on Flickr 20170802_154849 by gspeed151, on Flickr 20170802_162608 by gspeed151, on Flickr 20170802_155921 by gspeed151, on Flickr 20170802_155059 by gspeed151, on Flickr 20170802_162617 by gspeed151, on Flickr 20170802_162612 by gspeed151, on Flickr 2 Link to comment Share on other sites More sharing options...
Gspeed151 Posted August 10, 2017 Author Share Posted August 10, 2017 I also installed a new exhaust we took it to 2.25in from the flange after the cat to the muffler, I went with a Magnaflow 18in and we took it 2.5in out the back into a matching Magnaflow tip. It sounds great and after a couple days its getting deeper and more noticable not raspy or buzzy like I have hear on some other 3.3L's and I am very pleased with it. 20170807_135902 by gspeed151, on Flickr 20170807_135912 by gspeed151, on Flickr 20170807_135902 by gspeed151, on Flickr 20170807_135855 by gspeed151, on Flickr 20170807_165604 by gspeed151, on Flickr 20170805_195543 by gspeed151, on Flickr 1 Link to comment Share on other sites More sharing options...
Recommended Posts
Create an account or sign in to comment
You need to be a member in order to leave a comment
Create an account
Sign up for a new account in our community. It's easy!
Register a new accountSign in
Already have an account? Sign in here.
Sign In Now