
ramdala
-
Posts
95 -
Joined
-
Last visited
Content Type
Profiles
Forums
Calendar
Posts posted by ramdala
-
-
That's good to hear. Between the timing belt and this sub-frame drop, I've got a bit of work to do. By the way, your pathy es bakan!! It's good to see Chile getting into this sport. For a guy that loves 4x4's and snowboarding, Southern Chile is heaven.

Excellent to find someone as bakan as me
 . I am not in the snow sports right now, I used to practice ski but my knee says no more sport for me long time ago. Have you been in Chile?
 -
I might be going a different route here. Originally, like I said, I wanted to add limit straps to my front suspension to keep my front cv axles from tearing up. Now that they are torn up, and I have to replace them anyway, I'm strongly considering a 4" sub frame drop. After taking out the cv axles I figured I would be half way there, so what the heck, why not go all the way and get er dun right. I do, however, have a few concerns with this modification. First: The sub-frame drop will keep the cv's from tearing up when the suspension is fully extended. What happens to the cv's when my suspension is fully compressed? Do I have to worry about tearing the boots because they are flexing too far in the other direction? (fully compressed)
Second: will the angle on the front driveline be too drastic with a 4" sub-frame drop?
I want to go with a 4" because I found a guy, krfabs.com, that sells the spacers for the drop, and some guy from Santiago Chile posted a thread where he installed it. Looks pretty straight forward. The only difference with me is I won't be using the strut spacers provided by krfab because I already have the struts
Hi I am the one from Chile, yes the install is very straight forward and for you it should be easiest because of the impact tools and equipment. Please post your advances.
-
Wow those links looks big, how about the ride quiity?, any noticeable difference?
-
Good job ..am gonna look into that.
Thanks! Its a good addon with nice look.
Please give us a review of the product and it's reliability & accuracy. I like the install, very stock "OEM" like.
Thanks, I am sick at bed right now but I will report any issue the next week.
Take a pic of the replacement valve caps too!
Hello, on the manufacturer site there are a lot of pics, I have not take any of the valves.
take a look here: check link
Any pics of when the sensors got installed on the rims? Im curious how they look inside and out and if a tire shop has a hard time putting on a tire around them
Looks real nice, got me interested in looking into a TPMS system
Thanks, its just changing valves, except that the new ones have a nut to fix it on the wheel. In fact, I have replaced the valves by myseft while the tire shop person was unmounting the tires (I am not a confident person when it relates to install gadgets that are not common here). The only pic with the valve installed is one that I have found on the web. Good luck!
-
Wow, clean install. Very nice.
Thanks!
Very nice. Doesn't get any better than that.

Thanks again, another
That looks awesome! I wonder how low it will read, for like when you air down would it give accurate reading?
Kind of sad you get the whole system for $155 and when I had a factory sensor fail on my titan it cost $95 just for the sensor and another $85 to install it and program. And mine won't tell me how much pressure in each tire or which one is low. I just get a light telling me to pull over and kick the tires!
James
I have not tested on routes yet but from other comments I have read on the net, it support low pressure too (4 psi)and its fairly accurate.
The display has over and under pressure alarms and you can see alternatively the temperature of tires.
-
That's a very nice installation... bravo! looks oem !
Thanks!! it looks oem and the monitor fills the space perfectly!
-
where did you get that?
http://www.amazon.com/Display-Pressure-Monitor-Sensors-Koolertron/dp/B004CUGB6Q
That is the one I have used! but I bought it here: http://www.dealextreme.com/p/2-6-lcd-wireless-tpms-tire-pressure-monitoring-system-45222
Rgds
-
Hello all
How about to install a TPMS kit (tire pressure monitor system) on our trucks..and at the same time to fill the useless "hole" that we have in the center console?
This is the TPMS that I have bought, the kit comes with this screen and 4 tire valves to replace the standard ones.

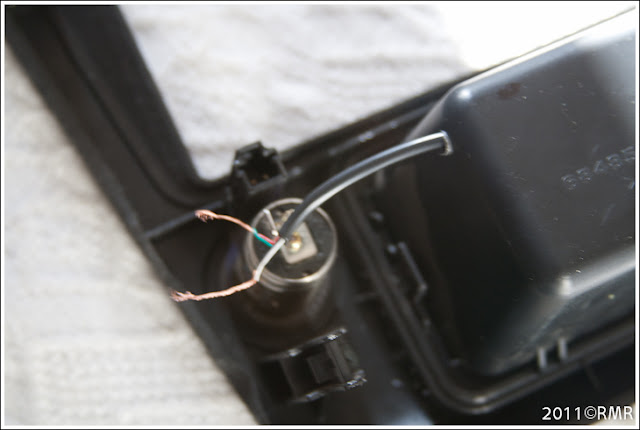
You have to disassemble the center console (there are some good threads about that on npora). I only need to drill the bottom of the pocket to pass the wire and connet it to the cigarette lighter:
With everything installed back, this is the final product:
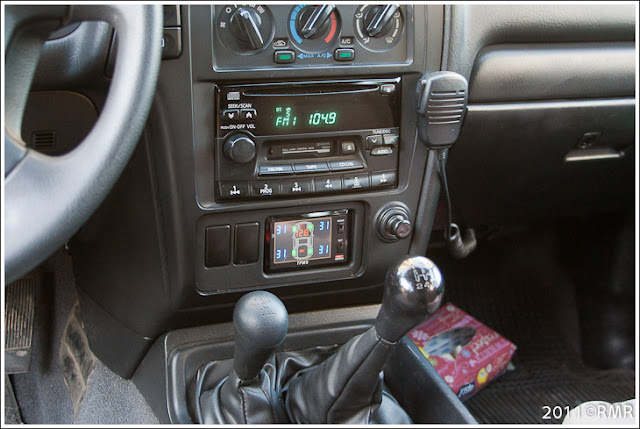
Install takes no more than an hour. Hope you like it!

-
Hi all.
I am from Poland, Europe. I have just bought my Pathfinder in October. Last weekend I went for my first little off-road. Here is a picture of my car.
 to the forum
And nice truck!!.
-
Wow, then yeah, please post that up. I've heard of folks extending the links to the sway bar, but haven't seen adding length to the bar itself. Can't wait to see it.
Sorry if I
 a bit ramdala, but please let us know where you were out 4-wheeling.
Yeah that's exactly what I was thinking, I have never seen an extended bar, just extended links....pics pics pics please :-)
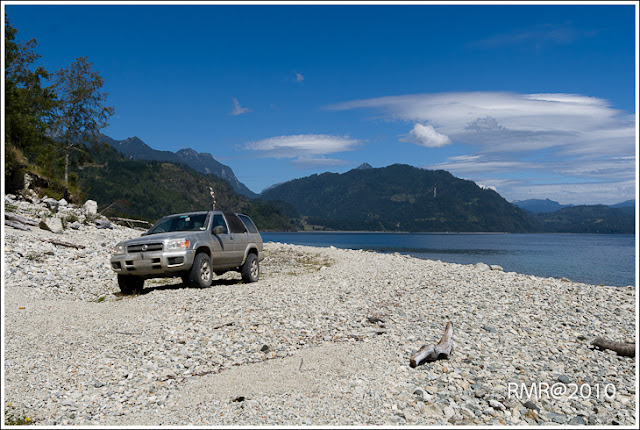
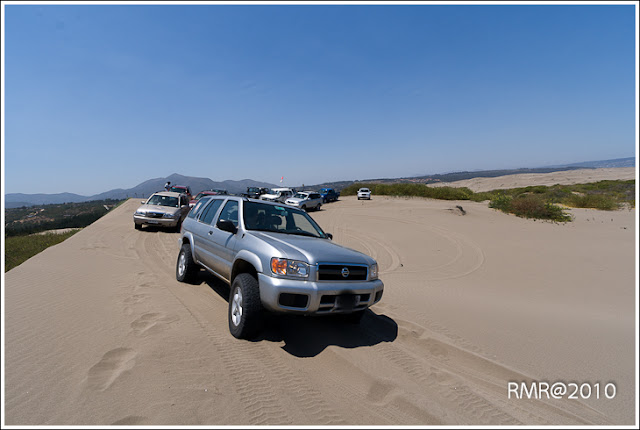
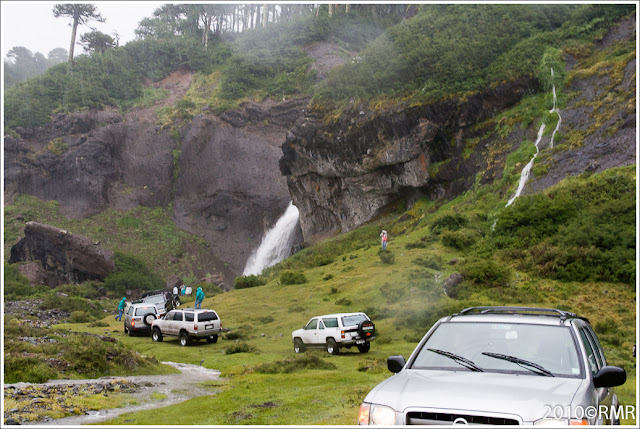
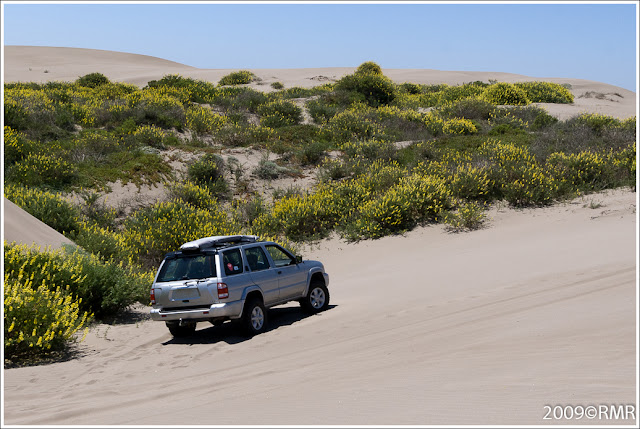
We have all kind of terrains relatively near. Mountains with ski centers at one hour travel and beaches with a sand dune camp at 2 hours to the oposite direcction...Rock crawling we can do relatively close to. Mud... winter and mainly the southern part of the country. For me 4x4 is to be with my family and friends, so i love to travel, go to dunes and explore....and bbq :-) I dont know if I have answered your question yet...

In a Lake on the south of the country
Day trip to the mountain and to a natural hot spring


Playing in a dune field
Southern part of the country
-
 1
1
-
-
Man, i just went through that install last week. Nice right up and pictures. I'm currently modifying the rear sway bar by cutting the shaft and welding on an extra 6" of steel rod to get it back to where it's supposed to be. I will be able to get more flex with this mod now. Will take pictures of it tomorrow.
Hi, thanks for your comments. I have broke the rear sway bar a year ago and I have removed it. No noticeable effects with the bar out. Please upload your pics !!
-
Hey sorry to be so blunt about it but. In that pic with all the trucks could you find out what rims that guy in the four door pick up in front of your rig has. They look SICK.
Hi, no problem with that but so far I could not know which brand/model is.
Dude, your install pic's gave me flashbacks!!!
Nice write-up, well done. It looks great.
Thanks!! now waiting for the new tires... im going on 32's
-
Man it looks sick. Love the suspense. I was scrolling down thinking "Where in the fsking world is a picture of the whole truck?" XD last pic has it.
Once again. nice rig.

Thanks for your comments! And for your patience ... other pics from the weekend :-)


-
Brake lines install
Front Brake line detail


And the new one on the rear:

Whell that’s all for now…have a nice beer, relax and enjoy your new lifted pathy : - )
And a last pic from the weekend...testing the lift

-
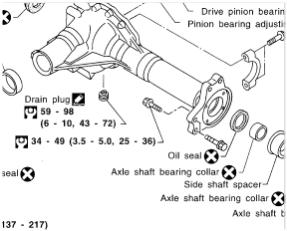
7.- Loosen subframe bolts and move it down +- 5” just to put lifting blocks. First bot the upperside then the lower one to the subframe.
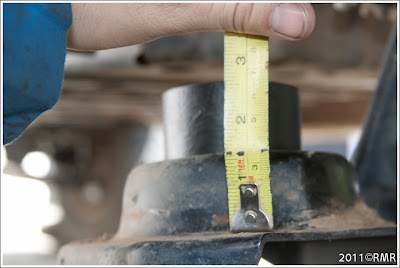
Some specs..
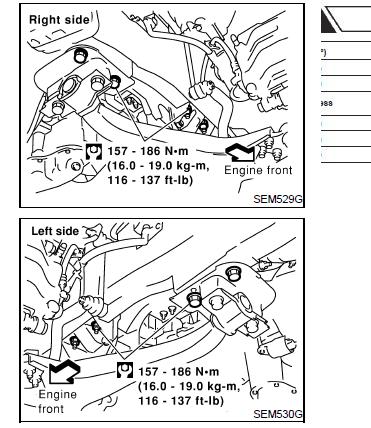
Engine mount spacers blocks:

Front subframe blocks:

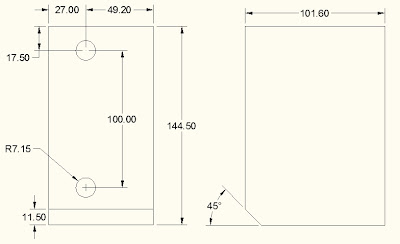
And rear subframe blocks
8.- Finally you lift the subframe, tighten bolts, mount CV’s, struts and whells. Final torque with wheels on the ground.
9.- Have a beer and admire your front lifted!!!!
OK, now to the rear:
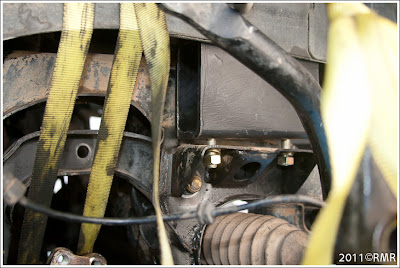
First of all, release the panhard support that is on the driver side and remove both shocks. Then lift the rear (blocking the front wheels) and remove original coils.
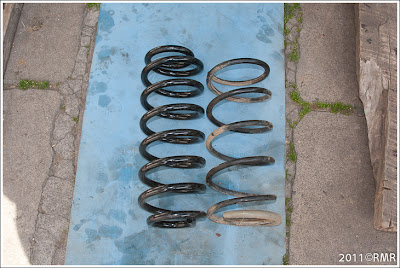
For replacement coils I have used WJ coil that as an internal diameter almost identical to the one that pathy uses. As you see in the pic, the Wj coil has two “pig tails” You shound cut ONE of them( the one that goes to the upper support) the other one will sit on the adaptor.
Coil comparisson:
To munt the adaptor you have to drill and to enlarge the original hole on the lower support:
This is the adaptor where the coil will be mounted:
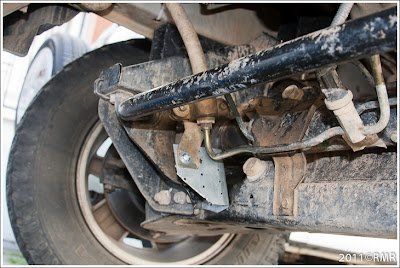
After you mount the coils, You can install a panhard drop. There is need to make a new hole.
I have a problem with the krfabs adaptor because the holes were not lined up and I ended cutting a piece of the panhard support of the truck.

And finally the panhard drop installed.
-
1
-
-
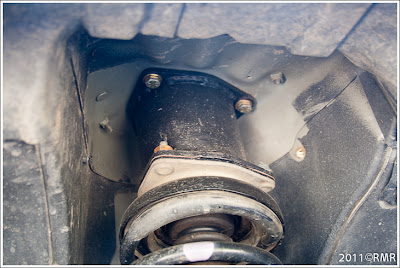
Then you mount every mcpherson, put spacers blocks on and the two towers will wait to be installed at the end of the process.….just a pic to show how this will be at the end.
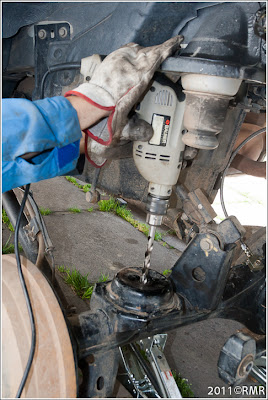
Now, from my point of view, come the most complicated and more time consuming part of the job: to install the blocks on the subframe.
My 9 steps recipe is:
1.- Take the CV’s out. With the CV’s out I changed the 4 bellows (?) In Chile you can do that for about usd60. I think that you can work much better with them out.

2.- Drop front differential. You can use some straps to hold it and not to put it on the floor…
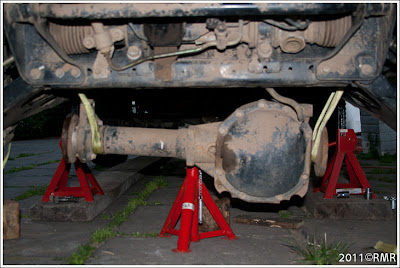
Well finally with that you can reach motor mounts.
3.- Loose motor mounts , just loose them.
Location and torque specs:
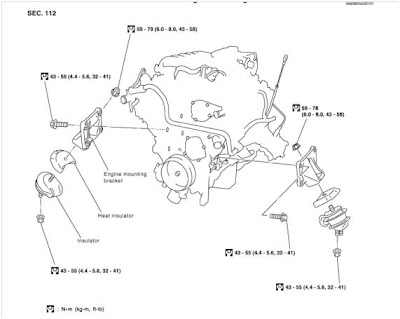
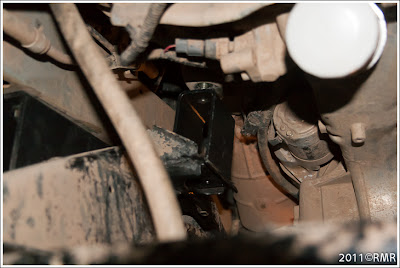
4.- Lock the engine to keep it posicion relative to the unibody fixed. I have used a pair of hidraulic jacks.
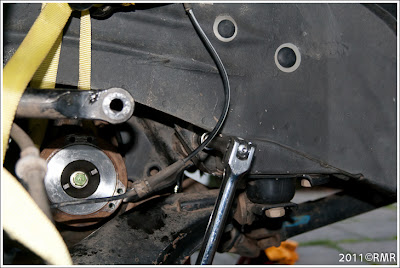
5.- Unplug the steerig wheel conection to the rack and the pressure senso. This is the joint and the replacement part:
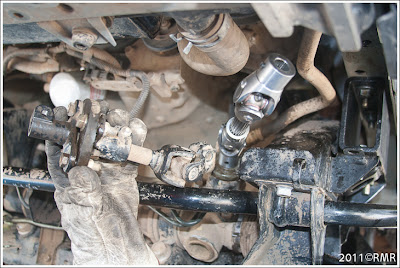
Be careful and do not let the steering wheel move because you can loose the alignement ant maybe Airbag/abs “coordination”.
6.-You have to loose the steering hose in two places:

That is the adaptor that I have made to keep the hose from moving around. That is the beta version, the final product is painted antirust black
The other one I have no pics but is on the passenger side.
-
Dear All Nissan people
I’am introducing this project with my R50 Pathfinder 2002 3.5 MT. Everything started with the idea to have a family rig to go out, camping and have fun.
What has been done so far:
-
- Front : 4” Lift with Subframe drop and cardanic joint to replace steering extension.
- Rear: 4” lift. I have used rear WJ coils with 4,5” lift, mounted with adaptors. This setup provide a little “rake” in the back (+- 1”), but I am waiting to the suspension to set down before to cut a little more of the coil to level the truck. Installed Procomp struts and a panhard drop.
- Brake Lines: New brake lines are required for safety in the front (2) and necessarily in the back (1). Since I was changing lines, I changed brake and clutch fluid too.
- Differentials Breathers: You need to change both breather hoses with larger ones. Diameter of front and rear are not the same… just if you want to be purist.
- Tires: I’m running my old tires right now 255/70/R16 (30x10), and I’am debating If to put 285/75/R16 ( 33 x 11,5) or 265/75/R16(32x10.5)… last weekend I go wheeling and I think I made my mind to go with 32”.
- Wheels: Original wheels mounted with 1,5” spacers
Front Lift
In first place you need 4 blocks to lift subframe, 2 blocks for the engine, and 2 mcpherson spacers.
Front subframe and motor
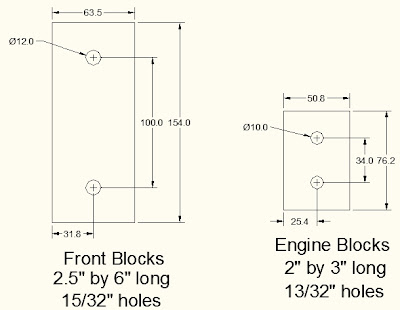
Rear subframe blocks:
And two spacers for the McPhersons

All the credit for the drawings and the idea can be found in this thread:
http://www.nissanpathfinders.net/forum/index.php?showtopic=23821&st=0
I bought my setup from krfabs.com (blocks, brake lines,panhard drop, spring adapters)
Let’s begin with the installation (Everything was done at home with manual tools) and get to work:
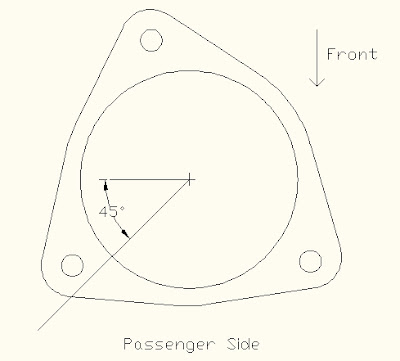
First of all hand brake, raise the front, put some jacks stands in the support points and reassure that all is well secured. Remove wheels and front suspension.
Jack points for Pathfinder:
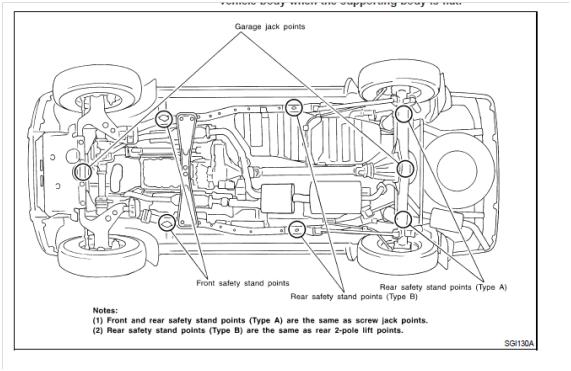
With jacks..
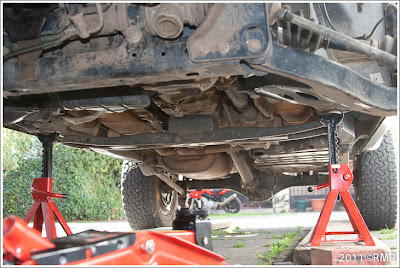
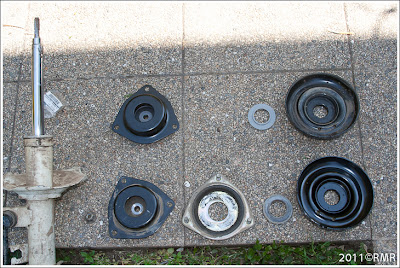
Removing fron struts, careful with brake lines and abs connector


Well, with front suspension out I have changed some parts:

-
2
-
-
nice, what lift is that ?
Hi, that is my old 2.5" lift. Now she is with a 4"SFD.
-
You win! Plus there is a wd21 in the lot too

jajaja
:D -
Looking Good, Any news on that bumper?
-
Hello All,
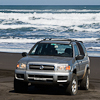
This pic was shot at the end of a raid in a dune field at the coast of Chile. I am the one in the middle... How many points for that :-)
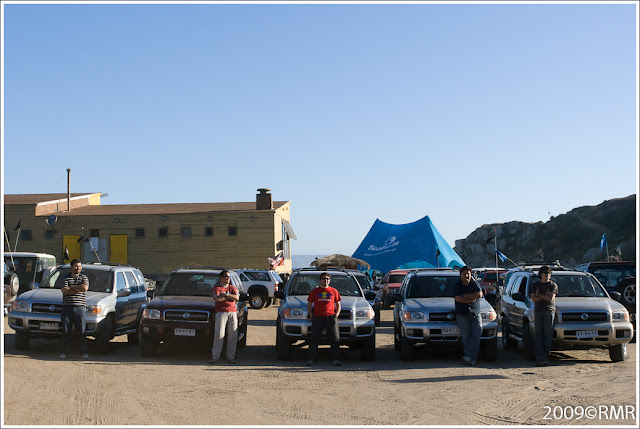
Another pic for the viewing pleasure...of me :-)
-
Well, not today but the last month I have been a little busy :-)
Installed 4" SFD (krfab kit + brake lines (f&r) + WJ springs + rear shocks + panhard drop)
Replaced both side TREs
Replaced both strut mounts & bearings
Replaced struts boots
Lubbed CV,s and changed al 4 cv boots.
Replaced Brake Fluid
Replaced Clutch Fluid
Installed K&N FIPK
Hardwired GPS
Hardwired VHF Handy
Hardwired and installed a TPMS.. It's pending to install tire valves while I decide if I change tires or not.
Changed HVAC and glove compartment bulbs
....and that's all folks !!
-
Definitely these two trucks have become my inspiration!!
I have already ordered the 4" SFD kit....just waiting they arrive to Chile.
-
 :thumbsdown: :thumbsdown:

Looks incredible!!!..
Suspension upgrade
in Solid Axle Swaps, Hardcore Custom Fab
Posted
I have bought the same finish... just treated it with black antirust paint.