
Terrano757
-
Posts
116 -
Joined
-
Last visited
Content Type
Profiles
Forums
Calendar
Everything posted by Terrano757
-
Welcome, Love seeing new diesels joining the site, mines also a diesel so i "might" be able to help in some areas, but theres a growing amount of diesels on the site, you should find everything your looking for. good luck, -Daniel
-
Cant be bothered keeping 2 threads up to date, All mods moved to: http://www.nissanpathfinders.net/forum/index.php?showtopic=30314&st=0&p=574341&fromsearch=1entry574341 i might occasionally stop back here to list the changes, but for pics you'll have to check out the other thread -Daniel
-
The wind blocks look good imho, also are really nice for cruizing with the windows down On a serious note, great looking terrano, very jealous of your km's.. take care of it and it will serve you well -Daniel
-
maxtrax..... just... maxtrax...
-
most probably after the snorkel which is getting towards the top of the list
-
looks good but those tyres already look like 31"s? or are theyy 30"s? cant really tell haha welcome
-
ideas for projects?
-
sorry for the sarcasm, was just a little fed up with all the unconstructive comments that day How did you get a picture of my other car....?
-
might you own a bicycle?
-
Mines manual and those are automatic. i dont like how the storage box in the console obscures the handbrake lever and the lid on those is so s**t i mean side hinges, really??
-
Why did my odometer start working again?
Terrano757 replied to zack1978's topic in 90-95 WD21 Pathfinders
umm.. are you jesus? or a stalker that broke his headlight switch? -
be safe, not lazy. theres no price on your life!
-
The internal space is only as big as the inside of the wheel arches, so not much bigger is possible although i quite like the size, and haven't come across anything i haven't been able fit in (yet) Also drawers would not have been accessible from the rear window which i wanted.
-
haha thats not me, thats dad i was the one holding the camera (and wearing shoes!!) as i am the one who does the work hahah my feet are.... younger.
-
Buttons did nothing. storage obviously. why dont you "dig" wood. and how would you prefer it be dressed? Yeah i was contemplating the red, however i hate the purply red of the interior and im going to see if i can eventually change it all over Cup holders are to come, what i plan to do is attach Velcro to the bottom of cup holders and stick them to the top of the console when needed (Velcro sticks incredibly to marine carpet - amazingly.) and i don't have to have them in the way hen im not using them.
-
Depends on how big really, most of the space is still available, its just the depth that changes (for me personally because i used to have the sub/speakers where they were only lower) and personally if anythings to big to fit in there i just put it in my rhino basket on the roof
-
.:: Center Console ::. Any WD21 or R3M owner will know just how stupid the stock Center console is... admittedly some models did come with a lid, but the design was still rubbish. anyway, a few weeks ago i got fed up with mine and ripped it out: When i did this i realized that it was using a quite simple mounting system, 1 screw was screwing in from either side of the unit, and 2 screws were holding it down (just under where your handbrake goes down - under the plastic trap door you will have to pop out with a screwdriver) Once removed the console simply slides off (leaving you with a treasure chest of lost change in my case) You are then left with a very blank canvas for starting your console. I will list in steps how i made mine, and i apologize for the limited photos of the process.. 1:. I layed the old console onto a large piece of thin (5mm) MDF craftwood and traced the shape of the bottom of the console (this is important!) 2:. I then cut two matching peices far larger than i needed but using the traced bottom line from the console. 3:. i took these peices out to the car and marked the side mounting screw holes (lay your chairs forward to do this) 4:. I then drilled out 2 holes where the mounting screws would then go. 5:. I then marked out the height i wanted the console to be and chopped the two peices accordingly. 6:. then i measured the width across the back of the console (between the 2 pieces of wood we have cut and screwed on) 7:. then i cut a piece for the back using the measurements i just took. 8:. Once the back had been screwed on i measured how far forward i could come before i came to the handbrake assembly. 9:. i marked out where the handbrake started and finished on the wood and i cut a peice to slot in the middle (remembering to cut out a slit for the handbrake) 10:. with that piece screwed on i screwed a long piece on the front bottom of the console (where the handbrake lever goes down to) 11:. now carefully measure where the anchor screws are underneith and cut 2 holes accordingly. 12:. Now you have a blank canvas that is securely mounted to your car and you can now customize as you wish. ____________________________________________________________________________ 13:. i then measured how low i could put the floor in my console without it being in the way of the hand brake assembly. 14:. do the same for when the handbrake is upright and cut the 2 pieces out. 15:. screw the pieces in place. 16:. now using the left over 5mm MDF cut 3 strips to border your front piece (where the hand brake goes down) 17:. Screw these 3 pieces into place, this adds a nice effect and storage too (phones ect) 18:. now cover in paint or carpet, which ever takes your liking and design up a lid. 19:. i just attached my lid using some medium priced hinges from a hardware store. 20:. once thats all done you can add switches or 12v sockets as you please! .::Pictures of the Process::. Basic Wooden Frame: Top View of my Internals (notice the anchor points) My Handy Carpeting Skills... Comparison Between The Old vs The New Console Here it is in the car with the lid on Shot of all the new storage inside Made to fit my iPhone+wallet+camera I thought the hinges would look better on the outside ;D
-
.:: Rear Storage Solution ::. OK so back in November i was going to go and get some professional storage built up for the back of my car, but with a $1100 quote from a leading 4x4 shop i decided i would give it a go myself. My needs were as follows; - Must be made out of 100% MDF (my metal work skills are not as up to scratch as my carpentry!) - Must Have Top Access (either as well as or instead of drawers - This is to access it from the back window) - Must be built AROUND my 12" sub woofer Box in the back. So pretty simple yeah? So i put 2 long beams of wood (800x180 if i remember correct) on the inside of the wheel arches (where they intrude into the boot area) and this provided for the "Frame", i then measured the large piece for the top (1200x800 - again a guess!) I fixed the top to the main support beams with L brackets, (4 on each side - 16 in total) i then measured where the cut out for the sub woofer needed to be, which i decided the center was the best position. i then cut this piece out. I added a horizontal support with L brackets to the 2 main support beams, to hold the main board up (seeing as i had just cut a large hole in it) The main frame now looked like a H with the main board sitting on top; although the horizontal did not go all the way to the ground. To be safe i added another identical horizontal beam to the front of the box. This no meant the top was strong enough to cut the trap door out without the wood snapping. obviously the next step was to cut the trap door out. while i was marking the trap door out i made sure it overlapped where the support beam was hidden underneath, this way when it was shut, it could rest upon the support beam. (i then removed the support beam to cut the trap door out) Once that was done i realized that, although it was the perfect fit for the car, i could not get it into the car (the boot opening is smaller than the internal width) so what i did was cut a piece off from the left support beam, all the way to the edge. i then attached a piece underneath the main board on the left hand side (where i had removed the edge from) for the edge piece to screw back onto once it was in the car. This photo shows you the unit in its current stage (as per the description) Notice that the piece on the left i was talking about has been removed in this picture. With Lables; Without Lables; After all that i installed it in the car, then measured up a front piece and screwed that on. I then bought some marine carpet (more expensive than everything else put together!!) i then covered the whole unit in carpet and screwed the trap door in place! Heres the finished product: Notice how it fits around the sub: Photos with the trap door open: NOTE: The front support beam (horizontal) that is not visible under the top board also doubles up as a resting place for when the trap door is down, the tight material fit on the trap door stops it from banging around whilst 4x4ing. If you experience a banging or tapping noise, try placing a thin layer of material over the bottom of your trapdoor, this will provide cushioning for when it bounces up and down. On a different point, the good part about it being wood is that if you wish to add things like inverters or 12V sockets to the box its a simple case of cutting and screwing. I hope everything is explained well enough for you here! if you want any further information or photos/videos of application please post below and i will get back to you ASAP! Also i would appreciate any thoughts on the project!
-
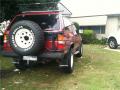
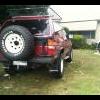
The muffler you see in the pics is the only muffler in the system now (the old one was ripped out), its pretty unusual to have more than 1 muffler though
-
yeah the standard exhaust is i think 1.5", the new 2.5" system provides for unrestricted airflow. also the original system has some weird bends that restrict airflow too, the new system is direct and larger tube get it done! its worth it!
-
Basically the turbo back just means the entire exhaust system was replaced from the "turbo, back" so everything from the outlet of the turbo was replaced. Sorry i cant tell you too much bout the install because i had the boys at the shop fit it
-
Heres a few pics i just took of the 2.5" Turbo back exhaust i had done a month or so ago, its not in as pristine condition as it was when new ofcourse haha.. The whole system made a huge difference in the performance, around 20% id say, definitely worth getting for anyone out there who is looking for some more power (Diesels like mine especially!)
-
ride looks good! really like those black on black wheels