87pathy Posted January 17, 2005 Share Posted January 17, 2005 I've been out of the boards for several months, due to the fact that i've been stuck in BFE, china for the last several months. During christmas however, i was home getting some much needed work done on my SAS and Rear axle swap. Its still not done but but getting closer and closer. If you want to see details fo what ha been done, have a look at - http://autos.groups.yahoo.com/group/HOMEGROWN4X4/ Link to comment Share on other sites More sharing options...
Airrun2002 Posted January 17, 2005 Share Posted January 17, 2005 Dude thats hot. Nice work hope to see finished pics when it is complete. Hope to see what that beast can do. Link to comment Share on other sites More sharing options...
hardwaretoad Posted January 17, 2005 Share Posted January 17, 2005 Dang, that's a tall '87 ! How ya planning on gettin' in there ? Nice to see a full pic, all I've ever seen is just the front in one of your avatars somewhere. Looks "formidable"... Didn't recognize you w/o the welding helmet... Link to comment Share on other sites More sharing options...
87pathy Posted January 19, 2005 Author Share Posted January 19, 2005 (edited) I can get in it ok.. but its tall, i have 25 inches of frame clearace, and the lowest point other than that are my radius arm mounts, other than that, i'll have a skid plate that will be at 24 iches from the ground. its all comming together! besides, when was the last time you saw a Pathfinder on 36 x 12.50's you should have seen my 8 year old daughter try to get in it..... Edited January 19, 2005 by 87pathy Link to comment Share on other sites More sharing options...
nige Posted January 19, 2005 Share Posted January 19, 2005 Impressive, most impressive Link to comment Share on other sites More sharing options...
hardwaretoad Posted January 19, 2005 Share Posted January 19, 2005 Curious... what kind of gear changes have you made to accomodate the tire height? Link to comment Share on other sites More sharing options...
87pathy Posted January 20, 2005 Author Share Posted January 20, 2005 Gears haven't been changed, YET. But i will be running 5.13:1 and with hopes in the future to install a calmini xfer case gear reduction.. i believe its a 96% decrease. Link to comment Share on other sites More sharing options...
MatterHorn Posted January 21, 2005 Share Posted January 21, 2005 I especially like your wooden parking brake ... hehe Link to comment Share on other sites More sharing options...
87pathy Posted January 21, 2005 Author Share Posted January 21, 2005 thats not the partking brake... i have an anchor in the passengers seet. Hell there aint no brakes at all, even the cylinders re out of the drums.. i aint got no drive lines yet so what the hell do i need brakes for? Link to comment Share on other sites More sharing options...
Guest REV TERRANO Posted January 30, 2005 Share Posted January 30, 2005 That is is very nice hope to get there someday much props. Link to comment Share on other sites More sharing options...
96pfinderSE Posted January 30, 2005 Share Posted January 30, 2005 SICK DUDE! i wish ihad the skills to do that kinda work. Link to comment Share on other sites More sharing options...
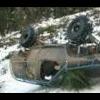
87pathy Posted January 30, 2005 Author Share Posted January 30, 2005 Ok, Rev asked for specs so here they are. Front: spring buckets, located on frame stand offs (this eliminated the necessity to shorten the axles) spring buckets were from a 76 ford F150. Radius arm mounts, Custom. I used 5 deg bushing for the radius arms. Then i had to locate the radius arm mounts at the proper angel to keep my castor angle correct. Springs are 5.5" wildhorse rock crawler series. These are normally for Early bronco. HPD44 axle Rear, Unless you have are very good in math, know somebody who is a geometry wize, who can fabricate anything necessary, and you have the formula to calculate it all.... Don't even try to do a triangulated 4 link. its not easy! (My job is custom fabrication of Heavy and specialty equipment) rear spring are 3.5" wild horse rock crawler series. They are located on 4 in stand offs from the axle. Ford 9" axle I have a 3 inch body lift installed. before i started I was running 30" tires, and had 13.5 inches of frame clearance. I know have nearly 24.5" I also have a custom Hand throttle, so i don't have to do the 2 foot 3 peddle shuffle. Stereo,, you only wish you had it! Over 600 watts, Resonant engineering 8" subs built into custom body pannels. I have added a couple of pics below so you all can see some more detail. I remind you ITS NOT DONE!!! Link to comment Share on other sites More sharing options...
87pathy Posted January 30, 2005 Author Share Posted January 30, 2005 here is one more so you can see the links.. they are 1.5 x .25 wall DOM, I made the inserts, and everything. Link to comment Share on other sites More sharing options...
Guest REV TERRANO Posted January 30, 2005 Share Posted January 30, 2005 Hey thanks for the additional pics very inspiring, gives me something to aim for on this project keep up the good work and keep us posted. Link to comment Share on other sites More sharing options...
MatterHorn Posted January 30, 2005 Share Posted January 30, 2005 lookin good man ... i'm kinda curious to see how those upper and lower links handle the torque ... maybe some gusseting might be in order? ... I guess it's kinda trial and error anyway ... Link to comment Share on other sites More sharing options...
87pathy Posted January 30, 2005 Author Share Posted January 30, 2005 definately gussetting, Like i've stated in all of the notes.. I"M NOT FINISHED. i connected everyting first to make sure its working the way i want. it is so now to finsih up. Teh tubes will handle the torque just fine. I used the same material everybody else does in their rock buggies.. spyder trax, poison spider.. etc. I even have access to real engineers who have looked at my work and they say no problem. the link connection on the frame are diffinately not strong enough until i finish up all hte reinforcements. Link to comment Share on other sites More sharing options...
87mudfinder Posted February 5, 2005 Share Posted February 5, 2005 (edited) Thats some insane looking work dude...... Is it gonna be streetable in the end? a local guy that has done alot of work picts as well Hmmmm so much to do all i need to do now is move outta this apartment and into a place with a garage.. I think i am going to follow yoshis front end style... on my pathy first before dealing with the engine swap Edited February 5, 2005 by 87mudfinder Link to comment Share on other sites More sharing options...
87pathy Posted February 10, 2005 Author Share Posted February 10, 2005 I think i am going to follow yoshis front end style... Yoshi got lucky and found a bronco set up. Those are really hard to find these days. He did one thing i don't understand. he went through all the trouble to make extended radius arms that use all the stock parts. The Radius arm design is inherant to binding. this is ALL ford radius arm designs. He went through all the trouble to build new radius arms and didn't put a wrist in them or at least change the frame mounting point to a heim joint. that just doesn't make sence. He would inclease his movment by either points above. The only reason i used the radius arms is cost and time. I do have plans in the future to change this to my own 3 link design. i even fabed my frame points to easily adapt them in the future. If you go with his design, wrist your radius arms or install Heim joints instead of the factory bushings. (My radius arm will be wristed in the near future. like before i'm done) Oh ya and as far as streetable.. there is a fine line of what is and is not legal... Besides the police don't work for the department of motor vehicles. as long as i get fender flares up front and mud flapps in the back they won't bother me too much. Besides, i'm building this for OFF ROAD use. Its gonna drive like crap on the road. Keeping it streetable is of low importance. Link to comment Share on other sites More sharing options...
Recommended Posts
Create an account or sign in to comment
You need to be a member in order to leave a comment
Create an account
Sign up for a new account in our community. It's easy!
Register a new accountSign in
Already have an account? Sign in here.
Sign In Now