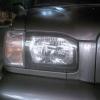
shoesandsocks Posted December 25, 2012 Share Posted December 25, 2012 (edited) So work let me out early today for Christmas and a rarity happened where i had an empty house so i decided it was time to get back on the pathy project. Now my headlights were hazed and gross and i was going to replace them with the black anzo lights buttttt. then i saw that they were 130 shipped with a smaller reflection area than the oems and said f it ill make them so i did not finished yet and i got to do the corners tommorrow but i like them so far. before the pics just wanna say bravo nissan i have owned three now and not once have u made it easy to a headlight out but anyway how they started. after opening them up painting the trim re assembled sanded and cleared back on the truck need to the corners now and do a final polish and sanding all in all i think its looking good so far for things i had lying around the house. Edited December 25, 2012 by shoesandsocks Link to comment Share on other sites More sharing options...
silverton Posted December 25, 2012 Share Posted December 25, 2012 looks good! now you just need to wet sand, polish, and wax the plastic lens. Link to comment Share on other sites More sharing options...
ahardb0dy Posted December 25, 2012 Share Posted December 25, 2012 Looks good !!! I did the headlights on my step daughters Kia, I think I used 600,1000,1200,1500 & 2000 grit, than Mothers plastic polish, they came out better than new. Here's a before and after shot, these were a LOT worse than yours: before: after: Link to comment Share on other sites More sharing options...
01silvapathy Posted December 25, 2012 Share Posted December 25, 2012 I have been wanting to do this to mine for awhile but I also got turned away by the price of the lights online. How exactly did you open up the lights? Bake them in the oven im assuming but at what temp and for how long....then how did you re seal them again? Link to comment Share on other sites More sharing options...
ahardb0dy Posted December 25, 2012 Share Posted December 25, 2012 Why do they have to be opened? To paint the trim piece? You could put them in an oven or maybe soften the glue with a heat gun, When we had our Infiniti Q45 I removed the glass (don't recall how) but I used window urethane to re-glue the halves together, also used the same urethane to re-glue the lens back into my sentra headlight. One tip with the urethane, any small amount even the size of a speck on your hands will spread to everything you touch !! A small amount like that goes far to getting on everything. Link to comment Share on other sites More sharing options...
shoesandsocks Posted December 25, 2012 Author Share Posted December 25, 2012 (edited) thanks for all the kind words guys. i'm glad so far the community approves usually i get a lot of it a waste of time but i really like how they tone it don while making it more noticeable. umm put to answer your question a hardbody they do have to be opened up to paint the trim since its actually held on to the lenses itself by clipping in on one side and a screw on the other. and the process i used involved an over and a heat gun obviously remove the light from the truck which is a write up in itself if u want to put that process i will and can take pictures. next preheat your oven between 350 to 400 get a baking sheet preferably an old one and a medium sized towel u don't care about and get damp not soaking wet set it on the baking sheet and the set headlight lens down into the oven leave them in for about five to eight min depending how hot your oven is then take them out if i need to tell you to cover your hands you should probably just buy them then get a really thin Flathead or a putty knife to gently pry the lens away from the housing the are four tabs that kind of lock it in place that i saw but the plastic will be soft enough to pull it apart. after u pry it around a lil bit with your glove covered hands u should be able to just pull it apart with your hands using the heat gun/hair dryer to keep the glue soft. after there apart get a lil drink congratulate yourself hard parts over then u want to unscrew the trim from the lens small screwdriver lots of pressure don't strip it. this an awesome time to sand down the lens as it isnt big and bulky and easy to clear up. and make perfect paint the trim piece whatever color screw it back in now take the heat gun and go over the lens and the housing to shrink down all the strands that dried up from u taking it apart now take some rtv i use black cause im cheap but i was told grey or blue works better but i don't care and apply i decent bead tn the seal of the housing insert the lens and press it down and go around and around until its even and secure give it 20min to dry resemble in the vehicle and your good go forth and be awesome Edited December 25, 2012 by shoesandsocks Link to comment Share on other sites More sharing options...
ahardb0dy Posted December 25, 2012 Share Posted December 25, 2012 I wouldn't use RTV, I think urethane would be better, but if RTV worked for you than I guess it's ok. I figure if they use urethane to glue windows in it would (and does I've used it) work good to attach the lens back to the headlight housing. Link to comment Share on other sites More sharing options...
shoesandsocks Posted December 25, 2012 Author Share Posted December 25, 2012 the manufacturer used grey rtv to seal as most Japanese companies do there is no nothing wrong with using urethane its actually a thicker product and could probably be better but i have done this on nearly every car i have owned and not once had a leaking headlight happen to me with using simple rtv from auto zone. there really is no wrong way as long as your patient though. Link to comment Share on other sites More sharing options...
ahardb0dy Posted December 25, 2012 Share Posted December 25, 2012 If it works it's fine I guess, how do you know the manufacturer uses RTV? Link to comment Share on other sites More sharing options...
shoesandsocks Posted December 25, 2012 Author Share Posted December 25, 2012 (edited) how do i know the pathfinders do i dont it looks like the same thing toyota uses i know that lexus and toyota do cause i have actually been to the assembly plant and it looks just like it. so i shouldn't say most manufactures i just know of one lol Edited December 25, 2012 by shoesandsocks Link to comment Share on other sites More sharing options...
shoesandsocks Posted December 26, 2012 Author Share Posted December 26, 2012 (edited) so did the corner lights learned a couple things one the plastic is super weak compared to the headlights so this is a heat gun only job and then the rtv of sealant they use is very noticeablei would use grey rtv only to make it look nice so im gonna re do it but here's the general idea Edited December 26, 2012 by shoesandsocks Link to comment Share on other sites More sharing options...
silverton Posted December 26, 2012 Share Posted December 26, 2012 Holy oxidized hood! Link to comment Share on other sites More sharing options...
Recommended Posts
Create an account or sign in to comment
You need to be a member in order to leave a comment
Create an account
Sign up for a new account in our community. It's easy!
Register a new accountSign in
Already have an account? Sign in here.
Sign In Now