

Terrano1992
-
Posts
178 -
Joined
-
Last visited
Content Type
Profiles
Forums
Calendar
Posts posted by Terrano1992
-
-
I did not mess with the Distributor - If it is installed wrong, it was done previously.
I am supposing that what you are saying is to lift it out, rotate it one gear tooth or so and push it back in.
Yes, exactly. One tooth. This is not a complex task.
BUT - 18° BTDC is only one degree out of the 15° ± 2° - so why worry about it ?18-20° BTDC is good angle for LPG or high-octane fuel. However, it can lead to a knocking with standard (87..91) octane.
I have an old SEARS Dwell Tachometer that was connected to the Coil whenDistributors had points - but gave RPM.
Is there a way to get it to work now, or is it an old relic to be tossed ?
Me don't think so... Your tach was designed for very old type of ignition systems.
To check modern engines, you need a tachometer with "contactless" sensor (inductive or capacitive), like modern timing lamps has (this type of sensor clamps over a high-voltage wire).
My Tach in the Dash is schizophrenic and completely useless for setting the Idle.You can try to remove dashboard from bezel and tighten small nuts (or screws? - can't remember) connecting tachometer to a printed circuit board, to restore electric contact. Sometimes it helps.
-
Timed the engine to 18° BTDC according to the marks - turned Distributor almost full throw
CCW.
Seems like you have incorrectrly installed distributor (rotor is turned "early"). If so, you need to reinstall distributor to get 15° BTDC "near a middle".
The Idle speed has dropped to quite low - will probably have to up that.FSM pages EF&EC-24..28 - full procedure of "Idle speed / Ignition timing / Idle mixture ratio inspection".
I'm still quite nervous in the service...waiting for the "Big Bang" !Shifts nicely - still that high pitched whine from something. (?)
I suspect AC tensioner Pulley as a source of whine under the hood. Alternator bearings can produce high pitched whine also. Remove AC belt to determine.
-
I also noticed that the FSM has nothing in it about timing the Pathfinder - anywhere!
If I am wrong - please inform us where it is at in the FSM.
This is described in EF&EC section of FSM (standard timing and mixture check procedure, can't remember exact name in table of contents).
nothing said about a vacuum advance in Chilton.VG30E has an electronic advance control, not a vacuum.
I have some Spray Motorcycle Chain LubricantIt will be better than any other oil to use on ACTP. Chain Lubricant is very thin (has a good penetration) immediately after spraying, then forms a layer of a thick grease (similar to commonly used NLGI-2). So, it can penetrate inside the sealed race bearings. The same idea as for "Spray'n'Seal".
-
Air Conditioner Tensioner Pulley sounds loud.
Ball or Roller Bearings ?
Ball bearing. It's a common failure at old (1987-95) Pathfinders. Natural wear of bearing...
If I loosen the one Bolt on the right side of the Distributor (the only bolt to loosen ?),which direction should I turn the Distributor to go back to 15° BTDC ?
Will I get zapped easily turning the Distributor - Spark ? Unpleasant experience !
Me think, CCW rotation is to retard and CW to advance timing.
If you are afraid to get zapped, you can stop engine, rotate distributor, fix bolt and start again to check timing.
30 deg. BTDC is too early. Are you sure that you don't made "one tooth error" when you put TB on sprockets last time? I.e. all 3 paint marks (outer side of TB) was clearly aligned to punch marks at sprockets?
If you are absolutely sure about "all things are fine here", I suppose your engine had incorrect timing before TB replacement (legacy from previous owner).
-
I did not realize that the '95 Nissan Pathfinder Automatic Transmission would be any
differerent that any normal A.T.
Doc, what do you mean "normal"? When you check ATF level, you must do it exactly as FSM prescribed for this tranny model, or you'll take incorrect readings. It's not a personal Nissan, Toyota, Ford, GM or any other car manufacturer imperfection - this is a consequence of automatic tranny construction.
-
Did the brake plus shifting thru the gears thing, checking the Fluid level, adding,
shifting, checking - ad nausium.
Long story short - I've added back most of what I drained out !
This is a "feature" of all auto trannies from JATCO. If you check fluid level while engine is stopped, you'll have incorrect readings (ATF level will be shown too high). So, check it exactly as described in Factory Service Manual (engine at idle, selector at "P" position). "Hot" level means 80-100 deg.C (normal working ATF temperature), "cold" - 10-30 deg.C.
Anyway, excellent work and excellent thread. Thank you.
-
Success !
Ran the engine at idle for about 15 minutes after dark (cooler) and watched the
Talcum Powder (nice and white) with a flashlight.
Narry a dark spot formed. Not one.
Holy Permatex, finally you did it!

 Congratulations, DoctorBill !!!
  So - tomorrow I will drive the bugger around town for a half hour.
Small ToDo list before you test-drive your rig:
1. Burp cooling system, add coolant to "Max" level.
2. Check auto tranny fluid level as described in FSM (pages MA-20, MA-21), add (or drain) some quantity of Dexron-III if necessary. Do not drive with very low (or high) ATF level, if you don't want to damage tranny.
3. After test-drive, check all fluids level: engine oil, power steering fluid (the same Dexron-III), transfer case, front and rear differentials.
-
Several days ago they were tight !
Just now, I started (left to right) to tighten them and they seemed quite loose !
You had to loose all these bolts before applying "Spray'n'Seal" (to allow sealant wick into the gasket). Do you remember to retighten them next day, after sealant curing?
WTF ? Will they be loose again in a couple of days ? ! How did they get loose in the first place ?No, they did not get loose if the gasket is well compressed now.
All of those Bolts go into the STEEL Engine Block - yes ?I am worried that I might be tightening them too much if into Aluminum.
VG30i/E has cast iron engine block, not aluminium. You'll probably break the overtightened bolt before you strip the threads.
If you are in some doubt, you can twist off completely 2 small (#2 and #3) M6 bolts to inspect them. Do it one by one, not both together. If they are stretched from previous overtightening (M6 bolts are relatively soft, even if they are 7-th or 8-th Grade), replace them with a new (7-th Grade minimum, see mark on the head).
-
I would guess that neither Oil Seal lip was riding on that groove....
I agree. This is machined groove, not a wear trace of lip. So, this is irrelevant to oil leak.
Try to install new oil seal carefully (without any damages of a lip edge). Use "margarine container tool" to safely slip a seal edge on a crankshaft neck, and suitable drift (a piece of plastic or metal tube with 45-48 mm outer diameter) to gently press seal into the hole.
Also, you can use petroleum jelly ("vaseline") instead of motor oil to lubricate shaft, "margarine tool" and seal. I think it will be more convenient.
-
I made two impressions - one with Candle Wax and one with Tacky Putty used on bulletin boards.
Neither worked exactly as I wanted, but they show how deep the groove is and approximately where.
Seems very strange. Too deep and wide to be a wear track. Moreover, it is placed too far from outside end of crankstaft neck. Standard seal has 8 mm total height - so, distance from front plane of seal to the lip edge will be 6-7 mm...
You need more accurate measurements to be sure were the lip places (on a groove, or not). I can't say this is a wear track or a machined groove right now.
Anyway, you can try to purchase a "thin" (7 mm height) seal (Payen NJ368 or any other 47x33x7 mm) and check how it fits.
-
I had the same problem with mine. I just took a sledge, a 19 mm or 3/4 Deep impact socket and pounded it on the lock nut (impact socket won't split from pounding) then a 1/2" cheater bar and Pesto!
My $0.02. Place ordinary 19 mm nut over the "secret" lug nut top and MIG-weld both nuts through the nut hole. Then use standard lug nut wrench...
-
Been doing some "Googling" trying to find "Repair Oil Seals" - all I get is "Repair: Oil Seals"...merde.
I did find a link to BARS products which claims to "Seal Oil Leaks" on rear main seals...
Ever tried that stuff ?
These chemicals are intended for old, "petrified" oil seals renewal (softening of rubber is a main principle). In your case (when you have a leak through a new, already soft seal) they can't effectively help. Also, they do nothing with leaky cardboard gaskets.
-
How and why do those grooves form ?[/b][/color] That seems odd given that the Oil Seal is rubber.
Dirty oil contains abrasive particles...
Also, do you remember that you can polish old copper (i.e. mechanically remove oxide layer from surface) with a clean soft cloth or felt?
The grooves would be well inside that oil seal slot - rather difficult to see no doubt.Take a piece of thin steel wire, bend one end to "L" form and use it as a feeler.
So - I wonder if those modified types of Oil Seals you mentioned are sold in America ?I think yes, but i don' know specific names and numbers for US market... AJUSA and Victor Reinz are European manufacturers. It's possible that Payen (Federal Mogul) NJ280 (47x33x8 mm) or NJ368 (47x33x7 mm) are "repair-type" seals, but i can't verify it.
-
Does the Crankshaft spin that "Inner Gear" making the off center "Outer Gear" rotate and,
by centrifugal action, push the oil out like a centrifugal pump does ?
No. It's a gear-tupe pump, not a centrifugal. Look here and see how "Gerotor Pump" works.
Anyway - I will install the New B/A Oil Seal tomorrowBefore you install new seal: check crankshaft neck for any traces of a wear (small groove under the lip of old seal). If groove exists, new original oil seal will leak too.
Example photo: grooved camshaft (look to end of a neck, near a conical part of camshaft)
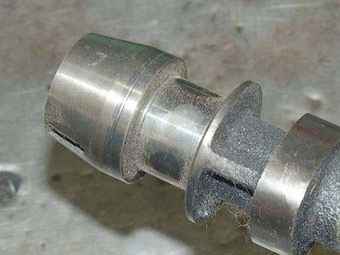
To effectively fight with it, aftermarket spare part manufacturers produced special "repair" seals. The only difference of these seals is lip placed with "offset" (displacement) relatively to original (so this lip sits at different place of a neck, non-grooved). All other dimensions are the same as original.
I can't find the better picture to illustrate these words, but the main point is clearly illustrated here (text comments at a picture are on Russian, don't worry about it):
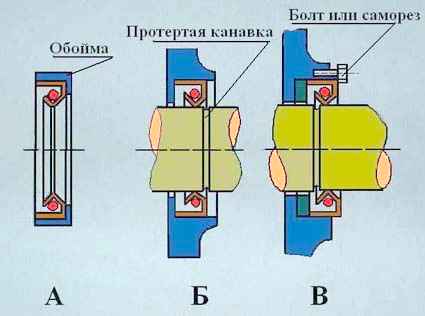
This picture shows standard oil seal installation with displacement. "Repair" seals displacement provided by their construction.
Good example of "repair seals" are AJUSA 15011700 (Front Main Seal) and AJUSA 15037500 (Rear Main Seal). I had to install both (there are visible grooves on my crankshaft necks, approximately 0.05-0.1 mm in depth) - and these seals are absolutely dry now, no leak at all...
-
WD21 rear defroster has 140 Watts power. So, it must have approximately 10 Ohm resistance.
-
Yes, I was thinking of dribbling a volatile solvent (acetone or MEK ?) on the leaking area and maybe
the solvent would carry any oil or water back into the sump (I'll change the oil right after).
I'd allow it to dry for 24 hours and then apply and allow this "Stuff" to penetrate - wait another
couple hours and tighten the bolts.
Seems as a good method. Do it.
Otherwise - If I had to use the Red RTV, thought maybe of trying to squeeze it in, then runninga very thin metal strip into the gasket to push the stuff in.
No!!! Do not touch gasket! Or you will had to replace it with a new one...
-
The Permatex Spray-n-Seal interested me - it is "New" - never saw it before.
Never saw it before too. But this thing looks very promising.
If the Spray n Seal is a fluid, it might "wick" into the gasket where it leaks and seal it.THEN I could tighten the bolt(s) and squeeze the material in the gap....
Yes. Degrease whole area around the gasket with any suitable solvent, paint (or tooth) brush and clean cloth, loose oil pump bolts, spray this thing directly to a crack with supplied extension tube. Allow to dry (30-45 min), then retighten pump bolts. Test for leak again.
would any movement booger up another gasket somewhere else ?Again, yes. Pump movement can damage pump gasket even greater. Also, you can destroy sealant seam between oil pump and oil pan. So, don't try to pull oil pump case from engine block. Simply loose all pump bolts (it will not hurt any part) and spray Permatex along the whole length of pump gasket.
-
of course, if it's 100% silicone, it's hi-temp whether it says so or not)
Not necessarily. For example, "100% silicone" clear windshield sealants are not a hi-temp. Only 175..235 deg.C (typical engine blue/grey/red/black sealants are between 315 and 345 deg.C).
-
Maybe a syringe & needle
I think it will be suitable only for relatively thin liquid (like a "Gasket Shellac"). You can't create high pressure (sufficient to squeeze thick silicone sealant into the crack) by your fingers. You need "seal gun" to fill crack with automotive silicone sealant.
- with thick type instant glue !Most of glues are not oil-resistant until they are not set...
What do you think of the fact that the Alternator Bracket Bolt is one of those holding theOil Pump down onto that gasket...
AC Compressor and alternator sits on a separate bracket, bolted to the side of engine block. So - no, there are different bolts...
You are in Russia ?Yes. Yoshkar-Ola city, Mari-El republic of Russian Federation.
-
Hey, Doc, me think you have a last hope to fight a leak without oil pump removal.
Loose all bolts holding oil pump cover to engine block. Prepare a tube presser loaded with a tube of liquid sealant (you can try liquid silicone sealant or "gasket shellac"). Cut and bend tube spout so it will meet this job requirements. Pump sealant into leak zone with maximum pressure you can produce (fluid must penetrate into crack between cover and engine block and moisten a fault area of gasket). Wipe off excess sealant, then tighten all bolts to a specified moment. Allow sealant to set (3-4 hour minimum, overnight will be better) and test for leak again.
I can't guarantee it helps, but you can try. It will be more easier instead of front axle and oil pan dropping... A key to success: pump sealant into the crack (applying it to mating surfaces), do not apply it over the crack.
-
Is a leaking Oil Pump gasket uncommon or has it happened to anyone before ?
It is not a common failure. Check oil pump bolts tightening. Link to FSM ("Lubrication and Cooling" - hope it helps). Don't overtorque these bolts - loose and tighten to specified moment one by one.
Then wipe dry all suspected areas, install TB (without front covers) and HB. Disconnect coil (or remove central wire from distributor and connect free wire end to engine ground). Crank engine with starter (until red oil lamp goes off) and look for fresh oil leak traces, as k9sar said.
Oil pump gasket replacement will be a royal PITA... FSM says, you need to drop oil pan before oil pump removal...
-
I don't know if you have to remove the rotor but if you do it's bolted to the hub.
Loose these bolts first (with brake pressed), then remove caliper and hub. Easy way...
-
The Nissan part No. of the Front Main Oil Seal was 13510 - 88G00.
Why the part no. difference?
Sorry... Part number 13510-V5000 (and 13510-D0100) was superseded by 13510-88G00. Different part numbers for the same part - it's ordinary for Nissan...
-
Just Checked...
Schucks - Crankshaft front oil seal $5 ! Beck/Arnley. Wow, maybe I should buy three of them in case
I screw another one up !
Don't know - at these prices, I might go broke...
Just for your reference, Nissan part number of Front Main Seal is 13510-V5000.
BTW folks....from the pdf manual (Adobe Reader)...QUOTE,Front Oil Seal.
1. Remove Radiator Shroud and Crankshaft Pulley. (Gee - only two steps!)
Remove t-belt and crankshaft sprocket...
 There you go - easy as pie ! Use a suitable tool....
Tube rolled from thin plastic sheet (margarine container, plastic bottle, etc.) and covered with one layer of adhesive scotch tape (to prevent unrolling) is a very suitable tool... Insert in into seal, press seal at place, then carefully pull out tube, slowly rotating it inside the seal (to prevent seal lip deformation).
It's not so hard task. Now you have so me experience. Do it again, with more accuracy. Clean seal hole and crankshaft neck thoroughly before installing new seal, apply motor oil to neck, seal and "margarine tube".
I wish good luck to you, you can do it.
temp sensor
in The Garage
Posted
Code 12 (Mass Air Flow Sensor circuit) means not only MAF sensor itself, but MAF sensor wiring faults also. You have already test your MAFS (by replacement with a new one without any changes). So, you have a wiring (harness) failure...
Probably, your temp gauge harness has faulty also...
Main rule of diagnostics: don't replace "faulty" sensor before you examine sensor harness.