

JackStraw1
-
Posts
160 -
Joined
-
Last visited
-
Days Won
1
Content Type
Profiles
Forums
Calendar
Posts posted by JackStraw1
-
-
Have you shot some staring fluid in to see what it does? Maybe your fuel filter is clogged, or could have an injector clogging. Make sure to check all the fuses & relays as well.
+1. Change your fuel filter first.
-
 1
1
-
-
Welcome to NPORA !
If you took off the upper plenum, you may want to check the small hose between the plenum and the firewall is connected (you would have had to disconnect it to take the plenum off). I believe it goes to the fuel pressure regulator ?
Also sounds like you may have disassembled the throttle cable at the throttle body and perhaps didn't get that bolted back right ?( thus the loose feel to the pedal) And yeah the injectors need to be hooked up properly but this should be easy to figure out based on the length of the wiring.
Download the FSM if you have not done so already .You will find wiring diagrams in there
-
Not sure if the coolant sensor can cause that problem but it seems possible since the ECU reads the coolant temp and makes adjustments accordingly. Coolant sensor is a cheap and easy repair. If that doesn't do it I would then look at cleaning MAF sensor next and also check fuel filter if it has not been changed recently.
-
I recently started having the same problem with the blower motor speed fluctuating intermittently and seemingly with the acceleration so today I took it apart and had a look. There was just a little debris in the housing which I cleaned out. Then I ran the blower out of the housing and laying on the floor. It still sounded a little weak.
So I unplugged it to see how it would spin by hand and if there was any possibility of the bearings seizing.
Here's what the plug looked like
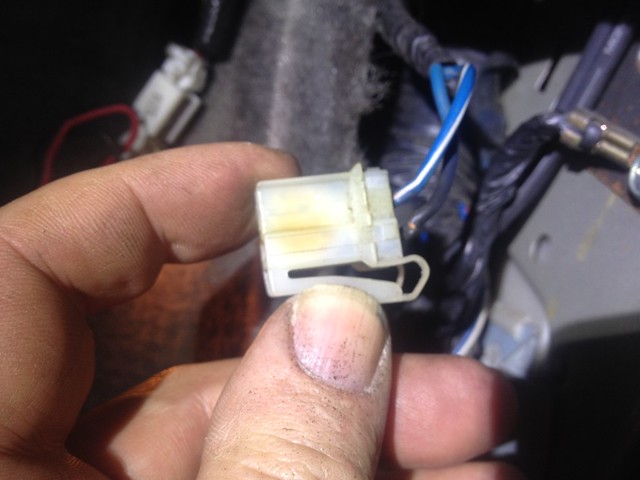
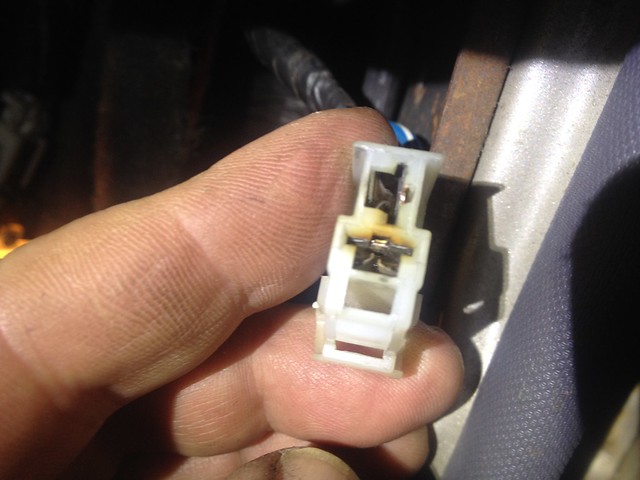
Pretty sure this is the problem and I am gonna hook on a few spade connectors and check it out tomorrow. I'd like to do the definitive repair with a pigtail connector here but have no idea what the part number is or where to find it. Can anyone help ?
-
Do all of the fan motor settings work ?
Is there a little heat coming out of the vents with the blower off and the temp setting all the way to the right?
-
1
-
-
Drop me an Pav a line if you make it, we can call adamzan and drag you into the woods for a bit of wheeling!!
Just saw this. Thanks for the invite. I doubt you guys would want to hang with an ol geezer like me but I'll definitely give you a heads up if/when we come up. It'd be cool to check out your rigs an have a brew or two. We'll probably take the wife's car though since it gets like 8000 mpg which is just a tad better than the Path guzzler.
Oh yeah, I promise not to talk too much about how the Otters are whippin up on those boys from your side of the line this year, LOL
-
1
-
-
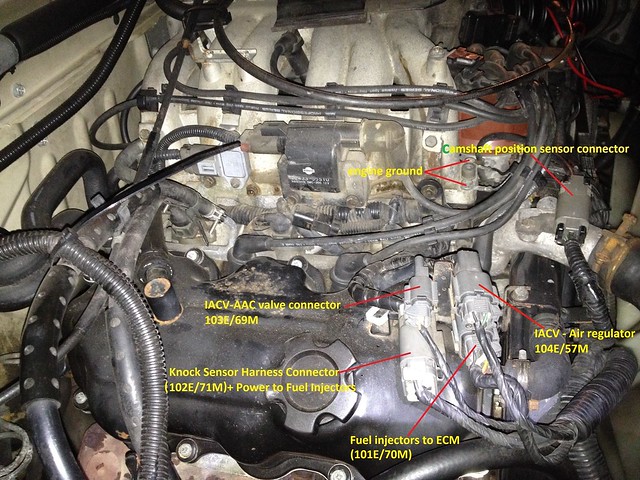
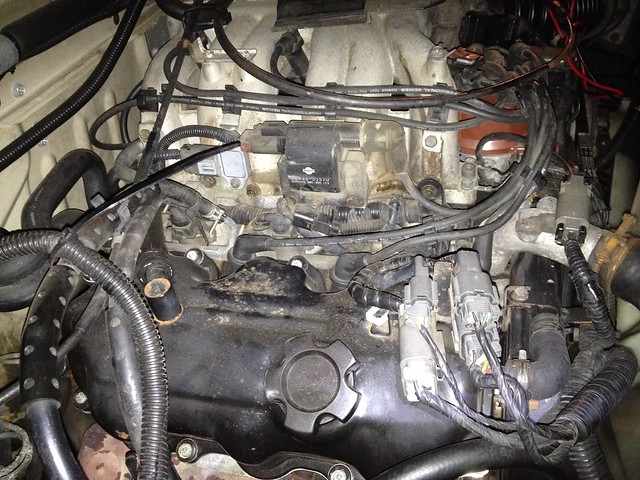
Thanks guys, I figured it out. it's amazing what a good night's sleep can do. Here's a few labelled pics to help anyone else who is looking to test the resistance of fuel injectors and doesn't want to spend an inordinate amount of time trolling through the wiring diagrams and FSM.
This one shows the more common functions of the engine control harness sub connectors and more importantly the numeric labeling of each.
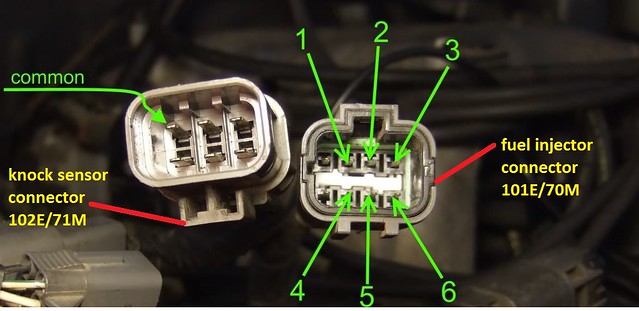
This one was pirated from PattiMax and I added the labels showing which connection was which (this was what i was having trouble with when I first looked at it) The green arrows show where to test resistance. Ohms should be between 10 -14 for normal function. Hope this helps someone get it done a little faster

-
3
-
-
I replaced several starters in my pathfinder until I found the starter relay mod. Turns out that was where the real problem lay for me. Once completed I have had no further starter issues. Yes it was a PITA getting starter out but I managed to wiggle it out thru the top (while running through my entire vocabulary of curse words) You might want to have a look at that mod if the starter goes out again less than the expected time and you have not already done the mod.
What diagnosed it for me was running a jumper wire to the solenoid. When the starter wouldn't crank, I would check the battery and if battery was good, I would just touch the jumper wire to the Positive battery terminal. Truck would start every time and I knew that the problem was not getting adequate power to the solenoid. Starter relay mod fixed it permanently. Jumper wire is still in place just in case

-
LOL, I was actually thinking about taking a summertime trip from Maine up into Nova Scotia. I wanted to take the car ferry over and bring my Pathy along for the trip but I heard that the ferry is no longer running up there. Bummer. Thinking about a trip to Montreal next summer though !
-
I love winter but I hate that part about living in the rust belt. Mine's getting eaten alive too. Friggin DOT guys dump salt and CaCl2 like its goin outta style around here. I guess they need to justify their jobs but I would rather just drive on 2" of packed groomed snow than a clear pavement given all the crap they need to dump to get to that pavement ! Those with 2 wheel drive vehicles should get 4WD or AWD, just stay home or move South !!!
-
1
-
-
I had trouble with those same Moog bushings wearing out PDQ. Granted I live in pothole city and I think its worse for these things hitting the potholes at night when you can't see em going 40 + mph than wheeling at lower speeds. The bushings just seemed kinda cheap. I got em of Feebay and they were probably some counterfeit aftermarket crap outta China is my suspicion. That said, the holes on mine are pretty hogged out.
I have not gone to all the trouble you have but I replaced them earlier this fall with a set of Autozone ones. Black but they are poly. So far so good. I think I paid less than 20 for the pair. fingers are stilled crossed that i get a year or two out of them.
-
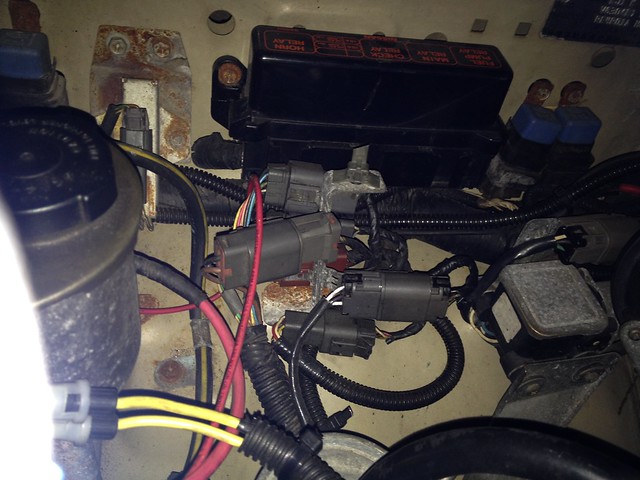
Here's a few pics of the connectors. Can someone kindly point me in the right direction ?
(Had to re-figure how to post from Flickr. Moderator kindly remove previous post.)

-
[url=https://flic.kr/p/BT4ivD][img=https://farm1.staticflickr.com/616/23550272419_2d0efc5591_k.jpg][/url][url=https://flic.kr/p/BT4ivD]photo 2[/url] by [url=https://www.flickr.com/photos/128745873@N07/]Jim Dandy[/url], on Flickr -
Ok, forgive my ignorance here. I can't seem to locate the connector where the injector resistance can be tested. I am looking at a 94 Path.
Does anyone have a picture of it. Can't believe I'm even posting this......<smh> tired.......zzzzzzzz.
-
Thanks for the link B. Nice site.
I found a 12" drill for my pilot hole at an old department store from the 50's that sells damn near everything. +1 mom and pop.
I tried the acetone/ATF. I managed to get one unbroken stud out. The two that are center drilled still won't budge. I soaked em overnight. There are two remaining unbroken studs and they're not wanting to move either. They are the two on the center exhaust port.
So..... as it sits now, I'm planning on drilling out the two broken ones and helicoiling and I think I'm gonna leave the two intact studs alone. Mainly because the bottom one looks darn near impossible to drill a straight hole into because of interference with the top of the engine mount on that side. I've torqued on em to the point of flexing with no movement.
I need to get this puppy back on the road before the snow comes !
-
I went to homedepot and bought some 12" drill bits. They were like $6 each. I went in through the inner fender. Not much space but it got the job done. The drill bits are only good for a couple studs so I bought 5 smallest bits and 5 of the next size up. I tried left handed bits on the ones I could get to since they are much smaller. They didn't grab for me. Use oil and drill slowly when you do. Don't heat the bits up too much. Good luck. It's rather stressful. Also try drilling the hole in the stud to the largest you can so you can use the largest extractor possible. This will help to ensure the extractor doesn't break.
No 12" bits here at HD, Loewe's or local hardware store.
I guess I am living in @!*%eville because I can't source a frickin thing here locally - really a royal PITA.
Can't find cobalt drill bits with hex drive. Can't find a drill extension with a chuck instead of a hex drive so I can use regular drill bits. Chewed up the TN bits. Can't find stud for the collector. Can't even get the dipsticks at Advance to find me the right exhaust gasket that goes between the downpipe on the drivers side and the Y-pipe.
On the plus side, I got a nifty little gizmo for centering the drill on the studs. Got one out cleanly and another drilled through but it's sticky and sitting in penetrating oil a little longer before I give it another twist. Really don't want a broken extractor here. May just have to drill it out and re-tap. Might just have to try that ATF/acetone or lacquer thinner
-
Well you the general rule of thumb with organs and other body parts.
If there are two or more - you can afford to lose one or two
If there is only one and it goes bad - remove it anyway - if its important it'll grow back.

-
Pretty sure I was able to get the fan changed out on my 94 4x4 without having to take out the radiator, just the shroud. But then again, I seem to enjoy frustrating the crap out of myself by working in ridiculously tight spaces.
Nice write up.
-
So I got the torch and it made short work of the exhaust fasteners. Got the top EGR nut off. Bottom one just wasn't happening. Also managed to get the bolts off the remaining studs. Had to take the horn out to squeeze the manifold and EGR tube out through the top. So now I've got 3 broken off in the head and 3 intact.
I was thinking about heating the intact ones with the torch before trying to turn them. I think I can get the torch on em perpendicular so as not to heat the block much. Which leads me to this... anyone heat the block around the broken ones with a torch ? I know its aluminum but I wondering if this can be done with out warping, deforming or god forbid - melting the aluminum. Gonna try to get this done Monday/Tues when it warms back up to 60
-
Yeah, one of the collector studs came all the way out for me too (the one closest to the block, nut was totally rusted in place surprised it didn't break) I guess I'll get it off when I pick up the torch.
I'm gonna try to get a center punch in there for the manifold studs cuz I've had the same off center drilling happen when drilling out a broken bolt on the a/c condensor. Thinking about using left handed drills too. Damn I wish I had a body lift to give me a little more wiggle room
-
Thanks for answering guys. I'm trying to borrow a torch now, otherwise imma have to trudge down to HF and get that lil portable (expensive fastner remover but I have always wanted one,
) Snow belt rust has made it much harder to work on truck. I took a look at the two bolts that attach the down pipe to the y-pipe and they have morphed into something that looks linda like melted plastic. Plus they are in a tight spot that almost necissitates taking offf the torsion bar on that side - or maybe moving back to the next connection after the Y-pipe.Did you guys loosen the lower or upper part of the EGR tube ? Upper is obvi easier to get to but I don't know if I could finagle it out of there still attached to the manifold.
@Jmoor --7 broken studs ? You're the king. The stud king,lol
-
Started this lil bit of joy today on the driver's side. Just couldn't take the ticking and the exhaust smell any more. No BL - kinda tight. 3 broken studs so far with minimal torquing with a 1/4" drive. Seems like they are just total @!*%e. Can't get either end of the EGR tube to move. Don't have a wrench big enough for the top end. I guess I'll put a pipe wrench to it after it sits in the lube for a while. Anyone ever just take the EGR off and work it out attached to the manifold?
Oh yeah, haven't seen it mentioned yet but I have spacers between the nut and the manifold flange. I have a 94 WD21 4x4. Is this common? I guess I'll have to get an extra one for the stud that is completely missing when i go to put it back together.
-
My turn! So I pulled my glovebox, and was presented with the black barrier thing. I was supprised to see that the screwheads were a little stripped, because my luck usually goes that no one improves anything before I own it.

Then I unscrewed the resistor box. It says "Up" on the top, in case you're an idiot!

When I removed the box...

WHOLLY CRAP!
So I started scooping. And scooping. And digging. And sucking. Good thing for my tiny girl hands!

Afterward, I was left with a sparkly clean blower box, resistor cage, and a mountain of leaves, pine needles, and mats of some sort of gray fiber.


I didn't find any poops, so I don't think the weird fiber is a nest... but who knows!
And as for the mysterious white powder on the floor, I assure you that I'm not trafficking contraband. It's baking soda, to improve the smell of my filthy truck.
Nice work. Be sure to check the blower motor squirrel cage to the right for leaves as well. Unless you like having your blower sound like a 10 year old's bicycle with playing cards clothes pinned to the spokes, lol
-
2
-
Fuel issue diagnosis
in 90-95 WD21 Pathfinders
Posted
^^^^^this and then......
No crank = no juice (or in extreme cases seized motor)
If battery and alty check out then you need to look at wiring to starter. It is an endless source of problems on these vehicles and many, many starters have been replaced when it was in fact a wiring issue. Easiest thing to do is attach wire to the starter solenoid that is long enough to reach the battery. Turn key on. Touch end of wire to (+) terminal. This by passes most all wiring and delivers 12 volts directly to starter and should crank starter if starter is good. (yes it will spark a bit but it won't kill you. I used this for years to start before discovering the relay mod) Use a rubber handled tool to hold the wire if you're worried). If starter cranks then search on forum for starter relay mod. If starter does not crank - you have a bad starter or wiring from ignition is faulty.