
CDN_S4
-
Posts
1,562 -
Joined
-
Last visited
-
Days Won
77
Content Type
Profiles
Forums
Calendar
Posts posted by CDN_S4
-
-
Never assume anything. Replace all fluids, front and rear diffs, tranny and of course oil. Probably the coolant too. As for the suspension, if it is the original and it sounds like it is, I would replace all of it. New shocks, struts and coils. Belt squeal, cleaning and lunricatong the pullies helped my squeal. They got gunked up after a while.
I have a 99 also. The rpm issue is not normal. Not sure what causes that.
And BTW, welcome to NPORA
-
No I didn't actually know about a stock option. There was nothing that looked like it. I figured if I ever wanted to reverse it, having a hole in the panel would be the easiest way to "fix" it. Plenty of those at the junk yard lol for like $5.
Sent from my iPhone using Tapatalk
-
Just for sh*ts and giggles I decided to install the 12v outlet that I removed from the Center console after my upgrade, into the trunk. Now I have access to power front Center and back. The back should be particularly convenient when camping ad living out of the trunk. It is powered by a small scooter battery that is trickle charged by a solar panel on the roof. I had all the materials laying around the garage, I.e this was the setup I used to run the power on my spare tire carrier. But since I now have an OEM swing out I no longer need it.


Sent from my iPhone using Tapatalk
-
 2
2
-
-
Really?! You don't have junk yards where you live?
Sent from my iPhone using Tapatalk
-
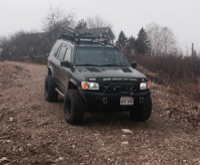
Quick shot of my drive home from work last Friday.

Sent from my iPhone using Tapatalk
-
2
-
-
Simple, get a pair of fog lights from a junk yard for dirt cheap, modify them to fit those, and you're all set. Or modify the ones you have and if you need to switch back to OEM for whatever reason, get a pair from a JY. Those bulbs looks great, projector lens and all!
-
Here it is fellas:
Hi Virgil,
At the moment we are not selling kits or any other products online. Unfortunately there's a good chance that we may not go back online again. Some personal and business related changes have taken place over the last few months and the time commitment to sell products online has diminished.
We have a small stock of material to make about 20 more subframe drop kits. As the Canadian dollar has dropped so significantly, we won't include the steering linkage, since we purchase it from the US. We will include the information to order it though.
We will make an announcement when we can put out the last 20 kits.
I appreciate you contacting us and feel free to pass this onto the fine fellows at NPORA.
Thanks
--
Andrew
Krypton Fabrications
Sent from my iPhone using Tapatalk -
Yes a simple adapter for the top perch of the rear coil would work well and would be simple enough to make/ install. I custom built one for the lower perch that includes a bolt on retaining mechanism.
What I've done to mitigate the loss of extra height from cutting the spring, and at the same time as sort of adapter, I've used one of Fleurys spacers on the top mount.

Sent from my iPhone using Tapatalk
-
1
-
-
I bought used WJ coils. They aren't too difficult to source. Then you don't have to feel so bad about chopping them up.
Sent from my iPhone using Crapatalk
-
It is actually. It is on this forum. As a matter of fact, I'm pretty sure there are diagrams with angles etc in my build thread
Sent from my iPhone using Crapatalk
-
Yes...officially
But there are some people that made their own kits. Just a PITA
-
Tons of options. I prefer any clamp style window mount. Just google search it and find something you like. The only advice I can give in terms of stuff to stay away from is vent clip mounts, those don't hold up off-road. And don't cheap out either because a good window suction mount needs to be solid, like a GoPro suction mount. I've had cheap ones and they just stopped working after a while. You could also consider cigarette lighter mounts, holds your phone and charges it.
Something like this:
http://www.amazon.com/UNPAINTED-MOUNT-WITH-SUCTION-GRIP/dp/B006QRHZJK/ref=zg_bs_2407778011_33
or this:
-
Seems that way...I've emailed Andrew to find out what's going on. It's possible he might have moved on. We'll see if I get a response or not.
-
CDN_S4 are those shocks mounted body up or down?
If you follow the writing on the sticker then they should be body up with the rubber part on the bottom. But since I prefer keeping that part out of the mud, I've always mounted my Bilsteins (2nd pair now - first was too short for the 6" lift) with the body down and the rubber up. It will fit both ways I guess, but like I said, I've always mounted them body down.
You are the second guy now that says KRFabs is no longer taking orders. That's a real bummer, he was the only one that made an actual full kit.
-
I used the WJ coils in the rear with these Bilstein shocks and the match is perfect.

Sent from my iPhone using Crapatalk
-
1
-
-
Sorry off topic, but what is that tire pressure gadget you have installed there? Looks good!
Also interesting that you have the manual climate controls in a 2001+ or was that normal for base model perhaps?
Sent from my iPhone using Crapatalk
-
Had to get a new Windshield today. Had a crack that spread in the cold temperatures with the heat inside the vehicle.
Gone is my Pathfinder decal and zombie hunting permit.


Sent from my iPhone using Crapatalk
-
1
-
-
Also, I believe one of the steps on my stepper bit ended up being near-perfect for the blind nuts. I did also buy a 13.5mm bit, but it didn't hold up well.
I figured that might happen, and I anticipate it to happen to me too since the one I bought only cost $9 while there were some for $300+ LOL. So yeah, I will likely end up using the stepper bit too.
-
Today I replaced one of the wheel studs on the carrier that was bent. Put a second coat of paint on the 3 bumper pieces. Cut out the 3 pieces which are outlined on the inside of the bumper, AND I discovered that the metal where these pieces attach into is thicker and comes out more than any other part of the trunk surround. This shows IMO that the body is likely the same, wether or not it came with a swing out. Despite Hawairish's findings of allegedly no support behind the taillight between models that came equipped vs non equipped, makes me wonder if they are all the same after all.
When I looked into the holes of the donor Pathy the holes didn't seem all that deep, it didn't appear to be anchored into anything.

Either way, from Hawairish's experience these carriers hold up really well.
One step closer:


Now all that's left to do is finish the paint on the carrier and wait for the rivets and bolts to arrive so I can start drilling. Also I couldn't find a 13.5mm drill bit. But I also only checked in one Canadian Tire. So I ordered one from Amazon.
Sent from my iPhone using Crapatalk
-
You won't be able to able to re-use the OE bolts that hold the carrier to the quarter panel...they are 10mm x 1.25 bolts, which is uncommon for blind nuts (and is a metric-fine pitch). Instead, 10mm x 1.5 is what you'll have to go with (it's what the McM p/n is for). The latch/striker bolts are 8mm x 1.0, which is common and you'll be able to re-use those.
Are these the right ones? Which length did you go with?
http://www.mcmaster.com/#metric-class-10.9-steel-bolts/=10lyyuz
-
You have to create a login first
Sent from my iPhone using Crapatalk
-
You won't be able to able to re-use the OE bolts that hold the carrier to the quarter panel...they are 10mm x 1.25 bolts, which is uncommon for blind nuts (and is a metric-fine pitch). Instead, 10mm x 1.5 is what you'll have to go with (it's what the McM p/n is for). The latch/striker bolts are 8mm x 1.0, which is common and you'll be able to re-use those.
My understanding was that was for the rivets, didn't quite read it to also get the corresponding bolts. All good, I'll place another order with them. Are these bolts a specific grade?
-
Yes that's a great idea! I used self tapping screws to mount the grab handle. But now that I got that rivet tool coming, I will re-do it with a threaded river and spacers like you described so that the handle can sit on the pillar trim. For that though, wouldn't I have to weld the spacers to the pillar to prevent leverage from pulling on the mount when someone is to lift their partial body weight into the seat? I think the bolt head needs to be as close to the solid pillar as possible.
I do have those stepper drill bits. It's just that this required square holes, which due to my shotty measuring had to be made bigger than necessary.
Sent from my iPhone using Crapatalk
-
Oh ok. Is there a specific grade of bolts I should get?
Sent from my iPhone using Crapatalk
LED headlight bulbs
in 96-2004 R50 Pathfinders
Posted
Buy from someone in the states and have it shipped. Even with a bit of a surcharge and shipping it would still be pretty cheap to get fog light housings. Just a thought.
Sent from my Pathfinder