dustinp Posted July 16, 2014 Share Posted July 16, 2014 Hey guys I've posted this a few places hoping someone could help me out. I stacked 2" fluery spacers on top of my sfd. I only did one side but it looked extremely compressed after and only lifted it .5" the wheel was also very toed out. I'm not sure of I just screwed up installing it however I can't see how you could screw something like that up. It could be just to much pressure on the struts but I don't understand why that would be. Link to comment Share on other sites More sharing options...
fleurys Posted July 16, 2014 Share Posted July 16, 2014 Hey Dustin. Do you have pictures of the install, maybe I could spot something... Link to comment Share on other sites More sharing options...
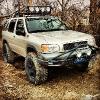
dustinp Posted July 17, 2014 Author Share Posted July 17, 2014 I have a couple but it is difficult to get them on this website since I forgot my photobucket password. I'll try a m d get them up Link to comment Share on other sites More sharing options...
Karmann Posted July 17, 2014 Share Posted July 17, 2014 This might be obvious, but are you sure you installed them on the top of the strut? Link to comment Share on other sites More sharing options...
dustinp Posted July 18, 2014 Author Share Posted July 18, 2014 I installed them on top of the subframe drop spacer Link to comment Share on other sites More sharing options...
lerch641 Posted July 18, 2014 Share Posted July 18, 2014 (edited) I think I saw your picture on the R50 page. Fleury's spacers are out of shot on the top. Edited July 18, 2014 by lerch641 Link to comment Share on other sites More sharing options...
fleurys Posted July 18, 2014 Share Posted July 18, 2014 (edited) At first look, your springs seems installed wrong... Like if they were not clocked properly... They seems compressed and bent when they should be almost straight and relaxed.... Did you align the notch on the coil-top-seat plate with the L or R on the top plate ?? This is super important as it will clock (or align) the spring properly in the assembly... Check here for some pictures : http://s435.photobucket.com/user/steve_fleury3/library/suspension%20project Also, it's like if your spring are missing a row... Check with my pictures of the same AC coils... S. ***EDIT** I made a mistake... The upper spring seat plate has a cutout... it needs to face the inner side of the truck AND be aligned with either L or R on the top (L being driver side, R passenger) Edited July 19, 2014 by fleurys Link to comment Share on other sites More sharing options...
CDN_S4 Posted July 19, 2014 Share Posted July 19, 2014 (edited) Fleury is there a step by step DIY or How To for the install of your spacers? Sent from Tapatalk Edited July 19, 2014 by CDN_S4 Link to comment Share on other sites More sharing options...
fleurys Posted July 23, 2014 Share Posted July 23, 2014 I do provide a summary of the steps needed to install the spacers. Link to comment Share on other sites More sharing options...
dustinp Posted July 24, 2014 Author Share Posted July 24, 2014 Thank you lerch that was me. I am attempting to put the other side on right now, It's aligned Link to comment Share on other sites More sharing options...
dustinp Posted July 24, 2014 Author Share Posted July 24, 2014 Where is this summary Link to comment Share on other sites More sharing options...
CDN_S4 Posted July 24, 2014 Share Posted July 24, 2014 ^^ that's what I wanna know too. Didn't find it on his website. I received the spacers today and wanna know how to install them... Sent from Tapatalk Link to comment Share on other sites More sharing options...
fleurys Posted July 24, 2014 Share Posted July 24, 2014 Here's a summary of the installation of the front spacers (the rear simply inserts between the coil and coil seat) : - raise the truck - remove wheel - remove the 3 top bolts that retains the strut. They are under the hood, where the strut tower is. - remove the 2 big bolts that attach the strut to the knuckle. This is where the break rotor is. - remove the strut - compress spring - dismantle the strut by removing the top nut - take the top plate (the one with the bolts pressed fit in) and bring it to a vise where the plate is sitting and you can hammer out the bolts - install the spacer on the top plate by threading the spacers with the longer bolts supplied - re-install the top plate on the strut by screwing the top nut. At that point you have in this order from bottom to top : strut,top plate,spacer - release the spring tension from the compressor -re-install the strut. You will need some camber bolts in order to have an alignment. I personally use the ones from ingalls : https://www.ingallseng.com/81260-14mm-fastcam-bolts_pair.html Link to comment Share on other sites More sharing options...
Recommended Posts
Create an account or sign in to comment
You need to be a member in order to leave a comment
Create an account
Sign up for a new account in our community. It's easy!
Register a new accountSign in
Already have an account? Sign in here.
Sign In Now