- Sign In Changes: You now need to sign in using the email address associated with your account, combined with your current password. Using your display name and password is no longer supported.
- If you are currently trying to register, are not receiving the validation email, and are using an Outlook, Hotmail or Yahoo domain email address, please change your email address to something other than those (or temporary email providers). These domains are known to have problems delivering emails from the community.


Little Mule
-
Posts
139 -
Joined
-
Last visited
Content Type
Profiles
Forums
Calendar
Everything posted by Little Mule
-
Sorry to hear that. I don't mind so much. Tell's me I'm not doing this for no good reason anyone. Its obvious my truck was dead anyway. Now I just have to make it stronger...faster... (Do you hear the background music?) Anyway, I think my mechanic that has worked on this truck has butchered it lately. So far I'm finding several things connected to nothing. Here is the first. Anyone have a picture of where this hose is supposed to be connected to? Mine was just hanging free. The one end is connected to the back side of the TBI. Anyone care to take a picture of their's for me? (This pic was taken from the passenger side.)

-
And here is the end of the crank:

-
Well, hit another bump in the road. My pathy had broken down shortly before I started, and I found out why. Looks like I'll be using the crankshaft from the new engine and having the end machined, or buying a new one. The harmonic balancer was loose on the crank shaft because the little protrusion on the crank was broken off in the pully. If you look closely at the end of the crank, you can see it missing plus it took a chunk of the crankshaft itself. Here is the balancer with the piece stuck in the groove:

-
Thanks Casey, That looks like mine.
-
So, does anyone have the answer to this question?
-
Stud comes free:

-
Pic of socket holding top nut and wrench turning bottom nut:

-
Finally, I'm sure many of you probably know this, but I didn't. So I'll offer this help in removing studs to those of you who don't know. I had several studs from the exhaust manifolds stuck in the cylinder heads. I hit them with PB blaster several times over the last 2 days. Then to remove them, I placed 2 nuts on them. Then with a socket to hold the top nut in place, I used a wrench to turn the bottom nut. With a little umph, it turned the studs loose. :cool2: Pic of 2 nuts on stud:

-
Also, once the spring is compressed, I found it was a lot easier to remove the keepers with a magnet instead of needle nose pliers. Just push the spring to the side a little while compressed, and it loosens the keeper and the magnet pulls it right out. I tried the needle nose pliers on the first one and started cussing after 3 minutes.

-
As for the valve springs, I rented a valve spring compresser from a local auto parts store. It looked like a big c clamp. However, because the part the compressed the spring interfered with the wall of the cylinder head, it didn't work very well. I spent 15 minutes and never got the first spring off. So I returned it, and bought a small one with the little crank to compress the spring. Well, with the cranked turned as far as it would go, it didn't compress the spring very much, and not enough to remove the keepers. Instead of returning it, I happened to have a thick piece of metal from an old project. I cut it with a dremel and bent it using a vice and hammer. Drilled a hole in it. And voila! It worked like a dream. It simply made the part of the tool that pushes on the spring retainer longer. Took 10 minutes and I didn't have to go shopping auto parts store for one that worked. Here is the pic. The little part is above, and my homemade replacement is on the tool.

-
Here is a picture of pistons 2,4,6

-
So here is the question. I assumed on a V6 engine, pistons 1,4,5 would all be at top dead center (TDC) when pistons 2,3,6 are at the bottom of the cylinder. However, when I got the cylinder heads off of the VG33e engine, piston #5 was down instead of TDC. I haven't removed the crank yet, but is this normal? Here are pistons 1,3,5 in this picture.

-
Well, here is the latest. I've completely disassembled the cylinder heads from the vg33e engine. I also went and tested the 0-60mph on the pathfinder in it's current state. Pretty sad. I did 3 runs on a flat road and all three runs took over 18 seconds. The fastest time was 18.25 seconds. With the AC on, it took 23 seconds. :oops: I know that's not the true test for the value of a 4x4, but that just plain sucks. I ran into a few problems that I'll show pictures in the next few replies, and I have one question regarding the pistons. One had to do with valve spring compressers, removing valve stem keepers, and removing studs (my friend taught me a trick). Finally, I believe there will be another expense I didn't originally consider, though I haven't come across it yet. Eventually there is going to be a speeding ticket with the new 300zx. I can't seem to wipe the smile off my face driving it.
-
Yes, it is from the VG33. I am also referring to the Haynes manuel for the VG33. I will be using the crank and pulleys from the old VG30i in this newer motor. The old motor is still in the my Pathy. I'll be taking it out next.
-
Also, to remove the crankshaft BOLT, you have to keep the crankshaft from turning, otherwise, turning the bolt just turns the crank. The Haynes manual suggests a strap wrench to hold the pulley while you turn the crankbolt. However, I don't have a strap wrench, and neither did the autoparts store. So I took off the oil pan, made sure the crank was at Top Dead Center, and braced a 2x4 in next to the crank to keep it from turning as I loosened the bolt. It worked very well. That's my only real helpful advice so far.

-
To document the process for those who asked: All I have been doing so far is taking apart the new engine. Nothing too special. I am taking a lot of photos. When I remove a part, I take a before and after picture of it. Then, for most parts and bolts, I place them in a ziploc bag and label it. I have all the big parts on one bench and everything is labeled NE for "new engine." That way, when I start to disassemble the old engine, I can keep it organized. It has been pretty easy until the crankshaft pulley today. I'm a little slow since I'm trying to be methodical. The photo is what I've taken apart so far.

-
I finally did get the pulley off, but it is destroyed. You can see one of several breaks below (red arrow.) One of the problems was that the puller wasn't large enough, and it would rub on the front lip of the pulley (blue arrow), so it didn't seat fully on the middle ridge of the pulley. (Haynes manuel recommends grasping the middle ridge). I finally got the thing off by breaking off the front lip of the pulley so it wouldn't interfere with the arms of the puller and then it could completely grasp the middle ridge of the pulley.

-
Thanks Redpath, Everything in the Haynes manual refers to it as the crankshaft pully (and I got the bolt off no problem), and even they suggest a 3 prong puller. However, I originally rented the balance puller that you showed. But the only metric bolts in the kit were 8mm, which were too big for the tiny holes in the crankshaft pully. (Red arrows in the photo.) So I returned it and rented the 3 prong puller, and the cursing started soon after.

-
Alright, hit a speedbump. I am trying to get the crankshaft pully off the new motor. It's kicking my butt. I even rented a 3 prong puller from the local autoparts store, but all that is doing is ripping the pully apart. I've also sprayed the crap out of it with PB. It doesn't want to budge. If I have this much difficulty getting the pully off the old engine, I'll be buying a new pully. Any suggestions?
-
Thanks 88. I figured it out today too.
-
Thanks guys. FYI: The bolts that you need to mount the engine block to the engine stand are 10mm x 1.5 pitch thread. I also need 70mm for this particular engine stand. Those worked out perfect. The goof ball at the nissan dealer parts dept told me that I needed 1.25 pitch thread. He was wrong!
-
FLApathy: Why do you recommend the L&P steering? Just curious as I don't have a preference at the moment. And I am definitely keeping my eye out for their supercharger kit!!!! Casey.T: Thanks for the advice on the flywheel. Are you recommending using the one from the new engine, or an aftermarket one? Just making sure.
-
Thanks. I'm pretty excited about it. I'm currently in the process of taking the new engine apart. So far I've removed the fly wheel, the exhaust manifolds (only banged the knuckles a couple times). Thank goodness for the mechanix gloves, no skin lost. I've also removed the wiring harnesses and air intake manifold. The hard part so far has been the stupid bolts needed to mount to the engine to the new engine stand. I called the local Nissan dealer parts department. They only had a part number and couldn't tell me the size of the bolt. The guy there said he was pretty sure the pitch was 1.25. So I guessed at the diameter at being a M10. I go to Lowes, find 4 M10 1.25 bolts 70mm long and bring them home. Nope. Don't work. Too wide. So I return them and figure I need M8. I buy them, return home, and nope...too narrow! Dag nabbit! So then I decided to quit guessing, and tried some other bolts from other parts of the new engine to see what fits. The altenater mounting bolt is the perfect width. Just needs to be longer. So I'll take that with me tomorrow and try to find something to finally mount the engine to the stand. (I didn't use the bolts from the old engine, as I'm still driving it at the moment.) I'm taking a lot of pictures simply for reference so I can go back and look and see what went where before I took it off. I'm also labeling all everything and placing them in plastic bags to prevent confusion. The best part about all of this is, knowing my truck will be out of order for a little while, I bought another ride for my daily driver. A 1991 300zx TT with 68k miles! I'll have it in a few more days!

-
Anyone know what size bolt connects the engine block to the tranny in an 88 pathfinder? M10? 1.25 pitch thread? Let me know if you know. Thanks.
-
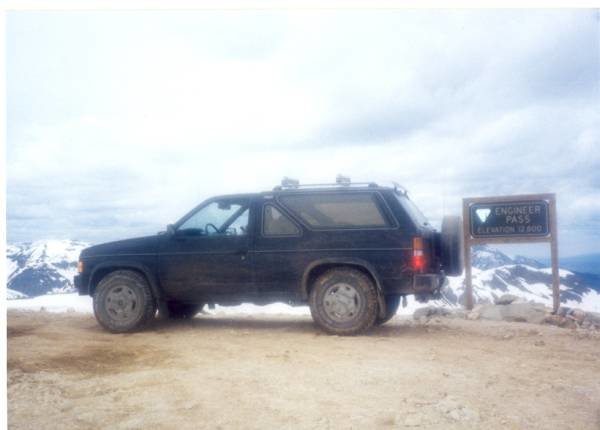
FYI: Here is a picture of my truck taken about 8 years ago. Since I don't have a dyno, I'll find an area when I can test it's 0-60mph time, just to compare to when the project is completed.