
zakzackzachary
-
Posts
125 -
Joined
-
Last visited
-
Days Won
10
Content Type
Profiles
Forums
Calendar
Posts posted by zakzackzachary
-
-
20 hours ago, PathyDude17 said:
T- case Skid (fits manual tcase on R50’s, great find in my opinion)
I need to keep an eye out for a t-case skid plate, but on a lot of the vehicles it's hard to even see under there b/c they remove the wheels and set the vehicle on the ground

-
 1
1
-
-
On 12/13/2019 at 8:59 AM, joshrichard said:
So after doing the entire lift I would say that as long as you have the right tools then it isn’t too bad.
With the back all I had to do was take off the shocks, and the sway bar end links and the axle dropped down just enough to fit the springs in with no problem.
The front wasn’t too bad either but a million times easier with a friend. I did one side alone and the other with a friend and it cut the installation time to about half.
Sent from my iPhone using TapatalkDid you make sure to assemble the KYB front struts with that little 1" metal spacer dealio? (I'm just checking!)
-
1
-
-
Welcome! Looking forward to some pics of your setup.
-
Welcome to the forum! Lots of great knowledge here.
-
15 hours ago, MTGunner said:
OK, not carrying anything. Springs must be shot. Might have to look into new springs. Land Rover springs may be in the future with a 2” spacer on the struts. Then new shocks.
12 hours ago, Strato_54 said:i would stay away from spacer if your going to go with land rover springs just buy bigger struts and do the whole thing
Pretty sure MTG meant spacers on top of the front struts. But still, spring lift is recommended over a big spacer lift like 2".
-
Nice.
-
On 11/25/2019 at 9:49 PM, Mattmill91 said:
Blow out caroal line from rear.
charcoal in box breaks up goes down the tube.. but I think that’s a different code.How do you blow out the charcoal line? The charcoal boxes are in the rear near the spare tire right? And if I recall, the vent is a tube that points down?
-
Welcome! Hopefully one day you can stretch the legs of Leaky Susan and get on some dirt. The 88's appear to be a great all around little truck.
4 hours ago, RainGoat said:Welcome! Entertaining write up. What city are you in?
Looks like Oklahoma City!
-
1
-
-
Welcome!
I lived in HSV 2016-18. Loved that city. I look forward to seeing pics of your rig and maybe some local exploration missions!
-
On 11/15/2019 at 10:55 PM, PathyGig12 said:
I always wondered though, can you use a Hi lift jack on the running boards (not the boards themselves, but where they mount to the body)? And how about the hitch assembly in the back? You could lift off of that right? I’m trying to justify mounting a HiLift jack on my rig so please help me spend money! Ha, At the very least I could use it to help with recovery, but knowing I could lift the truck too would be awesome
I would not recommend trying to use a Hi-Lift off the step mounts. They're rounded and don't really stick out that much. Just overall not a good anchor. I've seen people do it off the hitch.
But if you're new to a Hi-Lift definitely do some studying, and maybe practice with someone who's familiar. They're useful, but also super dangerous. In many circumstances a solid bottle jack, or even scissor jack, can get you out of a pinch. Just my $0.02! Once you get sliders a Hi-Lift would become a lot more useful.
-
That reminds me @ferrariowner123 I could start pulling paint matched rear bumper/fender flares if you wanted.
-
1
-
-
Welcome!
7 hours ago, RainGoat said:Ah, a silver Pathfinder in the NW, we’re all going to have a hard time making sure we get into the right trucks! But seriously, Welcome!
And interesting that he has that grill on a 99! The plot thickens with the amount of variations in our vehicles.
-
2
-
-
On 11/5/2019 at 12:27 PM, RainGoat said:
Does their “key in a box” mean that the immobilizer is essentially neutralized & functionally deactivated at all times? If so, you can have as many keys as needed. It’s easy to test. Cut a key for a couple bucks at Home Depot & try it. I have ones for just getting into the truck & occasionally the ignition has been turned on without the chip - it just coughs & dies. You put a key with a chip in & it starts by the 2nd try.
I hadn't thought of that and I think you're totally right. The boxed key is neutralizing the immobilizer I bet he could just get any 'ol blank cut at the hardware store and it'd probably work!
-
1
-
-
On 11/7/2019 at 6:41 AM, jlduthie said:
Agreed. With the OME MD springs I used 3 standard compressors 120 degrees apart and still felt sketchy. Would not do again even with the MD which are not as stiff as AC.I've done the OME HD front springs with 3-standard rental compressors. Sketchy and slow, but doable in a pinch. I was broken down in the middle of nowhere doing it in a parkinglot though, not ideal. 3/10 do not recommend.
8 hours ago, PathyGig12 said:20 hours ago, R50JR said:
Buy these for the same cost of having them compressed. A few us of us own these. Do not use power tools on these!!
https://www.amazon.com/dp/B01DP2CDJU/ref=cm_sw_r_cp_api_i_S2gXDbGPWBH66
Sent from my iPhone using TapatalkTempting, but it will still be slower than having the shop do it with a press. And I’ll likely never use the compressor again
On a different subject, some of my packages came in early so I’m going to try to wire up the camera and water sensor tomorrow so that I don’t have to worry about squeezing everything into one shop day. I’ll post up some pics when it’s done.
Honestly, if you plan on working on your vehicle pretty regularly, and have friends who could possibly benefit from using this compressor, I 1000% recommend it. Vs the sketchy rental compressors, these only take minutes to compress an OME HD spring, makes rebuilding the struts incredibly easy.
I had a shop do my front struts the first time around and they did it WRONG and it ended up nuking my assembly. I wish I had just done it myself the first time around. You can take your time and make sure everything's done right. It's really not hard and this compressor makes it so much safer.
-
2
-
-
2 hours ago, onespiritbrain said:
It looks like those little spacers are important... the new strut mounts I put in last time are now wallowed out. I locked the nut up top down as tight as was possible holding the shaft with channel locks but the rubber on the inside now spins around with the shaft. I cant tell if this is going to allow the whole thing to become dislodged again. Dang it..
NooooooooO! Check out post #90 and the ones that follow my build thread. I tried to spread the word more, but it didn't get to you
 Let me know if you have any questions, but you'll need to disassemble and rebuild your struts properly.
-
As an aside for those reading-
When you lift with a lift spring (OME, AC, etc) we put the spring into OEM spec struts. The strut limits the total length the assembly can be and therefore limits the total droop of your suspension.
When you lift with a spacer, the spacer goes on top of the strut assembly. Therefore the total length possible will be the strut length plus the spacer.
The CV axle has limits to the angle it can be at before it binds, on stock suspension that angle can't normally be reached. Typically with lift springs the strut length still isn't long enough to cause binding issues. If you have lift springs + spacer, or just a big spacer, then you're extending the length limit and could reach the binding angles when approaching your max droop.
That's one of the reasons why lift springs are different than lift spacers.
Correct me if I'm wrong, but this is my understanding.
-
4
-
-
2 minutes ago, bertrenolds said:
So 2" lift is max across the board, I keep reading people think ac springs are different than 2" spacers and put less stress/angle on halfshaft. 2" is 2", it will increase axel angle no matter what is how I feel. So you think my passenger halfshaft will be safe with a 1.5" spacer? I know a 2" spacer messes with the passenger side half shaft angle bad but not the drivers side for some weird reason.
There's additional suspension geometry to take into account.
-
2
-
-
I'd like to chime in and say that with a previous car the only way to shut up the alarm was to hit the unlock button on the fob. At the time I was only using the key so I tried everything I could think of, finally I replaced the battery in the fob and that worked like a charm.
-
1
-
-
1) Remove all the relevant fender liner screws to gain access to the backside of the fender/metal. (maybe only for front wheels)
There are a bunch of plastic tabs that snap the fender into the vehicle body. I've been told you could try to slide the fender (I think towards front of vehicle) to disengage and leave all the snaps in the body, but I couldn't get that to work.
2) Use a heat gun to warm up the backside of the plastic tabs, this'll hopefully help keep the tabs or your fender flare from breaking.
3) With slow, strong, even pressure, start at one end and pull away from the vehicle. They should pop out one by one. Once you get one out, you'll see how it's all attached.
4) I continued to warm everything up as I popped the fender flares off.
-
2
-
-
14 hours ago, hawairish said:16 hours ago, onespiritbrain said:
Is that spacer supposed to be visible from the engine bay when you take the rubber grommet off? What happens if the spacer is not installed??
The spacer isn't visible (not sure what rubber grummet you speak of). The pic is of the bottom of the spacer, so it gets installed when the strut is assembled. If the spacer isn't installed, the non-keyed portion of the strut shaft will eventually dig into the metal insert of the mount and eventually allow for 1/2" of vertical play, which may also wallow out the hole over time.

I think he's talking about this rubber grommet! I didn't know they existed, but found a set at the junkyard and threw them on my 3.3L. Keeps water out and stuff.
-
I recently pulled some mirrors off an R50 in the junkyard-
1) Remove door panel screws (
one in the pull handle, you'll also have to pull up on the elbow rest to get to two in there, then pull carefully on the door card.2) Pull open the plastic vapor barrier.
3) Unclip the power mirror wiring
4) Pop off the corner black plastic piece on the inside by the mirror
5) Remove the 3 bolts
and the mirror should fall off.
-
The 3.5 a significant jump over our 3.3 in terms of towing ability. I personally wouldn't tow just about anything with my 3.3 other than very very light loads.
-
2
-
-
3 hours ago, RainGoat said:
OEM struts have the spacer as part of the top hat. Most aftermarket strut sets have it as a separate spacer.
That's a perfect picture to illustrate this. @onespiritbrain If required, ensure this spacer IS INSTALLED. In my experience, all the aftermarket top hats have the spacer separate, where as OEM has it built in. Update us if you learn more, I'm just curious.
-
16 hours ago, onespiritbrain said:
I definitely did not install them correctly haha, I stripped the ever living frig out of the shaft threads on the first installation, then when I installed new springs it stripped completely and I made a stupid attempt to clean the threads with a die which apparently gave up the ghost right away, probably on the first drive but it all stayed together until I creamed a speed bump which dislodged the strut shaft.
That's literally exactly what I did... Shame on us, haha. Although I also assembled the strut incorrectly, and forgot the 1" metal spacer. Hopefully you did that correctly. The reason I ask is because I noticed that your upper strut top mount hole is oblong (similar to mine) from the threaded portion sawing away at it.
-
1
-
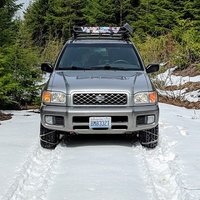
zakzackzachary's 2000 R50 new to PNW from AK
in 96-2004 R50 Pathfinders
Posted · Edited by zakzackzachary
Wow, I have NOT been updating this. My life has been insane lately so I've mostly been lurking. Not a whole lot has changed with the rig other than a new basket-light set-up. The rest has been maintenance and using it!
Met up with a bunch of the NPORA PNW guys and did an overnight near Mt. Adams-
After that little shindig I decided I wanted to change up the basket lights. I built some custom brackets for the side lights, and then swapped in some round front fogs. I always liked the "classic" round fog look. Wind noise is up, probably eats at my minimal MPG, but it's fun for now.
Went out with a buddy to play around in Tahuya ORV, about 20 min from my house. I've got lots of pics and vid, but I'm on a time crunch. I might add them later otherwise they're on my instagram @GrizzlyPath
I basically have a 1/4 mile driveway so once a week the Pathfinder is the Trashfinder-
Random-
Testing the light set-up. Pretty good floodage and I love the side/rear lights. I may need a spot for forward though. The trails get dark.
Always fun when you run into a stock one.
If you want more misc pics/vids definitely scroll through my Instagram. You don't need an account to view on a computer, unsure about on a phone - GrizzlyPath Instagram