

hawairish
-
Posts
2,684 -
Joined
-
Last visited
-
Days Won
318
Content Type
Profiles
Forums
Calendar
Posts posted by hawairish
-
-
The 2WD 3rd will physically fit all the same, but if the pinion flange is like how it used to be on trucks with the ABS sensor on the pinion snout, the flange will be about 3/4" longer than models with the ABS sensors at the drums. Though...I want to say some 2WDs (maybe the QX4?) had a CV-style driveshaft with a different bolt pattern. Pics would help confirm that.
All R50s have 33-spline. The 31/33 split applies to Frontiers. Xterras were all 33-spline...you can use a 3rd from a 00+ Xterra or Frontier as well. Same HG46 ratio.
-
 1
1
-
-
1 hour ago, alexg89 said:
I appreciate the open arms! lol
talk to me about this reverse cut stuff. ive never really understood it.
As for the differential itself, whats limiting me to sticking an xterra full front diff in place of this one?
You'll probably know it as "high pinion" (reverse cut) and "low pinion" (standard cut), much like the reference on Dana axles. The pinion line is either above or below the centerline of the ring gear. Rotation's all the same, but the teeth on the gears are cut in opposite directions.
R200A from an W/D21 or W/D22:
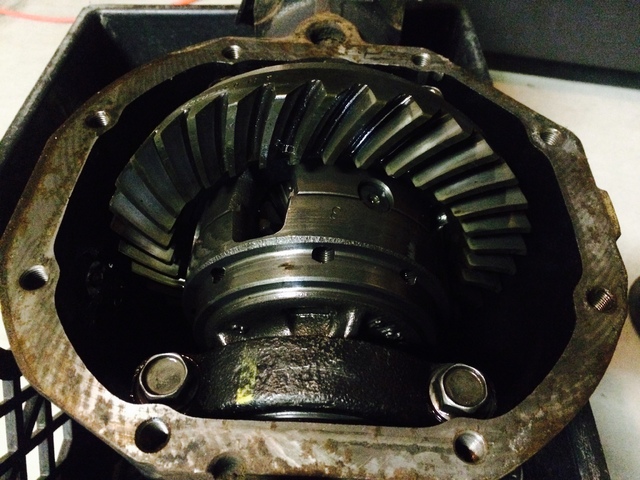
R50 R200A:
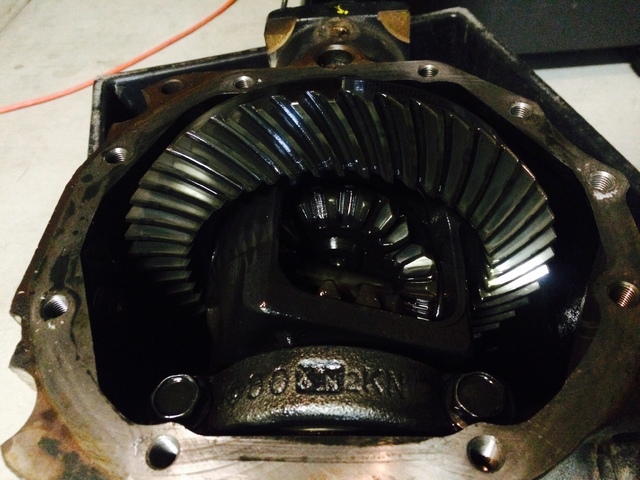
In general, high pinion is best up front, and low pinion best in the rear due to gear mesh. But fck Nissan for making the R50 the only high-pinion R200A application.
The short answer is they can't be (easily) swapped because they are mounted to the truck in completely different ways. The long answer:
-
I recognize that X from the Nissan SAS group. Welcome back.
All R50s are 33-spline...but the problem with 4.9s is that there isn't a set that fits the front axle. R50s have reverse cut gears up front in the R200A; W/D22 are standard cut. You're limited to 4.6s, and hopefully that's what you already have.
-
On 9/2/2025 at 4:21 PM, jaymzinsa said:
Any suggestions on what to go with the air intake?
A Lokka and 4.63 gears would go great with an air intake!
 (I'm your guy if you're interested!)
-
That's a head scratcher. Locking the hubs would cause more thing to spin. Unlocking the hubs would mean things aren't spinning, which makes it pretty hard for idle parts to cause vibrations.
-
On 9/3/2025 at 12:53 PM, system_f said:
It's been a minute, and I haven't been up to date on where your R50 was before the SAS. So anything done that isn’t pictured I am not aware of and it may make the comments seem redundant. I have a couple of questions and some comments.
1. Rear vibration you are experiencing. Did you do a hack and tap slip yoke on your rear driveshaft? That was the only way I could get rid of the rear vibration when I was 6" ++ lift.
2. Steering: Toe and Camber, you'll find the right settings.
I have two questions for you. These aren’t criticisms, I’m in no place to criticize this kind of work, but I am curious about your thought process?
1. What about side-to-side bracing, under the radiator support? Something to replace what the subframe did. This may be completely unnecessary, but what are your thoughts?
2. Strut tower bracing. Do you think the strut towers are strong enough? I know they were designed to handle the vehicle load, again, your thoughts.Now there's an old-timer name I recognize from the forums! caR50! Your truck surfaced here a few years ago with its new owner, if I recall correctly. Your old ARB front locker before your SAS got passed around, ended up in my truck pre-SAS, and is now in TowndawgR50s hand...an exchange for all his help on my project. Welcome back, man.
To answer your questions:
- The vibration was there long before the project. Honestly, I think one of the tires just needs to be re-balanced, but it could just as easily be from the 6" of lift and the pinion angle. I get a slight driveshaft rumble when coasting and decelerating still, but it's subtle (it used to be pretty bad). I will eventually be correcting a few things back there with longer upper and lower trailing arms. I do have a tapped output shaft on the t-case, plus a Calmini SYE on hand for whenever I get around to tackling things.
- Toe and camber...I hope so. I pulled the drag and tie-rod off over the weekend to get a feel if maybe the ball joints were too tight...but they seem ok. I was hoping to adjust the preload on them, but that didn't go well so left it alone.
No worries on any criticisms! They're accepted here, for sure, especially since I know you've done the work before.
- Crossmembers and other support in general was something I put a lot of thought into, and honestly, I think I need maybe one more support somewhere. One thing I considered was trying to square-up things up where the chassis rails meet the radiator support because of where the steering box was mounted...but the location of the box itself is what made it difficult. Eventually, when I do a bumper, it'll likely have an integrated skid that will reinforce the radiator mount. Though, the subframe didn't really add any support under the radiator, but it did stiffen things below the engine. That is something I would like to restore, but it'll have to be directly under the engine without interfering with the diff snout, and space is pretty limited. I'm considering two approaches, though...one that would be bolt-on using the motor mount perches. The other is one of those "in hindsight" things where I'd have to remove everything to do, but would be the best approach...I'm just not ready to take it all apart! Notably, during the design process, I really wanted to just to a simple support bar running from the upper panhard mount to the passenger rail, but there really wasn't a straightforward way to do that, so I instead opted to C-box the entire rail and put whatever I could in place to prevent any twisting from the leverage at the panhard. All said...I'm not sure how necessary all this is at this point, but I think I would like to have it eventually.
- I think the towers are strong enough, yes. But I have considered a strut tower brace a few times. My biggest problem is that space is such a premium on these trucks, and the passenger strut area eventually ended up being the most suitable place to mount my compressor and all my solenoids. The compressor mount already mounts using the strut tower, so I'd have to get really crafty to make it work. For now it'll have to suffice.
On 9/3/2025 at 5:51 PM, system_f said:As for your speed, the gears don't matter one bit, remember we are getting speed directly from the tone ring which is always spinning at wheel speed. Stock tire size is probably close to 720-740 RPM per mile and the speed will always be set to see "TONE RING TEETH" * (720 to 740) = pulses per minute at 60 MPH unless you can get into the ECU and change that in the firmware.
No matter what the gearing your speed will always be off "Stock tire size" + or - "new tire size".
Fck. You're right. I didn't even think about it like that...been so used to dealing with speedo sensors on my other Nissan and tire-gear corrections that I didn't even realize the disconnect here. Or hell, how I didn't realize that when I jumped to 4.63's long ago?
Well, now I know. Thank you for enlightening us!
So, I guess the good news is I've still accounted for performance from the engine's perspective, just not from the computer's perspective.
Custom tone rings with more teeth would've done the trick then, and I would've had everything apart at one point to change them (including the rear)...but that's extremely impractical now.
I guess I need to see what sort of inline module I can find or make to bump up the voltage on the signal then. OR, I could go back to stock tires!!
-
I'd be surprised is a manual hub is making noise, let alone causing any shudder. Those are hubs are either engaged or they're not...and to that extent, they're either working or they're broken. There's not really anything in between.
Rumbles at a speed range that tend to go away outside the range I almost always attribute to rear driveshaft. Bad u-joints, specifically, but in some cases, a shift in the u-joint at the yoke causing the driveshaft have some an imbalance caused by excessive run-out. But technically, any imbalance will do it.
...of course, if you have a transmission code, that's always suspect.
-
On 9/3/2025 at 2:47 PM, csprinkle said:
For P0420/P0430, has anyone tried the O2 spacer mod on the downstream sensor to trick the car into making the codes go away? I've seen a couple people online use an "O2 Sensor 90° Adapter" with an optional "Mini Catalytic Convertor" attachment.
Ha, I just did this the other week to pass emissions (it worked). But, a few things to know:
- I started with Dorman 42109. They're like a mile long and comically shiny for something you don't want to be visible, depending on where you are and how emissions are done (no concern for you since WA doesn't do emissions). However, the length is fine for the driver's side, but on the passenger side it'd be a tight fit because the sensor will be up against the transmission. I ended up not even opening the package and returned them.
- I used Dorman 42009, which are shorter and also a little on the shiny side. However, these need to be drilled out sufficiently to clear the sensor tip...
- Lastly, and perhaps the most important part: keep in mind these are sold as "spark plug de-foulers/non-foulers" and are not meant for O2 sensors. In my case, I realized that the O2 sensor on my passenger side has a tip that much larger than the sensor on my driver side. So even after drilling them out, it would not fit on the passenger side without compromising the threads of the adapter. If you go this direction and the O2 sensor tip is too big, this approach likely won't work. A 90° might be okay and clear the passenger side.
-
1
-
A few years ago, I briefly had a 00 Frontier with the pop-up sunroof. I think I recall that it was the same as the W/D21 and WD22 X units. I realized it also shared parts with the T-top panels from Z cars, including the twisty things, which were broken on my cover.
If you do decide to keep/repair things, try Amayama for parts. They appear to have new gasket (73873-15F05) and seal (73872-01M05) available, and if the cover clip part on the glass is just glued on and is broken some other way (can't tell in the pics), I suspect 73565-03P00 might be what you're looking for. The twisty part I needed was 73556-16P00, but I don't recall what color it ended up being.
Had to take a guess on your exact body code using WHYD21 (your specific body code is on your VIN plate somewhere, but should be all the same): https://www.amayama.com/en/genuine-catalogs/epc/nissan-japan/terrano/whyd21/5415-vg30e/body/H7301
But I get not wanting to keep it, especially if a rack would prevent operation. Some sort of overhead box or mount would be cool, though.
-
Alright, got it through emissions and re-registered! Only 8 months late...
Last night I installed a non-fouler on the downstream driver's O2 sensor and it seemed to do the trick. Not only did the P0430 not move to stored to screw up my day, but it's also no longer in pending.
Steering was a little more squirrelly today. I need to get to the bottom of that. But otherwise, the truck is operational. Hoping to do a shakedown run soon.
-
2
-
-
It's as good a guess as any, so I'll take it.
I think it's an average, too. I don't think my scanner has very granular data units, and I suspect it's programmed to do its own conversion of voltage to speed based on "Nissan" vehicles that's slightly different from the speedometer. It's reasonably close, but I trust the speedometer more than the scanner. It's just useful to confirm that the wheel sensors are functioning.
The FSM shows no other data inputs to the ABS system beyond the wheel sensors and the G-sensor, unless I had the all-mode setup or VDC. VDC-equipped trucks do use CANbus. But otherwise seems very clear cut in descriptions, diagrams, and schematics. Single wire feed from the ABS unit to the gauge cluster.
A speedo calibration box is basically what I need to find and just put it on that wire. But still, the total offset I'm seeing just doesn't make sense.
-
Took the truck for about a 45-mile drive on Saturday to get it emissions-ready...and it's ready. The day didn't go as planned in terms of driving it and taking it straight to emissions, and annoyingly, when I got home I saw that there's a pending P0430 code. I can still get it tested in that state, but I'm screwed if the code becomes "stored". Fingers crossed I can get it through emissions before it stores.
Overall, the truck did well! Got it up to 75mph without the axle falling off (there's still a vibration from the rear that was there before the SAS). It still wanted to wander a tiny amount, but manageable. The toe is dialed in, but the caster may still need some dialing in. Steering is still a little on the heavy side, even after removing the stabilizer. I may need to explore options for a smaller pump pulley, perhaps. Brakes work great. Acceleration seems to suck, but I feel like I was facing some issues before the swap. During the project, I had swapped out the radiator...the truck ran nicely right at 185°F the entire trip, no overheating...which was an issue before the project.
I tried to find some dirt near the end of my drive, but the little spot in the desert I was planning to check out has since been gated off. I had to settle for some gravel under an overpass. Gears, lockers, and sway bar disconnect working just fine. No real articulation test, and being so close to the road couldn't really kick up any dust. Once it's through emissions and re-registered, I'll do a shakedown.
The only thing that is completely baffling me right now is the speedometer. It's way off, and in the wrong direction...it reads slower than actual. I'm expecting it to read about 5% faster than actual, but somehow it's about 8% slower than actual...which makes absolutely no sense.
I've confirmed (as I already knew before) that the speedometer gets a voltage signal directly from the ABS control unit based on the wheel sensors. There is not a mechanical or electrical speedo pinion on my t-case like there was on older/other Nissans with the TX10/A. There is a VSS turbine sensor on the transmission, but everything in the FSM says the signals come from the ABS system. My OBDII scanner displays live data and all 4 sensors were reading in unison when expected (the rear tone rings being my control data), but interestingly, there is a VSS data point that also seems to read the same.
Notably, the wheel sensor speeds were all about 6% slower than the speedometer, which was about 8% slower than actual as measured with GPS (via my iPhone which is spot on in my other newer vehicles in stock form). In real numbers, we're talking like 52 mph on the sensors, 55 mph on the speedometer, and 59 mph via GPS. It makes for a delicate balance when the speed limit is 55, I need to be positively in the 53-60 mph range for several minutes, and not get busted for speeding in a truck with expired tags (though technically, I got a 3-day restricted use permit to do this drive), without pissing off other drivers.
But anyway, it just doesn't make sense. I've crunched the numbers on this multiple times...I have a full blown spreadsheet that handles all my what-ifs and calculations. My tires are about 13% larger than stock (32.7" vs 29.1") and my gears are 17.4% lower (4.363 vs 5.125)...so I'm expectedly over geared by 4-5%, not under geared by 8%. The truck seems to behave like it's over geared in terms of acceleration, but I'm trying to figure out why the speedometer is so far off. Even if I can re-index the needle on the cluster, the input signal is still what's ultimately too low. There's not really a good way to boost the voltage signal up, but I'm all ears if there's any EEs in the crowd.
-
I tend to stick with NGK, as far as brands go. Nissan OEM, tried and true. As far as which flavor...the cost-to-mileage ratio used to be fairly linear, but it's gotten diluted as the cheaper plugs have just become overpriced and rival better-performing plugs. In you case, going with those ruthenium ones you linked at $11/ea beats paying $10/ea for the OE-recommended double platinum ones (p/n 6240, a.k.a. PLFR5A-11) because you'll basically have a plug that far exceeds platinum tech in every way, including not having to replace them for another 100K-120K miles (vs. 50K-60K). Ultimately, I'd love for you to keep that engine running up toward 400K!
Hose and jet sprayer probably isn't terrible. Otherwise, get a can/bottle of engine degreaser, head to the local spray-n-wash, spray the degreaser on and let it sit a couple minutes, then wash it off. Of course, a lot of spray-n-wash places have built in engine degreaser modes, plus a reduced spray for underhood use...but I like to go full blast.
-
1
-
-
Replacement on packs and plugs entirely depends on what sort of age, mileage, or wear they've experienced. Usually can't go wrong changing the plugs, especially if you don't know when they were last changed. Coil packs...usually not a need to replace them unless there's a problem (they're not usually cheap items x 6).
How are the belts? Oil change?
Power washing the engine and underneath after all is said and done wouldn't be a terrible thing either.
-
The hub should already contain what little grease it needs, and you don't want to pack it with grease like you might expect. A light amount is all that's needed to help it disengage.
R50s came with drive flanges (fixed flanges) instead of auto hubs. Pry the cap off to access the snap ring, remove it, then it should come off easily by undoing the 6 nuts. Those hubs come with a paper gasket, but don't use a large o-ring like the drive flanges and other hubs do. You can put a little grease on the boss if you'd like to help keep a little moisture out.
-
5 hours ago, r50loverPR said:
So I reconnected everything and found the leak was coming from one of the hoses. I replaced them and then found that the nozzles are also super clogged up, I tried a pin, using an old hose and sucking whatever is in there out and nothing. So I guess I'll try and find some at a junkyard or ordering a universal one somewhere.
Soak them in some vinegar for a bit or diluted CLR. I went with cheap replacements off Amazon on my other truck.
-
1
-
-
No need to take out the headlight. The bottle is two parts: the body and neck. The next is attached besides the headlight using a 10mm nut. The neck just seals into the body and has an o-ring on it. The nuts that hold the body (also 10mm) are pretty accessible from underneath/behind the bumper cover. The washer pumps just press into the opening.
If the hole is at the bottom, you might not need to remove anything. Not sure how you plan to patch it, but I recently patched mine using a 2-part Gorilla Glue epoxy. I accidentally cracked it at the corner. Despite it not being recommended for it due to the plastic type, it seems to have held on well enough so far. I just made sure to scuff and clean the area well enough and applied a generous amount. Heat from the cure didn't seem to be a problem.
-
1
-
-
$2600. Wow.
Honestly, I wouldn't neglect it. What they're quoting isn't reflective of the effort required. If you're a socket-and-wrench mechanic, that's all that job requires. Parts and materials (valve cover gasket kit, manifold gasket kit, tube of RTV, splash of coolant) probably won't even run you $100, and the job needs little more than 10mm and 12mm sockets. You don't even need to do the idle relearn like us 2003-04 owners. Besides, might even address your other codes.
I didn't mention anything about your vibration issues. If it's at idle, I suspect your motor mounts are toast. Now, changing those is not a fun job.
-
1
-
-
Thank you!
Yeah, now that the SAS is nearly finished, it's time to start thinking about bumpers again. Sold off the others before the project. Going with a plate design this time around, and I may have some flat space that needs to be broken up a little for breathability. Thinking triple-slot may be the way to go.
-
1
-
-
I've considered changing out the speakers in mine a couple times, but bypassing the amp is just not something I've wanted to bother with, let alone bypassing it with another amp (and I've been sitting on a nice 5-channel for a while). I don't think it'd be difficult at all, and the HU amp is probably sufficient, but I've also never minded the Bose setup. Knock-on-wood it still sounds decent enough after 20 years. Finding other speakers to fit the low impedance of the Bose amps has also not yielded anything worthwhile.
I have replaced my HU with a couple Pioneer units over time, each time having some sort of "amplifier interface adapter" to put some gain into the signal to suit the Bose amps. I tried it once without it and the audio level is too lower (I even tried putting the Bose HU in my Frontier for fun...volume level was also questionable). I first used a Scosche unit (OEA4) and now a PAC unit (ROEM-NIS2). Sound quality isn't mind blowing, but isn't terrible either, so I stuck with the Bose amps and speakers.
-
14 hours ago, Slartibartfast said:
The later service manuals waste a lot of space telling you what buttons to press on the special Consult scanner that you don't have, but there's usually real diagrams/troubleshooting if you scroll down a little.
Oh man, the newer-newer style of FSMs around that 2005 point went straight to trash. They used to be maybe 20 decently-defined chapters, but now there are like 40-50 chapters and they cover the dumbest micro-topics and just have you bouncing around from one chapter to another. Reason #328 I'll never buy a Nissan newer than 2004.
-
Yep, 28 splines. That SKP part will be a 28-spline unit if it cross-references with the 98-04 Frontier and 00-04 Xterra.
He should have the part-time 4wd system (stick) if it's an SE. I think the benefits are mixed...my MPG has been crap for a long time, but I'll take any improvement I can get.
I recently dug into that whole all-mode w/ hubs scenario (I'd seen the post above and didn't really dig into it at the time) and I think I also reached the conclusion that the system doesn't care. The whole fluid pumping doesn't even occur unless it's in Auto or 4wd anyway, if I recall. I can't seem to find where I typed my notes up.
-
Howdy.
If you're not familiar with the Factory Service Manual, they can be extremely helpful: https://www.nicoclub.com/nissan-service-manuals. Recommend to download each PDF for your model year (there's a download link below the inset PDF viewer). The General Information (GI) is a great starting point for how to read diagrams, wire colors, harnesses, etc.
You'll want the Automatic Transmission (AT) chapter for the P0740: https://www.nicoclub.com/service-manual?fsm=Pathfinder%2F2002%2Fat.pdf
You'll want the Engine Control (EC) chapter for the others: https://www.nicoclub.com/service-manual?fsm=Pathfinder%2F2002%2Fec.pdf
For the P0740, ignore the "Starter Signal Circuit" part of what your code scanner is giving. The code is for the torque converter clutch signal. You won't notice anything different for gears 1-3, as this applies to the transmission being able to lock up the torque converter while in 4th gear after the transmission has warmed up. Either the valve's not functioning, or the circuit from the transmission control module (TCM) to the solenoid is open. Lowest hanging fruit is checking the harness under the truck on the passenger side; should be a small heat shield to remove and also checking one of the wires for ground continuity. The solenoid requires some work to access from underneath the transmission with the pan off, so taking it to a shop depends on much you're willing to take apart.
P0420 and P0430 are the same codes, one for each side/bank of the engine. It's unlikely that sensors on both sides and/or catalytic converters have crapped out at the same time, but because you're throwing both codes, there's something in common between bank 1 (cylinders 1, 3, 5 on passenger side) and bank 2 (cylinders 2, 4, 6 on driver side). Possibly a leak somewhere along the intake (i.e., anywhere between the MAF, along the intake plenums, down to the fuel injector rail and intake manifold atop the engine), which changes the air metering the engine expects to burn. There are metal gaskets at every connection; maybe there's a leak. Could also be coil pack(s) related, but again, it's likely something in common...one bad coil pack might only trigger one of the codes, but not both. Last time I was chasing those codes (P0430), it was due to ill-fitting fuel injector o-rings when I serviced them. It was a frustrating process to figure it out, eventually discovered using a smoke machine to detect the leak.
Lastly, the oil leak. Does seem likely valve covers. I think the gaskets tend to leak at the front corners of them, near the 1 and 2 cylinder coil packs. They do require RTV sealant in those spots and it wouldn't surprise me if it's time to re-seal those spots, particularly if it's not been done within those 277K. If you're planning to investigate the P0420/P0430 issues on the engines top end, it's a good excuse to tackle the valve covers when you get things pulled off anyway. The Engine Mechanical (EM) chapter is your friend here with all the torque specs and bolt tightening orders. https://www.nicoclub.com/service-manual?fsm=Pathfinder%2F2002%2Fem.pdf. Page EM-38 shows the points where RTV needs to be applied on each gasket. Overall job will take a few hours. Not a fun job, but also not too difficult.
-
1
-
-
Can someone tell me the dimensions of the triple grille slots on their hood, please? Looking for:
- Width of a slot
- Height of a slot
- Total width across all 3 slots (i.e., outer-outer including metal gaps)
-
1
1997 Pathfinder 4x4 Rear Differential swap
in 96-2004 R50 Pathfinders
Posted
Not limited to 00+. The trucks that had it were 2WD...but maybe some really old W/D21 4WD before 4-wheel ABS systems came into play. For sure, that setup has existed for a long time. My 98 2wd Frontier had it with the H190 axle, and now that I have an H233B in it, I used an older Hardbody diff to retain the system.
Stated differently, it won't matter if the diff has it in your case. It won't get used, and you won't need to remove it. But the flange protrudes a little farther than the non-ABS version because it has more components to work it, but the bolt pattern is the same (I overlooked you said it was from a Frontier). You can't move your flange to housing because it won't clear the snout due to bolt holes that mount the sensor flange. The longer flange means you need to confirm that your driveshaft doesn't bottom out in the t-case when the rear suspension is fully compressed.
Parts look like this: