

iceageg
-
Posts
45 -
Joined
-
Last visited
Content Type
Profiles
Forums
Calendar
Posts posted by iceageg
-
-
The wood is simply the skeleton that the fiberglass forms around. While I did try to build it as stout as practical, the fiberglass itself adds tremendous strength to the whole assembly. For comparison, speaker boxes are often made with only a base and 3 sides with slender dowels holding up wooden rings. Fleece and fiberglass is layed to make the side(s) of the box that you can see. The rings then hold up competition quality speakers that can easily weigh 50lbs each and create a tremendous vibration.
As for the fiberglass itself . . . yes it is messy and time consuming. In the end though I will have something I created myself. However, if you can find me a center console for a 92 Pathy that won't fall apart like all of the others I've found in Denver that includes two built in concealed holsters I might scrap my project and buy it.
-
In Tungsten's defence it does look like @!*%. Time put into making it look pretty at this stage of the build is time wasted. The fleece all gets covered up and sanded over. I would be stupid to waste time making it attractive at this stage.
I did consider cup holders but a larger general purpose compartment and twin built in holsers was the order for this project. I like the idea of adding a power outlet though . . . hmmmmm.
As for the condition of the existing console, it is missing from the parking brake back. The PO told us it was smashed beyond recognition and no longer has the pieces. I am stuck with finding one or making one. I think my choice is clear.
-
One last hint to see if there are any gearheads out there with as warped an "outside the box" way of thinking that I do. The design of the supercharger system in the picture is a normalizer. In general this type of system has a very different set of benefits and drawbacks compared to traditional turbo/super charging systems. Other than the reason for the single throttle body/six intake runners, the rest of the remaining answers are related to the concept fo normalizng.
Or let it go dead and I will eventually share the ansers. But its more fun to try.
-
Finally posted some of my progress on the center console. Things are crazy busy with my other projects so this has taken a "as time allows" seat for the moment. MMy better 95% wants her console though. We all know that if mama ain't happy, ain't nobody happy!
-
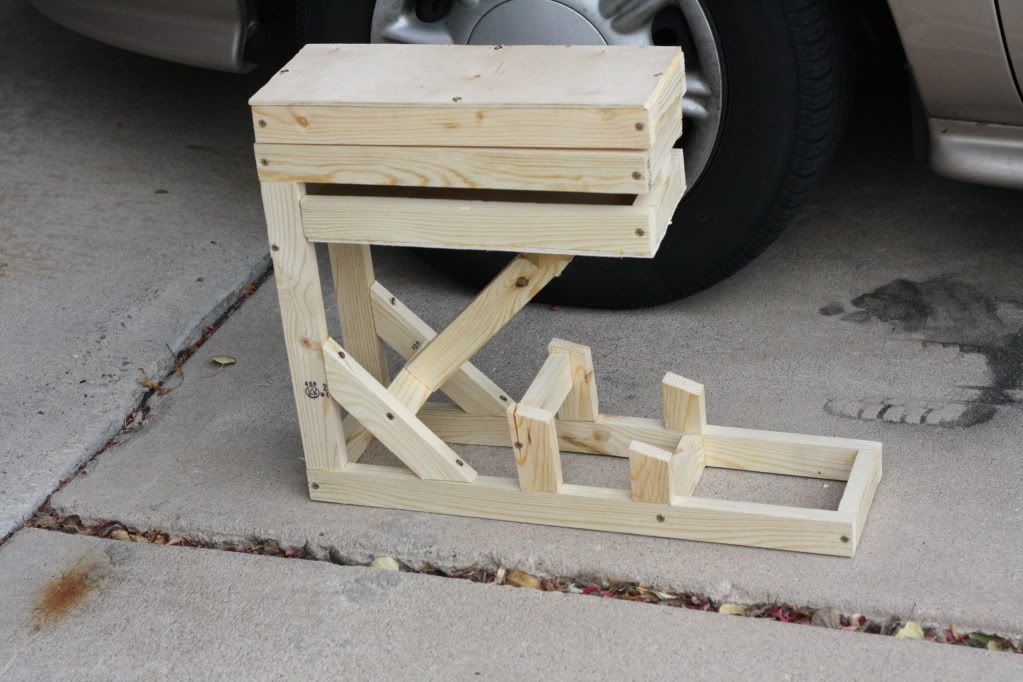
When we purchased our '92 Pathy there were a number of known issues that we are fixing as time and funds allow. One of those was a smashed center console. After checking several scrap yards in the area and visiting a few part outs it became aparent that every used center console available had been smashed in a similar manner to our own. I decided to make one from scratch using the same techniques that I have used to make speaker boxes in the past.
Mats:
Wood for skeleton (I used .75"x1.5"x8' but thinner material would work)
Wood glue for skeleton
Screws/brads/nails to assemble skeleton
Drill/screw driver/hammer
Fleece to support skin
Optional chicken wire or similar material to form interior pockets if desired
Staple gun & staples
Fiberglass sheets
Fiberglass resin
Cups for mixing resin
Brushs to apply resin
Body filler (if you intend to paint)
Multiple grits of sand paper (if you intend to paint)
Paint (if you intend to paint)
Vinyl (if you want the leather look)
Carpet (if you want to cover on the cheap without painting)
Spray adhesive (if you don't paint)
The basic techniques for this can be found in hundreds of places online so I will not detail every nuance of how to operate a saw, stapler, brush, sand paper, paint can, fiber glass, carpet or vinyl. When I am finished I will come back and post links to good resources for those if desired. For now I will simply post a few pics of my progress and update the first post as updates are available. I have limited bandwidth in my life so am seldom able to start a project and finish it as rapidly as humanly possible.
Planning:
Spend some time at the start to envision your final product. Now is the time to decide on any special features your existing console did not have. For instance, the small recess under the parking break that could serve as a small dish for coins or a garage door opener is absolute crap. It is not deep enough and the sides are sloped so anything in that dish goes flying under the seat when going around a corner. The one I designed has strait sides, is deeper, and extends farther forward towards the gear shift than the original. I have also accounted for a built in holser on either side, a small hidden compartment and a pocket facing the rear seat, but those are details for later. For now decide what features you want and envision them in the car. Measure the space you have and verify that your plan will work. Modify as needed and measure again. Make sure you write down all of those dimensions and ensure that the measurements add up. I used a CAD program to make 2D scematics but paper and pencil have always served me well in the past. This diagram will allow you to figure out how much of what material you will need for your build.
Assemble skeleton:
Now that you have your diagram and aquired the materials you need it is time to start assembly. Brads are often used for assembling the skeletons of speaker boxes but I used screws. You will want to predrill the holes for the screws to avoid splitting the thin lumber. The fiberglass provides most of the strength but every little bit helps. You will see some triangle gussets in my design for this reason. Depending on the fit/finish you are looking for you could run the exposed edges through a router after the glue dries to round the corners. I did not elect to do this myself.
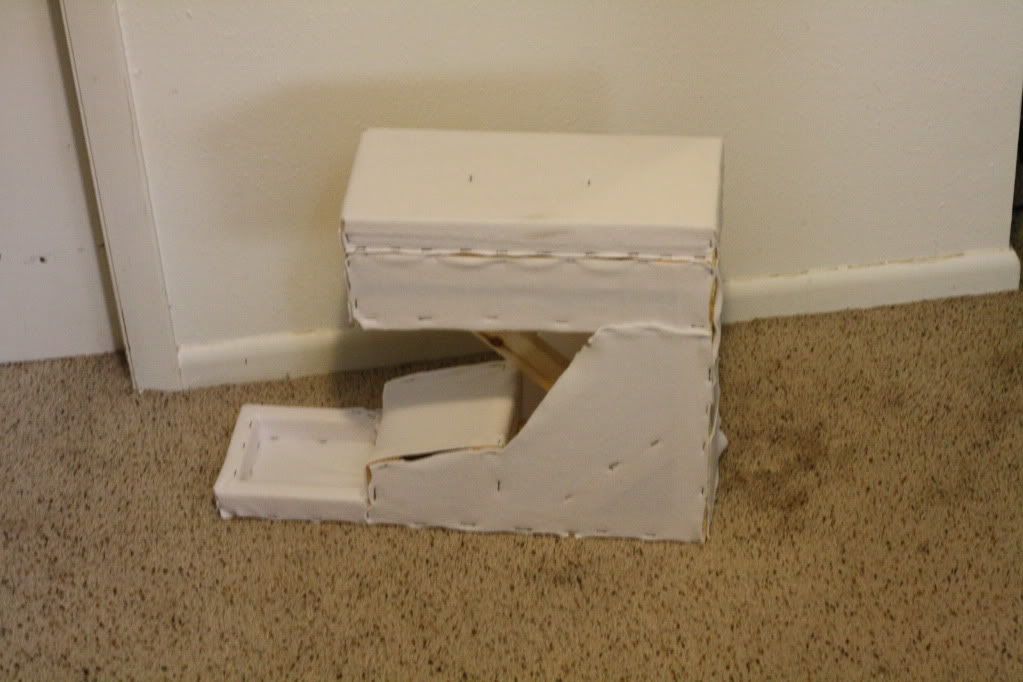
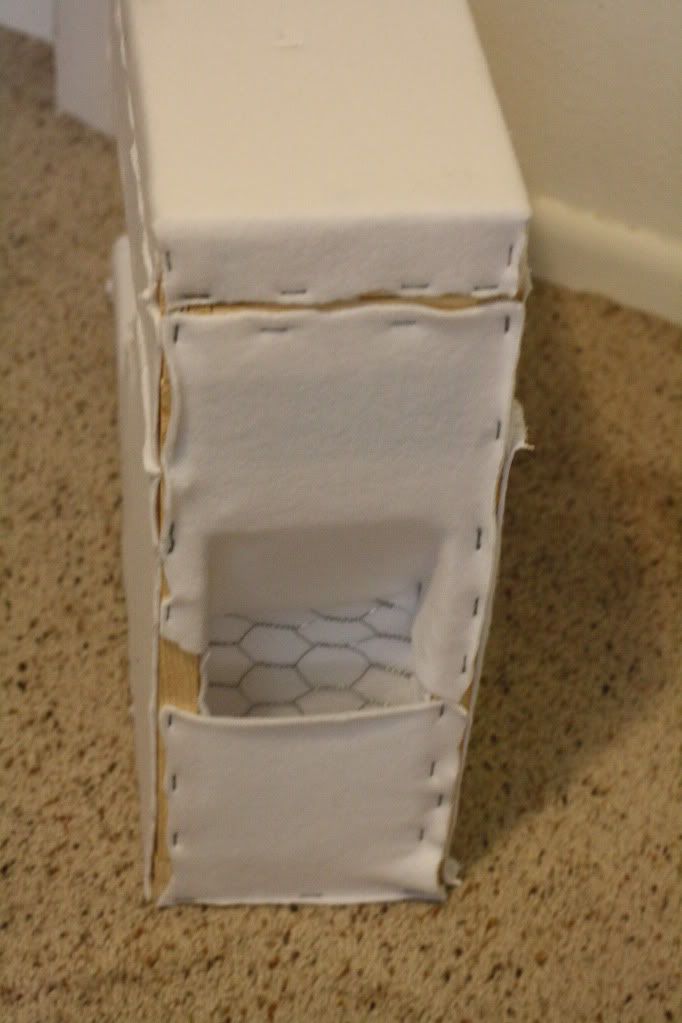
Fleece inner skin:
Once the glue has had a chance to set overnight you can apply the fleece that will provide the shape for the fiberglass. Use the staple gun to attach the fleece to the frame and pull it snug around all of your formed surfaces. If you have done speaker boxes with this technique before you will be frustrated by the number of interior folds and cutting you need to do at each corner. Fortunately, the fiberglass and body filler will cover up any blemishes so this step does not need to be aesthetically perfect. For the rear facing pocket I used chicken wire to for the pocket then wrapped the wire in fleece. The wire/fleece assembly was then stapled in place and will be glassed over. This would likely be much easier without the outer pocket skin in place but I am going to try it with the outer fleece already in place. After the fiberglass skin is complete I will cut out the slot for the parking break. I already know that the arm rest/compartment will be overly large and be partially in the way of the parking break but I already understand that and am ok with it. Of note, in my build I already know I will need to cut the side fabric down to improve access to the internal holsters. This will require me to create and attach the holsers prior to glassing the outer skin. I will provide details about creating the holsers as well once they are complete.
I currently have several projects competing for my time. I appologize in advance to those who are hoping for more rapid progress but I assure you I am using every available moment to get this done.
-
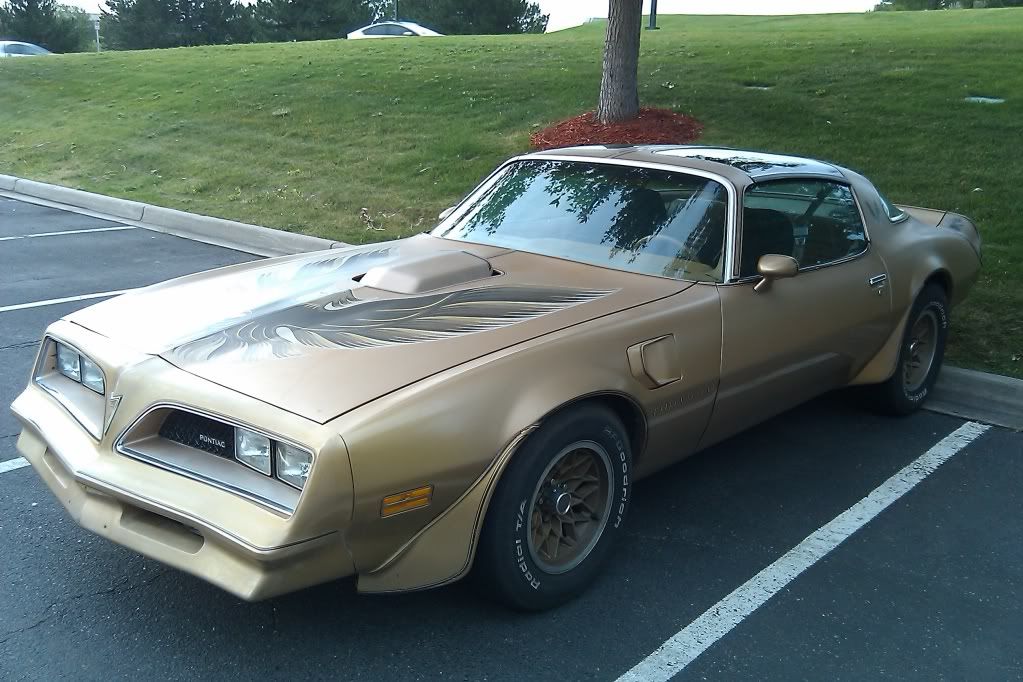
1978 Pontiac Trans Am (Y88) Gold Edition
Olds 403 bored .040 over. Balanced/blueprinted. Forged internals. Aftermarket H/O Racing Specialties turbo. Edelbrock performer intake manifold. Crane cam .471/.520 with fairly long duration and enough overlap to sound lopey.
Turbo 350 3 speed. 2500rpm stall and a shift kit that will rattle your teeth.
Otherwise she is bone stock #'s matching. 95% of the work was done within 5000 miles of rolling off the showroom floor. My uncle bought it new and I am the third member of the family to own it. Now that I think about it . . . I have had it longer than the other two put together. 104,XXX miles and still starts every time.
-
Nunya,
Yes, that is the tailpipe you see exiting in front of the rear wheel. The PO removed the muffler and his solution to getting the emissions tested was to weld that monstrosity on. Even worse than the location is the way it is attached. Eventually it will be replaced. The truck runs and there are things that are more irritating than the placement of the exhaust. No center console is one, power steering leak is another. Still need to fix the lock timer too. Too many projects.
Dowser,
I have been taking pictures as I go. I will put a build thread together when there is more to show.
-
Last weekend I got my my custom center console drafted in CAD and put my materials list together. Yesterday I got the skeleton assembled. Today I will try to get the moulds for the skin assembled and on the skeleton. Pics and build thread to follow.
-

Pics?
Sorry about the delay. Populate photobucket usually isn't very high on my list of things to do. Here she is . . .
Also, I started on the custom center console last weekend. Got it all rough drafted in CAD and yesterday I got the skeleton assembled. Today I will start the forms for the skin.
-
Discovered power stearing leak. Need to locate the source. Gave her her first full exterior wash/wax/tire/wheel spa treatment. Found out the power door locks work intermitently. Found out the rear washer fluid pump does not work. Hurray for successful forum searches. Liking this group more and more.
-
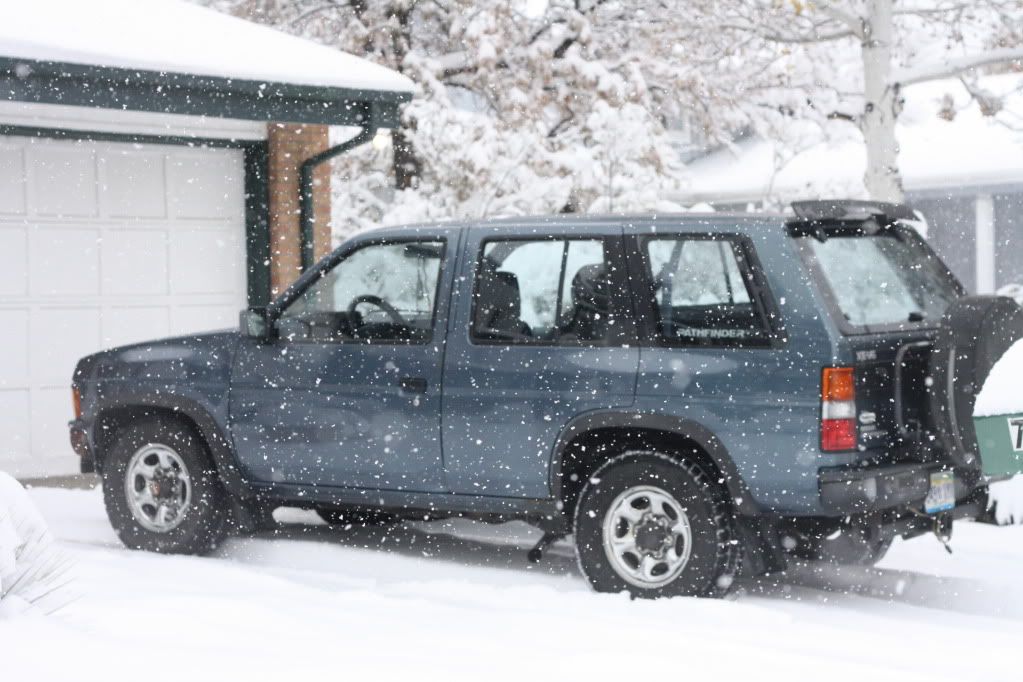
She just got her first full exterior bath yesterday. Interior detail is scheduled for today. She's not a beauty queen but looking much better now. Will take some pics soon. Supposed to get snow tomorrow. Might make for some good photo ops.
I was looking at/making plans for the custom center console the other day. Judging by the near impossible to find nature of intact factory units I am now planning on making a few of them. Not sure if there is much demand for 92' rear half consoles but it wouldn't be all that hard to make 5 at once instead of 2 or 3. Have the plans in my head. Just need to put them down on paper and get started. Food for though.
-
Well the intake manifold splitting to each of the six cylinders is the equivalent of the intake runners on our FI engines. D and or C could also be controlling a fuel pressure regulator. The airplane is a Cirrus SR22 (given away by the image file name), the powerplant is the Continental IO-550, the blower is made by vortech (V-1 S-Trim). A better picture or maybe a couple more angles would be nice to get a feel for the interaction of the components.
I had to edit the hint in the previous post. C had nothing to do with the fuel system, I was thinking about the D parts. Fail on my part. C is a specific type of BOV as already answered. D is certainly fuel related, but has no association with D other than they both reference manifold pressure (taken from differen places in the duct work).
The split intake manifold is similar to the runners in the FI engines, just taken to the next level. The runners are each designed to be an exact length. The idea is to get a single throttle body to perform similar to ITBs with velocity stacks. Since aircraft engines are usually run at a single RPM for 90%+ of their life it is easier and more practical invest the time in tuning the intake. The result sort of looks like equal-length headers on an intake.
The blower itself is based very closely on a Vortech V-1. The produce that exact unit for us, to our specs. That exact blower is not in their catalog. It is an SR-22 with an IO-550-N engine. Bonus question answered. Still lots of "outside the box" stuff to identify. Keep up the good work.
-
why does E split 4 different ways? What is the little spider looking thing right next to it?
I figured jeep because of the curved hood on the sides.
Actually, it splits 6 different ways, and "why" is the detail that I am hoping somebody will guess at and eventually get right. The little spider looking thing splits fuel from the one incoming fuel line out to the six fuel injectors. Old school mechanical fuel injection system. Still very high tech by aviation standards.
-
How can you think this game is too hard. You got almost all of the basic questions correct. Its not supposed to be easy. Its supposed to challenge how you think those parts should work and work with eachother. And no, subjecting any of those parts to impact with a duck will provoke a very negative response to their operation. Especially those labeled "C".
Bonus question + Correct - It is an airplane, but you can provide a lot better detail than that.
*hint on C* think ambient.
-
A - Supercharger
B - Boost Controller
C - BOV
D - Manifold pressure line for boost controller
E - Intake manifold
F - Air box
A = Correct, not much more to say about it.
B = Correct, but not like any you've seen before. More details anybody?
C = Correct, but a very unique one. More details anybody?
D = Incorrect. It is a manifold pressure line but it has nothing to do with the boost controller.
E = Correct, but with a very unique design. More detials anybody?
F = Correct, but the shape is very purposeful. More details anybody?
No, it is not a Wrangler. Not a Jeep at all in fact. Not quite over in 1. Lots more detail still available. Let the game continue!
-
I just bought my first Pathy and I'm new to the forum. I started a welcome thread with more details so I won't go into much about that here. While not related to Pathfinders or Nissans, I do have a gearhead game of name that part to offer. Check out the image below and identify the parts. Be as specific as you can and describe the purpose of each if possible. Bonus points if you can identify what the parts are on. If you have read my welcome thread it shouldn't be difficult to figure that part out, but some of the parts themselves should still be a challenge to explain in detail. I'll keep a running tab of which parts have been identified. No, points won't be kept track of and aren't redeemable for anything. Just for fun.
Silverton, no getting the answers from another forum and cheating . . .
So far . . .
A = Correct, not much more to say about it.
B = Correct, but not like any you've seen before. More details anybody?
C = Correct, but a very unique one. More details anybody?
D = Incorrect. It is a manifold pressure line but it has nothing to do with the boost controller.
E = Correct, but with a very unique design. More detials anybody?
F = Correct, but the shape is very purposeful. More details anybody?
-
Dowser,
Thanks a bunch for those references. I'll surely be looking them up. I've scoured the archives of a few online forums. If the search engine works fairly well I should be necro-threading in no time. If I manage to make a functional center console I will try to document it well enough for others to duplicate. Rest assured that any supercharge development I manage to pull off will be documented and rendered in CAD for duplication.
r
Nunya,
I'll dig around and try to find any info they may have posted about the Jeep console. I thought some about trying to get something else to fit but I'm sort of looking forward to the custom thing at this point. Besides, it will be good for the kids to learn about fiberglass and we are starting to outsource some composite work at the airport now, so more knowledge/practice for me can only help on that front too.
Trog,
I havn't ever had a reason to head up to Creede, but I have traveled 160 more than my share of times. Pretty country down there. If your step dad works at Centennial airport he likely knows who we are even if he doesn't know us directly. Ask if he knows Forced Aeromotive. I would encourage everybody else to check us out too. Not much that applies here, but seriously cool gearhead stuff to be sure.
-
Howdy Ian and welcome to NPORA!!
Thanks for the intro, it's always good to 'meet' people. Working on planes sounds like fun. What type of CAD do you specialize in?? Professional curiosity is all as I'm a machinist who currently dabbles in AutoCAD and SolidWerks but not on a serious level, just as a work tool when needed.
B
Thanks B,
I am a long time MicroStation superuser/developer, with some AutoCAD and TurboCAD experience. Have dabled in Pro-E. Have never had a chance to use SolidWorks for some reason, but would like to. I have done lots of cartographic work, parts design (much of which has been delivered to machine and sheet metal shops) and now work for a rail company.
-
Greetings from Denver. Last week I purchased a 92 XE-V6 manual. Silverton (a fellow member of another online club) pointed me at this community and BAM! . . . here I am. Me? CAD manager by trade and currently employed in that capacity as my 9-5. The family buisness is aircraft parts and maintenance, mostly custom. We have a patent and several certified parts for a number of light aircraft (Cessna, Cirrus, Mooney, Diamond, etc.) Our specialty, custom supercharger kits. We're the only people determined/dumb enough to go to the effort of certifying this type of system in aviation.
As for my Pathy . . . former mechanic's car. 215k with all new front end (timing belt, water pump seals) with damage to the front bumper and some rust starting in the typical places. She will never be a beauty queen but she runs great, heat works and that's all I required from this purchase. I have already made a few trips to the wrecking yard and to a few local part-outs for corner lights, rear glass hinges, armrests, window switches and that sort of stuff. Biggest problem right now is finding a center consol for a manual that isn't completely busted to $h!t. At this point it looks like I am going fab one out of fiberglass and a wood frame like I would a speakerbox. I'll make sure to take pics and post a thread about when I get there. Otherwise she is just going to be maintained and taken care of. No plans for building her into anything more capable than she already is. I will try to find a way to put a supercharger on her though . . . can't bring myself to look under the hood of anything and not try.
Anyway, I am happy to help with CAD work, some fabrication or an extra set of hands when I can. Depending on what's in the hangar at the time I have some excellent shop space too. A must have for working on anything during a rocky mountain winter. I look forward to getting to know the group.
Ian
Custom Center Console
in 90-95 WD21 Pathfinders
Posted
As somebody who makes his living off of the production of aftermarket parts, OEM nazis don't bother me in the least. And I am quite sure my wife is more eager to see the final result as well.