

Mr.510
-
Posts
1,920 -
Joined
-
Last visited
-
Days Won
9
Content Type
Profiles
Forums
Calendar
Posts posted by Mr.510
-
-
I replaced the connector for my cylinder head temp sender. Then pressure washed the mud out of the RR fender well and tightened all the clamps on the filler and vent hoses. A small amount of water has been getting in since a chunk of tree ripped the plastic guard thing out on a wheeling trip. I got another guard/cover and will bolt as well as glue it in tomorrow with silicone so it's not so easy to rip out next time.

-
The bushings in the trailing arms are only 'connected' in the center part so they can twist farther before binding. Filling them is probably fine on a truck that's only run on the street. On a wheeler doing that will limit suspension travel and apply more torsional load to the trailing arm itself as well as the brackets.
-
My '88 SEV6 was almost mint condition with 252k miles when I bought it. It had a blown head gasket and the knuckleheads let it fill a couple cylinders with water and rust solid. I paid $900 for it and was into it about $1500 when it hit the road with a good used VG30.
-
 1
1
-
-
No, generally, just let it stuff and rub. The inner lip of the fender can be massaged so it doesn't create a hang up point or threaten to cut the tire. But otherwise, let it rub!
^ This.
fskc that I don't want my paint rubbing off starting rust issues.
If you wheel your truck frequently enough the tire will also rub the rust off!
My 33" KOs stuff hard into the inner fender at full compression and there's no paint left. My 33" Swampers are almost an inch taller and will require spacing the bumpstops down from the frame about 3/4" to keep them from stuffing hard enough to hurt something. You can add spacers between the bump stops and frame but they need to be as wide as the surface they are resting on. In other words, if you use a stack of flat washers to space them down the bolts will shear off because the load on the bump stops is rarely straight. When mine hits the axle is at a huge angle relative to the frame so there's quite a bit of side-load on the bump stops:

-
1
-
-
My '88 is now up to 386,447 miles. The engine and transmission are not original, but most of the rest is.
-
1
-
-
patrol without hesitation... full frame, tons of aftermarket support and diesel engine.... I only which I had unlimited budget... I would be driving a patrol...
^ This. Any Patrol prior to '97 is a far better wheeler than a Pathfinder, right outta the box. Solid front axle, full frame, etc.
I just wish I could find a old 60's Patrol that isn't a pile of rust or insanely expensive

Yea I posted one not long ago as well. The ones that are restorable seem to be as much as FJ40 Cruisers, and there are a billion parts for those. I want to find a barn stored Patrol for like 500 bucks. Yea, I dream a lot.
I have a 1964 Model 60 Patrol. It is much better built and a better wheeler than an FJ40. I'm not going to say that you cannot bend or break a model 60, but you have to do something seriously stupid to hurt one. The thing about the Model 60s is the paint on the frames and and bottom of the bodywork did not last. Most that you see in original condition these days are rusted bare metal on the entire undercarriage. Mine is this way. The sheetmetal and frame are both very heavy material and don't seem prone to pitting or structural cancer, at least out West where they didn't salt the roads at all until just a few years ago.
-
1
-
-
What about a cabin 4x4 lewer, maybe is not turning off completly.
Transfer case, maybe thats my problem. I'll take a look on weekend, and see what I can find
I do not recall anyone having a problem with the transfer case where they shifted out of 4x4 and it was still engaged. Not saying it's not possible, just not common at all. Yeah, experimentation and inspection is the next step.
B
Your transfer case is different than mine, but sometimes mine does not disengage the front drive when shifting from 4hi to 2hi. The dash light goes out but it stays locked in 4wd. Usually I just have to rock it back and forth a couple times and it comes out of 4wd. But a couple times it would not disengage no matter what I did so I just unlocked my hubs and eventually the front driveshaft, diff, and half shafts stopped spinning.
I would put it in 4hi with the hubs unlocked. Drive it around a bit, a couple circles in a parking lot will do, then go back to 2hi. Next physically look at the front drive shaft and see if it's still turning when someone else slowly moves the vehicle. If it's not possible to see the driveshaft in yours you can look at the half shafts (CV shafts) but you have to look at both since often times only one will actually turn with an open front diff. If it is sticking in 4wd and you go onto dry pavement with the hubs still locked you can break stuff. When I do this my Pathy vibrates insanely bad, the steering gets stiff, and the handling is all messed up due to drivetrain wrap-up and binding.
Another thing you can do to help diagnose this is an old wheeler's trick: Put a zip tie on the front driveshaft in a location that the tail of it hits something non-critical as the shaft turns. (Be sure there are no wires or hoses it can hit!) The end of the zip tie will make a light slapping noise that you can hear from inside the truck. This will tell you if the T-case has stuck in 4wd and the front end is still turning.
-
1
-
-
I have wholesale accounts at two local Nissan dealers, Magic in South Everett and Younker in "Kenton". I also have the hookup at Infinity of Kirkland. If you need a bunch of parts or anything expensive don't hesitate to ask! Depending on what it is I get 25-50% off suggested list and most (all?) dealers in the NW sell for more than suggested list to retail customers.
-
1
-
-
Hahaha! I just figured the playing field needed a bit of leveling, given the number of active members vs. the low number of votes for ToTM and ToTY polls. Hopefully some of the people that see this thread and yours will remember to check in and vote more often. The SAS'd R50 is pretty cool... for a unibody station wagon with way too many doors.

-
1
-
-
Go here 2011 NPORA ToTY Voting and vote for Truck of The Year! It just takes a minute and there are some cool pics to look at. At the moment a caR50 has a huge lead because someone posted a thread like this one yesterday in the R50 section to draw voters. You don't have to vote for me, but you should vote for one of the WD21s. Come on, click the link RIGHT NOW!
-
1
-
-
My only concern would be what a pressurized cage (or bumper!) would do in an accident. That, and the PITA you'd have trying to find that one crack/pin hole.
If you hit something hard enough to break a weld or tear a tube you'd get a rush of pressurized air out, and nothing more. Depending on the size of the hole it would take between two seconds and several minutes to lose all the pressure. To find a crack or pin hole use 409 multi purpose cleaner or soapy water just like you do for finding tire leaks. Even the tiniest of air leaks will make an obvious stream of soap bubbles.
-
The last trail ride I was on we had a guy in the group who had a C02 cylinder, small in size, said he bought it from 4WP. It had a coiled line and gauges regulator etc. He kept having to put air in one of his 40 inch TSL's, and must have done it probably 20+ times. That cylinder held some serious air.... probably in the scuba pressure range. I figure that might be a viable investment, but if you ran out you would be screwed. Not sure how they fill those tanks up, but the local FD has a compressor to do their SCBA tanks....(I am thinking out loud here...)
I use a CO2 tank for airing tires as well. I use CO2 for shielding gas with my MIG welder so I have a few of the 20 pound aluminum cylinders. These are the same cylinders that restaurants use with their pop machines:

CO2 is stored as a liquid, and maintains a steady tank pressure of about 800psi until there is no liquid left, then it drops rapidly. I have not done the math to figure out how much volume of CO2 is actually in one of these tanks but I could easily air up 100 33" tires with a full tank. Exchange of these tanks at the local welding store is about $22 and I typically get at least a dozen trail runs airing up 2-5 trucks with a tank. Since the tank maintains pressure until the liquid is gone you have to weigh a CO2 tank to know how much you actually have left. The gauge is meaningless until you run out of liquid and the pressure starts to drop. Also keep in mind that a CO2 tank must be in a vertical position to use it or you'll get liquid CO2 out of the regulator and this is a *major* frostbite danger!
-
There are also straight-tube driveshafts and swedged-tube driveshafts in WD21s. The swedged-tube shafts are larger diameter and taper down at the ends where they are welded to the yokes. I recently twisted my straight-tube driveshaft in two wheeling and the replacement I had at home is the swedged type. The straight tubed shaft cleared but I think the swedged one just barely rubs. I am running long shocks and have a ton of droop/flex. I'm going to add a single limit strap attached between the center of the diff and the frame to limit droop. This will help in keeping from yanking the shocks apart should the truck become suddenly airborne but will not limit flex. The other easy solution is to add a spacer between the trans and isolator, as was mentioned above.
-
I've pressurized the cage on a couple vehicles. It's amazing how much volume there is in a tube structure when you add it all up. The downside to doing this is you can't drill any holes in the tubing to mount stuff (not that you should really do that anyway). Any tubing strong enough for use as a roll cage is strong enough to take more air pressure than you could likely pressurize it with. 250psi is nothing for .120 wall steel tubing! The other thing to remember is that unless you drill a hole where each tube intersection is while building the cage there will be no way for air to pass between the various tubes. Every roll cage or other tube structure I build has all the tubes connected by 1/4" holes just in case I or some future owner decide to use it as a reservoir. It only takes an extra minute to drill a hole at each intersection and this saves the major PITA of drilling them and plug welding the "access holes" later.
Way back in the day some F1 cars had the chassis structure pressurized with nitrogen and a gauge installed. As long as the chassis held pressure there were no stress cracks between tubes hiding under the paint. - Wish I'd thought of that one!
-
Mr.510
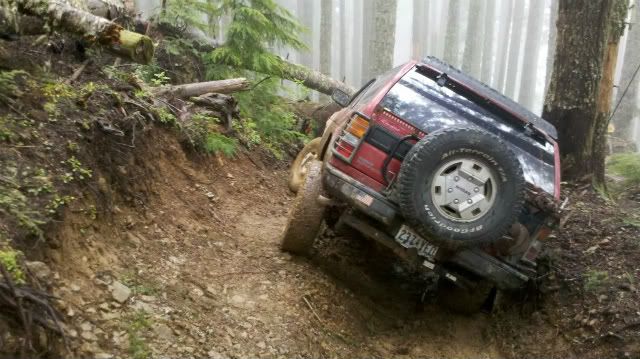
The Devil's Driveway 6-18-11
-
my vg is deafening at 5,000 rpm.. it just gets deep-loud until 3k, then it gets high pitched loud and from there it just gets higher pitched and louder.
And you posted this why? You post everywhere and rarely say anything useful to the conversation. I don't wanna be a jerk but maybe you should spend some time learning the automotive basics before asking questions about elementary stuff in the middle of threads where everyone else clearly understands the subject at hand. Leave the answering of questions to the people that know the answers.

</rant>
5k rpm is nothing for a VG30, a stock one with 200k miles will go 7k rpm all day long. They sound pretty freakin' mean up there too.
Headers by themselves will probably gain a few HP. Headers with free flowing exhaust using a good muffler and either a high flow cat or none at all will probably gain you 10hp. Ceramic coat those headers inside and out and you should get 5-7hp more (assuming you aren't drawing intake air from under the hood, you'll gain much more with coated headers if you are). So replacing everything after the heads might net 15 *real* horsepower. If it were a Honduh there would be ads with dyno graphs claiming a 35hp gain. -
I have wanted one of these for a very long time:

It's a Kyosho 1/9th scale gas powered four wheel drive two door Pathy! They were also available electric powered if I recall correctly. This kit has been out of production for a very long time and they fetch $500+ whenever I do see them for sale.
I have some vintage Kyosho R/C stuff but sadly no Pathy! -
To answer a few of the questions above: MY1PATH has a gutted 2wd HB steering box and pitman arm in place of the stock steering idler. You can do a double steering box setup with a stock or HooHaa CL. The second steering box is just a bomb-proof idler arm. There's a thread here somewhere, I think it's called "Double Steering Box Mod" or something like that. Search should find it.
The HooHaa/Grassroots center links are modified stock ones. He cuts both ball joints off the CL, welds on machined housings, and presses two spherical bearings into each. This is the same as the old "TK1 mod" except he does both sides so they share the twisting force. This reduces the strain on the idler arm to some degree. To install one you have to drill out your pitman and idler arms to 5/8". Then 5/8" bolts go through the bearings and the arms with locking nuts on top. As far as I've heard nobody has ever killed a HooHaa CL.
At the very least every Pathy that goes off road even occasionally needs a steering idler brace. CLs wear out but they don't generally bend, break, or otherwise catastrophically fail. When the idler fails you suddenly have no steering and this is not a bandaid-able thing you can fix on the trail unless you carry a spare! (I do) I've been running the AC idler brace for several years and it has done it's job well.
-
So is there any advantage on getting the 33x9.5 tires for trimming purpose? definitely would like 33's on my pathy
My guess is that 33x9.5s on Legos would clear everything with no trimming or massaging at all, with stock length rear shocks anyway. With increased rear travel any tire over 31" will rub the rear edge of the rear fenderwell opening when flexed out and stuffed. This is because the drooped side moves way forward due to the short upper arms of the rear suspension. This forces the stuffed side rearward until it buries itself in the quarter panel. The way the quarter angles inward at the bottom means that it contacts the middle of the tire so width doesn't have much effect here.
-
This may have been posted elsewhere, or even in this thread for that matter as I've not read the whole thing in ages. Anyway, you can download the '89 & '90 D21 FSMs in .pdf here: D21 FSMs It's basically the same manual as the WD21, I've been using it and it has notes on things that are different between 'truck' and 'wagon'. There are tons of Nissan FSMs on the download page at nicoclub, this is the main FSM index: nicoclub FSM index
-
This 50% off coupon sale runs through MONDAY in case that helps anyone get there.
-
I replied to the OP's PM but for anyone else reading this my goal is to sell the crank pulley adapter hubs for less than $100. Only one has been made so far, the prototype that's on the VG34 in my Pathy. I should have production parts in stock by the end of the year.
-
Another good 'temporary' fix for a fuel tank leak is to rub a bar of soap into the leak while it's wet with fuel. This is an old trail repair trick and works very well. I know of several tanks that have been sealed this way and have gone many years without issue. Another option rather than replacing the tank would be to use one of those liner kits like Kreem. They coat the interior of the tank with fuel proof resin. There would be very few vintage motorcycles still on the road if it weren't for Kreem! www.kreem.com
-
I just bought a new o-ring from the dealer recently, so they still sell them. I asked specifically about a gasket but they had no idea. Another good reason to have an oil pressure gauge...
Ah, I didn't realize the OP is in Canada or that Nissan pulled BS like that on you guys. The O-ring is still available in the US but the pickup tubes that use an O-ring are not. The gasket for the later style pickup tubes is Nissan P/N 15053-1E400. Unfortunately an oil pressure gauge won't really help if the pickup tube O-ring leaks. What typically happens is a little bit of air is continually sucked past the failed O-ring and the air bubbles erode the very soft bearing material until failure occurs.
otherwise i guess i will be going to the junkyard to get an xterra pump/alternator *sigh*. the pathy alternator isnt the same just flipped around is it ?? also the frontier is the same as the xterra with accessory layout, yes???
If you're asking about the WD21 alternator it's mounting is the same 'old school' layout that physically interchanges with most Nissan models all the way back to 1968. The Xterra alternator has different mounts and does not directly interchange. I do not know if caR50 and X are the same. The X alty has the adjuster mounting piont offset further forward and also closer to the block than the earlier stuff. Accessory layout is the same between X and Fronty, or at least it is on the S/C models.
oh also does anyone know if i will need the xterra/frontier block/accessory brackets as welll... im assuming they are different...
Probably. If in doubt take what you have with you and/or take lots of pics before you go to the yard. You might also do a quick measure of how far out the accessory belt grooves are from the lower timing belt tin to be sure what you get is going to line up. Swapping accessories/brackets/balancers around between VGs and having the belts line up correctly is often a problem. Don't quote me, but I *think* there are eight different VG33 harmonic balancer/pulley part numbers in the US market. I had my brother order one of each when I was trying to find an elegant solution to the VG33 with VG30 accessories problem while retaining a harmonic balancer. There was no way to modify stock parts to make it work so I designed the adapter hub that replaces the balancer.

Feb 2012 Nominations
in Truck of the Month
Posted
Mr.510
Elbe Hills 11-18-10