NavyP503
-
Posts
89 -
Joined
-
Last visited
Content Type
Profiles
Forums
Calendar
Posts posted by NavyP503
-
-
Dang, good job! I may have to make a trip to Dillon to check that out

-
If it's like mine, the wires for my 4WD light and back up light keep hitting the exhaust manifold and have completely melted through the insulation. So they were intermittent for a while before finally grounding out and blowing the fuse. That would be one place to check. The wire goes from a connector on the passenger side wheel well, just behind the power steering reservoir down to the transmission.
-
 1
1
-
-
Traced a ground on the 'Meter' circuit. Exhaust header had melted the wires for the 4wd indicator. I'll get to re-wiring it next week.
-
I had a Rodeo that did something similar and it was the fuel filter.
-
I finally got a lot done today! Gotta love junkyard runs.
FR window switch, Rear glass switch, door jamb switch, A/C idler pulley assembly, rear dome light, hatch latch, some misc. plastic parts, front door stops,
New clutch master cylinder and lower hose. Only thing that keeps me from going for a ride is I need to get a new idler pulley tensioner bolt, the one I had turned out to be broken.
-
I finally decided to tackle my dome light issue. It works in the 'ON' position, but in the 'Door' position it's always on, meaning it stays on regardless if the doors are open or not, however it is at about half it's output. I measured the resistance to ground on the 'Door' lead, R/B, and when the doors are closed I'm getting about 10 megaohms, which accounts for the dim light. When any door is opened I measure a good ground with usually less than 1 Ohm, and the light is nice and bright.
So as I was writing this I decided to search a couple things about the rear door switch, since it was the only one I couldn't find to disconnect. Turns out it's a common problem. So I used the washer trick to fix the switch and voila, the luggage light is working and the dome light is working as well. Only thing I can figure is that the diode between the R/W and R/B leads was dying and since the rear hatch switch thought that the door was open the reverse biased diode was giving about 10 mega-ohm to ground. I would still like to fix the diode, so if anyone knows where that stupid thing is, please let me know.
Just wanted to say thanks to everyone in here who posts up their problems and solutions. This forum is by far the most knowledgeable about their vehicles than any other forum I've been on.
-
If anyone is still looking for new switches I found that O'Reillys has them on their website. I don't think they'll work on the driver's door though, looks like a different connector on mine.
-
I've had the passenger side switch completely apart and the actual mechanism isn't all that complicated. I cleaned the contacts much the same way DoctorBill did and that helped, but the plastic rocker portion of the switch had worn down so much it would no longer push the contacts together anymore unless you really crank on it. So if your'e feeling up to it, taking the switch apart isn't too bad.
Also, the switches work the other way around as well, if you have the passenger door switch unplugged, you can't roll the window down using the master switch. I'm headed to the junkyard soon, if I find a broken master switch assembly I'll post up a breakdown of the switch.
-
The stereo install went great! It sounds a million times better then a messed up deck and two blown speakers. The door panel replacement however didn't turn out very well.
I laid the original panel over some hardboard and clamped it down. Using a drill and some files I matched all the holes on the hardboard to the original board.

I used spray adhesive on both the board and the cloth sections and lined it up as best I could.

The finished door panel looked ok, the cloth wasn't as stretched as I would have like it to have been and a lot of the little plastic pins that hold the plastics to the board were broken, either by me or were already missing.

But when I tried to install it, I found that the cloth had shifted and now I couldn't get the curved section to fit on the door and line up the panel clips with the holes in the door. Also a lot of the panel clips didn't line up directly with the holes in the door. I was rushing a bit yesterday when I drilled out the board, trying to beat the snow. I have another piece of board I can try again with. Or as some have suggested I might look into just attaching the plastic to some aluminum. If anyone has pictures of that I'd be interested in seeing how it turned out.
-
This is my latest project and I've already been working on it a couple days. I bought a new stereo and speakers because the old one barely worked. I just went with a cheap Wally World deal, Pioneer deck and 4 speakers for under $100. Someone had previously run new speaker wire but didn't do the greatest job. I pulled the front seats and dash to better get at all the wiring.

My drivers side door panel was in a pretty poor state. The backing board had ripped in a few places and most of the clips that hold the panel to the door had ripped out. I've been to the junkyards but haven't found a door panel in decent condition. So my project this weekend is to replace the backing board. I've already removed the plastic trim and cloth from the board.

I'm going to pick up a new board today, and new clips. I'll update this post as to how well this works out.
-
Good work on that '95! We're getting back to Littleton tomorrow and I'm going to be doing some work on my '91 next week.
-
I think I spent around $400 to get mine up and running, it had been sitting for around a year or so as well. Most of the cost was the head gasket set, and changing all the oils since it had been sitting for so long. So you can probably get it done for less. Also it's free to take it apart and see if it's messed up
-
I bought mine with a blown timing belt and I only had to replace one lifter and the hoses edicer2 was talking about. So you may have gotten lucky. I live in Littleton and can lend a hand if you need it. Good luck!
-
I was an electrician in the Navy for six years, just graduated with a BS in mechanical engineering. Both come in pretty handy working on the Pathy but still looking for work.
-
Haha, I'm actually heading to the Denver one next week. Can't wait to get my hands on some parts!!!
-
I bought my pathfinder with a broken timing belt. After taking everything apart, I only had to replace the belt and one lifter. You never know, you may have gotten lucky and not done too much damage. Good luck!
-
-
I had an 87 as my first car (in '98) and it lasted just over 200k IIRC and got really good mileage. Didn't look great but ran like a champ the entire time.
-
Hahah, I was scanning through the new content and I read this topic as "Mile High Club" lol. Just turned over 260k on mine and took it on a 400 mile highway trip over Christmas, gets to 75 no problem and still got 18-22 mpg. The 22 mpg was with a pretty good wind at our back. Can't complain about that at all!
-
Got them installed yesterday, I was anxious and hadn't made it to the parts store yet so I tried the stud, first one snapped at 10 ft-lbs, so I pulled them all out and went and got some good 12.9 bolts. Went to start it and the battery was dead
 After jumping it and testing it out it works great and no more ratcheting noise!!!! It snowed about 9 inches today so I'm taking her out to run some errands today.
 -
Woo!! Just got the shipping info, getting the hubs today. Putting them on tomorrow
-
This is the first time I've had one of these apart and the FSM doesn't exactly give theory of operation, so this is just what makes sense to me. If anyone knows otherwise please post it up!
2wd:
The hub housing is bolted to the rotor, so it spins as the wheel does.
The axle is stationary, so the slider (I think FSM calls this sleeve gear) is not spinning either, the gear teeth are disengaged and the hills on brake A are in the valley of the sleeve gear with the spring keeping the sleeve gear and brake A apart.
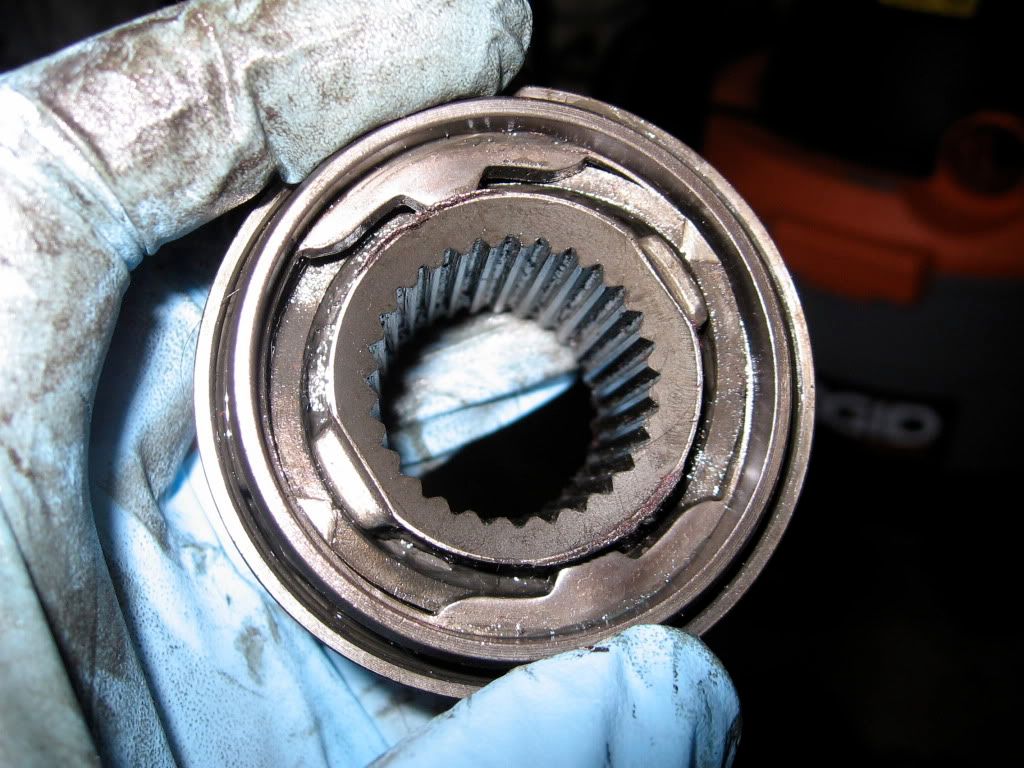
Brake A on sleeve gear in 2wd position
Brake B is keyed to the knuckle spindle and doesn't spin at all. Friction between the brakes keeps brake A stationary as well.
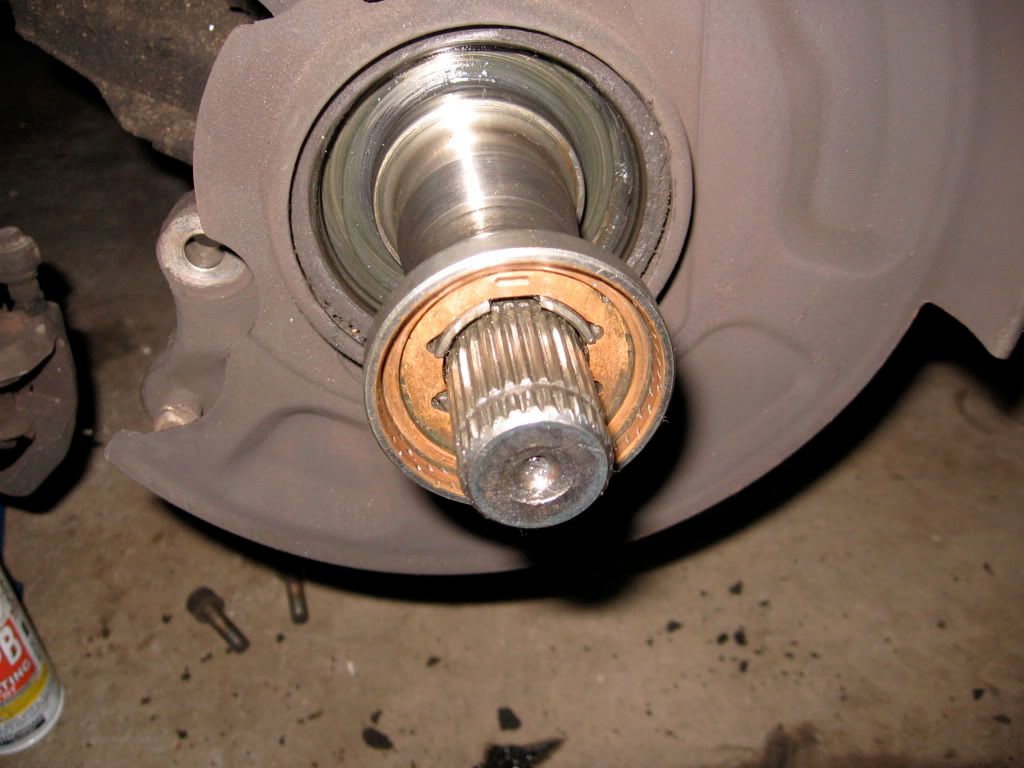
4wd:
At a stop with the transfer case in 4wd as the axle starts to turn the sleeve gear turns, the hills of the sleeve gear engage to brake A, pushing it tighter against brake B until it's stationary and the hills of brake A begin pushing the sleeve gear into the hub housing until the teeth engage and the front wheel turns with the axle.
I think the reason for the brakes is to engage the teeth of the sleeve gear with the hub housing more gently. If they happen to be out of alignment as the axle begins to spin brake A can turn a little until the sleeve gear fully engages.
Hope it helps
-
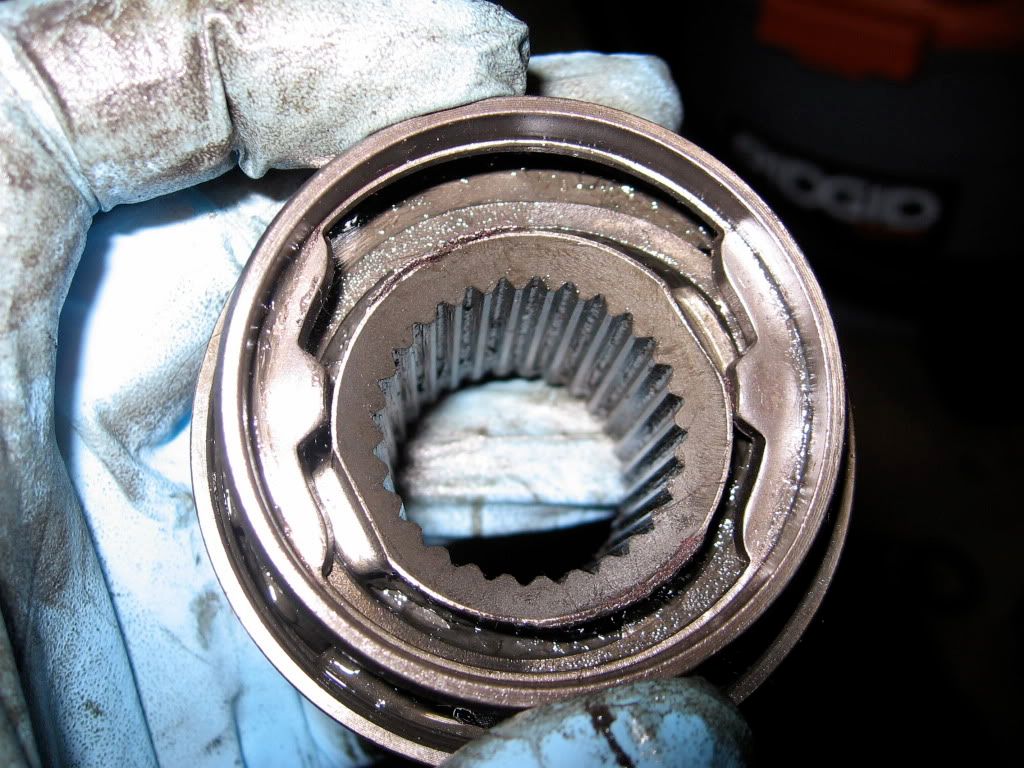
The picture is of the part that slides into the hub housing, the teeth showing are what engage to the hub, the other side has the dips that brake A normally rides in, when the axle starts turning the two 'hills' meet and push the those teeth together in the hub housing. I can take more pictures later if needed.
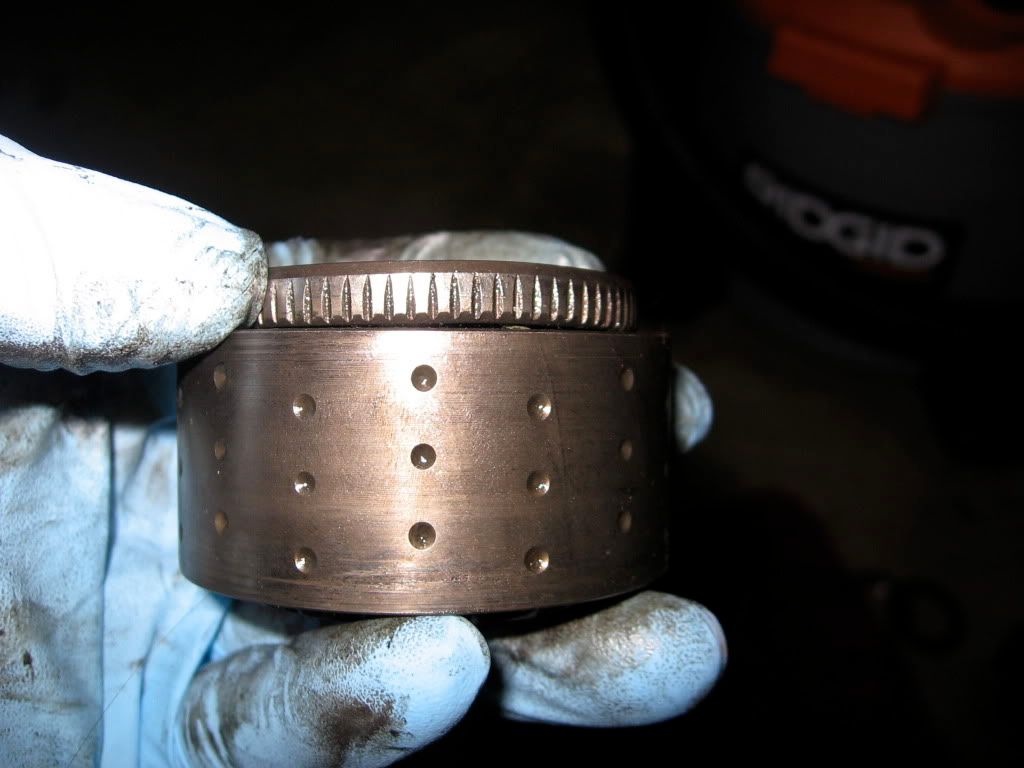
The parts can be had from Nissan, but for an arm and a leg, they wanted $50 for each set of brake A and B.
-
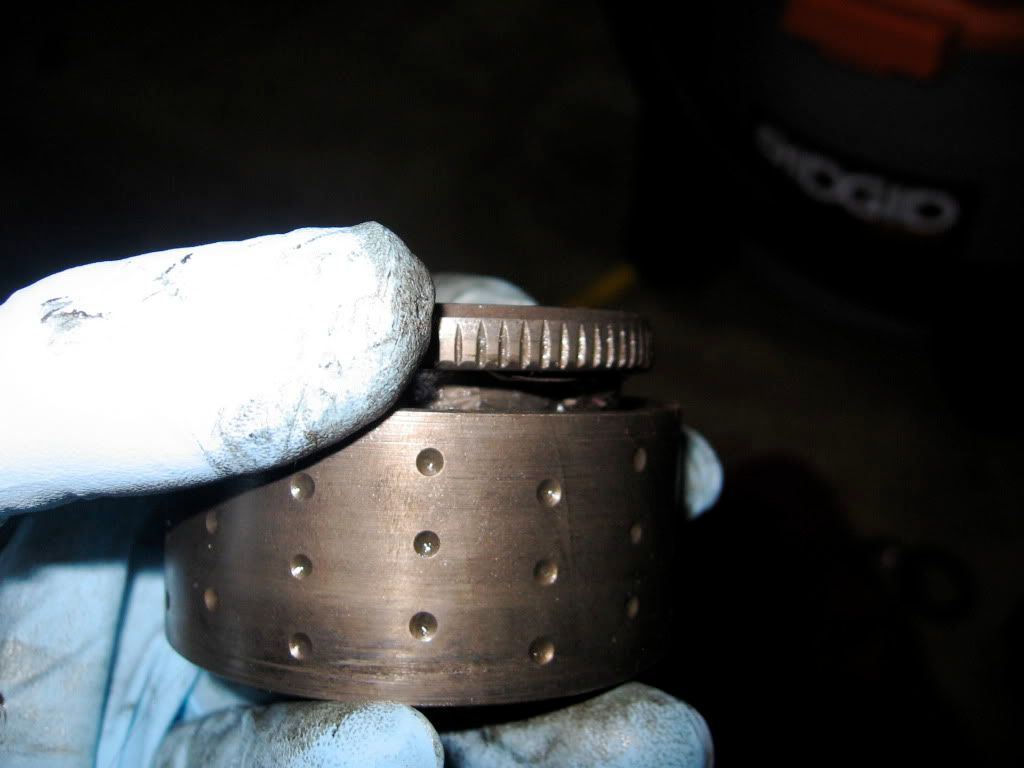
The pictures are of the passenger side, the outside of the hub looks pretty bad but the inside was fairly clean. When I pulled it apart the grease was a little runny, and by the looks of the outside it had overheated pretty bad. The brake A part is really worn, and bent a little. The O-ring was actually in good condition, I was able to pull it off without it cracking. No worries about the FSM, I didn't find it too helpful either, I just start pulling stuff apart and cross my fingers


Head's up on parts truck.
in Rocky Mountain Area
Posted
I thought I'd give everyone in the Denver area a heads up that there is a 1991 Pathfinder parts truck at Federal Valley Motors. V6, Auto, red interior, engine blew a gasket. The interior is in very good condition, it even has the armrest! Parts are flying off it though, so if you want anything head over there. I'm not affiliated with them, I just know how hard it is to find decent interior pieces. Let me know if you need a number or can't find it.