DsR50 Posted February 26, 2013 Share Posted February 26, 2013 ive heard of it but need more detail considering the mount is akwardly shaped. i dont like this angle Link to comment Share on other sites More sharing options...
devonianwalk Posted February 27, 2013 Share Posted February 27, 2013 It looks like you need an extra U-joint in there. I just replaced my P/S rack last month. IIRC .. you should be able to loosen the four bolts that secure the rack to the sub frame and rotate the whole assembly to reduce that angle. Take my advice with a grain of salt as I have not attempted this feat. Link to comment Share on other sites More sharing options...
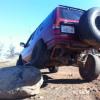
01silvapathy Posted February 27, 2013 Share Posted February 27, 2013 I rotated my r&p when I did mine. Just unbolt the brackets and bend the bracket on the drivers side. I dont remember how much I did mine but just do that side. I used washers to fill up the space and it works just fine. Here are some pics Link to comment Share on other sites More sharing options...
DsR50 Posted February 27, 2013 Author Share Posted February 27, 2013 (edited) I rotated my r&p when I did mine. Just unbolt the brackets and bend the bracket on the drivers side. I dont remember how much I did mine but just do that side. I used washers to fill up the space and it works just fine. Here are some pics Alright ill try that tomorrow, thanks Ghees I wish my rack was that clean lol Edited February 27, 2013 by DsR50 Link to comment Share on other sites More sharing options...
muddfildvaynes Posted February 27, 2013 Share Posted February 27, 2013 (edited) I Found this write up in the SFD write up, ask shift220 if he still has the picture that was on this post..... Alright so I thought I would need a small spacer and a longer bolt but it turns out to get it tight enough you need bolt it down like stock.First I loosened and removed the steering linkage off the steering rack. This had to be shortened after rotating the rack anyway. I then took off the driver side bracket and loosened the passenger one to rotate the rack. I just wiggled it upwards how far it would go without really pushing it. Checked the linkage and it was nearly straight. Perfect.Then I did the wire trick and figured out that each ear on the bracket just needed to be angled more. You can see in the picture about how much. I just cranked the bracket in the vise and took a few good wacks at it. The white is the modified bracket.It needed to be bent roughly 10 degrees so the picture can be printed out and will help if you need it (check it on the vehicle too). What I did was hold it tight on the top bolt and make sure the square part hugged the bushing well. You'll notice that the bottom part is about 20mm above the stock mounting hole. This is where I figured I needed a spacer and a longer bolt but it turns out cranking down the stock one worked perfect and held it tight.Of course I forgot to take pictures of it but if I did now you wouldn't noticed much of a change except the rack pointing up more. Edited February 27, 2013 by muddfildvaynes Link to comment Share on other sites More sharing options...
Rick13 Posted February 28, 2013 Share Posted February 28, 2013 I rotated my rack this week. I just loosened the bolts on the rack brackets and the linkage, rotated the rack, then placed some dense rubber washers at the top bend of the bracket on the driver's side. I then just cranked the bolts down. On the driver's side I did use 01Silva's washer technique. It held REALLY well and turns like a dream again. Link to comment Share on other sites More sharing options...
Recommended Posts
Create an account or sign in to comment
You need to be a member in order to leave a comment
Create an account
Sign up for a new account in our community. It's easy!
Register a new accountSign in
Already have an account? Sign in here.
Sign In Now