
HitTheTrails
-
Posts
222 -
Joined
-
Last visited
Content Type
Profiles
Forums
Calendar
Posts posted by HitTheTrails
-
-
That's what I want to hear! So do you think a total of 6" of lift will make a difference using 33 x 12.5 x 15's ..... More lift should help with fender clearance?? Yes? I also plan to put a KMA Winch Bumper as well should add plenty of weight up front.
Yeah, it'll work the same. I had to do some cutting on my fender flares for the tires not to rub, and also had to cut some of the front bumper and fender up front. You might fit a bit better with the extra height, but you'll probably still need to trim the flares a bit. With 3.75" back spacing the 33"x12.5" tires tuck nicely into the rear wheel well.
-
I must have done the same thing. I have flashing air-bag light and no horn since the SFD..
Now it makes so much sense why people recommended tying the steering wheel to prevent rotation during the SFD lift..
So do I have to remove the airbag to get at the spiral cable / clock-spring ?
There doesn't seem to be many for sale on Ebay, I hope I can get one for cheap at a local wrecker..
-
I have 3.5" SFD and OME coils and run 33x12.5 on 15x8 with 3.75" backspacing. Works perfect.
-
Looks great!!! Glad to see another SFD completed.
-
I just popped off the inside door trim on the side I was replacing and then reached my hand in to change the bulb. I didn't remove that bolt and didn't fully remove the door trim. Be careful with those little plastic trim holder clips though, they break easy.
-
All done, looks sweet.
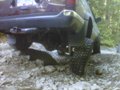
Completely stock:

3.5" SFD/OME, 5.5" custom lift coils:


I used Pro Comp rear shocks, EXP-929500, Extended/Compressed length: 29.83/17.32in.
I have the KYB GR2 front struts and OME 923 coils.
Those are 31's on it right now, I'll be putting on 33's soon.
-
hey guys just reading through the topic, those of you who have installed the custom length springs for the rear, do you have to what measurements they were made at?
as all ive got out of it was 160lb spring rate, 13.5mm dia rod and 5" ID, what was the finished length that would be suitable for say a 3.5" sfd?
Before I installed my rear coils I measured the uncompressed length, 18.75". This is 5" longer than the OME Medium rear coils I removed (13.75"). I ordered 5.5"+ lift springs with 160lb/in spring rate. I think these rear coils are more than 5.5" over stock though, cause at 5" longer and stiffer than OME (OME 922 are 140lb/in), they will give more than 5" over the OME, and those are 1.5" over stock.. I'm not done with the front though so I can't say for certain, but with 3.5" SFD and OME coils up front, I think the rear is going to be 1" higher than the front. Having 18" uncompressed length probably would have been better. I'll post some pics when I'm done.
-
Yeah, so I was looking under the pathy a few minutes ago and what kinda tool exactly are yall using to break lose the axle bolts? Just a normal ratchet, or a impact with a universal joint?
When I did mine I already had the struts out so I used an an impact and a long extension(no u-joint needed). If you remove the axle before removing the struts then an impact probably won't work and you'll have use a breaker bar to crack them loose and use the air rachet to spin them out.
-
I used the OME rear shocks (N61) with my OME lift and they are great. Extended length = 607mm, compressed = 367mm (23.9in/14.4in). The OME shocks were the limiting factor when flexed out and never had any issues with this...
-
I used the 923 (medium) fronts and the 922 (medium) rears. I also used the OME rear shocks and have been very happy with the setup. I've heard the springs are the same length, just different springs rates and you only want to use the HD (928) fronts if you have a heavy bumper or something otherwise they are too stiff...
Here is my email to ARB tech support and their response, on specs for the OME front and rear coils:
Hi,
Can you please tell me some technical info about the products you sell for R50 pathfinders (my truck is a 1997):
1) Pathfinder Rear Shock - Item # N61. What is the compressed/extended length?
2) Pathfinder Front Coil Springs - Item # 923 - What is the spring rate?
3) Pathfinder Rear Coil Springs - Item # 922 - What is the spring rate?
Thanks.
Hi,
1) N61- Open:607; Closed:367
2) OME923: 200 lbs/in
3) OME922: 140 lbs/in
Hope that info helps!
Matt Glass
ARB USA
Tech and Marketing Assistant
-
Taking out the axle was actually one of the easy parts. Generally dealing with rusted bolts was the tough part. I had to cut off both sway bar links, from the sway bar ends and the strut ends cause they were so bad. Many other bolts had to use lots of leverage, even after soaking with penetrant. I'm replacing all 4 of the knuckle to strut bolts as they are in such bad shape, rusted out and wrecked threads..
-
Okay so I am possibly installing my sfd this weekend if we get around it it (other stuff like fabbing sliders and stingers comes first lol) I have written up a rough list or instruction set of sorts and im going to put it up here for those of you who have installed a SFD before to read over if you would
 And any tips or missed steps that I left out post up what it is, or a different way of doing it
Prep
-Soak all bolts in PB the night prior to install
-Rent Coil Compressor for rear coils - i didn't need one
-Get front diff fluid to change since its going to be pulled anyways (dont know what to get, suggestions?) - I think I used Syntech 75W90 synthetic
-Buy brake fluid to top off after bleeding brakes
-Get rear brake line made and remember to bring it lol
-Tube to extend the breathers in both the front and the rear? - yes, both front and rear, i think it's 1/4" tubing
Front SFD
-Jack up front end and place jackstands under the pathy, with the parking break on as well. Remove front wheels and tires
-Remove front driveshaft, cv's, and take out front axle, or drop it enough to access drivers side engine mount. *Probably just easier to remove it?* - Yes, unbolt the drive shaft and then unbolt the cv's - with your hubs locked and brakes on it makes cracking the bolts loose easy. Then place a jack under the axle and remove the 8 bolts(4 per side) that hold the axle in place, then lower it down, easy.
-Unbolt and tie up the front struts, to prevent them from falling down - I fully removed them, then attached the spacers to the top of the struts before re-installing.
-Place jack with piece of wood on top under oil pan on engine and unbolt the engine mount bolts. (all while being extremely careful to not move the engine + or - 1 inch - just keep the engine level/0.5in up.
-Place second jack under front subframe and unbolt the subframe and lca mount - not sure what you mean LCA mount, just unbolt front and rear subframe mounting points.
-After securing the steering wheel with the seatbelt or string, unbolt the steering
-Carefully lower the subframe while watching to not stretch any lines or connections that may still be on - I had to remove 1 electrical connector from the steering rack and unbolt one small mounting bracket from the steering rack and also unbolt one small bracket from the driver's side that holds a hose going up to steering fluid resevior - 3 things to unbolt/unplug total.
-Lower just enough to place blocks on the engine mount and subframe, and place the strut spacers on
-Install front steering extension and tighten down all bolts for the lift blocks and the struts - you have easy accesss to the steering after everything is done, so you could do it after if needed.
-Re-install front axle if it was taken out
-Re-install struts while the cv's are still unbolted so don't have to worry about over-extending them.
-Replace front cv's and front driveshaft
-Untie steering wheel and lower all jacks supporting front end and jackstands
Rear
-Jack up back end and support with jackstands under pathy and also under rear axle
-Remove rear coils and shocks
-Disconnect spring for the lsv (disco the panhard rod?) - Yes, disconnect panhard where it mounts to frame, this makes flexing the rear end easy
-Remove old brake line and replace with extended line
-Place new spring spacers and bolt down and weld them in place
-Replace springs and re install bump stops and shocks
-I did the rear before the front, that way when I was working on the front the rear was sitting nice and high so I had extra room to work under the truck. I used 2 jacks, one under the axle and another to jack up one side, forcing the other side down (to get springs in/out).
Final Steps
-Make sure all bolts are still tight and turn wheels to make sure there is no binding
-After admiring in awe the sheer awesoemeness of the sfd take it for its first spin just around the block a few times to make sure everything feels good
-Recheck that all bolts are still tight and weld in the subframe blocks and steering extension
Thats my list so far, I think I covered everything. But I have a few questions yet.
-As far as the engine mounts go I think that once im sure everything in good im just going to try and tack weld the bolts on the passenger side mount to secure them, cause once everything is good I dont want to have to drop the axle again to tack the other side.
-As far as the axle goes, how would you just lower it? Its on brackets so how can you just lower the axle it looks to be like its either in or out
- You might as well just remove it and get it out of the way.
-Breather extension- what diam. tubing do I need to extend the breathers is there a breather in the front? - Yes there is a breather on the front, I think they're 1/4", not sure though.
-last thing what did yall do with your lsv spring and is anyone using the stock panhard rod? I will probably wind up having to make a drop bracket of sorts cause I imagine that it wont fit to the stock location with the spacers. - I actually drilled a hole in the sheet metal that is used to stop the spare tire from moving too far forward and re-attached the spring, this keeps the spring pulled upward and gives the rear more braking, you could just zip tie the lsv to keep it in the position needed. I have a drop bracket for the panhard and it looks like it's going to work great.
Thats it, I would REALLY REALLY appreciate it if those who have experience with a sfd or the front axle to chimme in and tell me if I have got everything covered
This is not something I can afford to screw up on 
-I just did my SFD this past long weekend, not done yet, still some finishing touches, but I'm going out of town for a couple weeks so I'll finish when I get back. Thanks Shift220, great kit. Also, custom rear springs are sweet! The rear end is done and looks badass.
-
I think for the 5.5" lift coils everything's good to go. I'll ask him if he can use the same information from your coils. Thanks
I thought the OME HD (#928 coils) provide 1.75" of lift...? I guess with settling 1.5" seems about right. Are these also the coils you're running up front?
I have the 923's up front and got about 1.25" - 1.5" after settling. Even with 1.75" lift (if you get that from the 928's) you should be fine, I wouldn't bother getting custom front springs made just to fine tune because of 1/4", you might end up getting 2" lift from the custom springs, you never know...
-
I'm trying to get a hold of this Kevin at coilsprings.com... But haven't heard from the guy regarding custom coils.
Last I heard from him, he wanted me to send a pair of front OEM coils in for "calibration and testing". Did anyone else get this request?

All I want are 1.5"+ coils at 160#/pr for the front and 5.5"+ coils at 160#/pr for the rear...

I ordered my 5.5" lift coils for the rear on Mar 17 and they called me yesterday (May 18) to say they are ready to ship them. Basically took 9 weeks to finish the springs and I'm guessing another week for shipping, 10 weeks total. I was told 4-6 weeks. Not sure what the issue was but I'm excited they're on their way! My order # is 2523 if you want to reference that for the rear coils. As for the front, I thought they had a database full of stock spring specs and they would use that to go off, but maybe they don't.. FYI, the front springs you have (OME right?) are 200# and provide you with ~ 1.5" of lift, so why do you want new ones???
For everyone's info, here is my email to ARB tech support and their response, on specs for the OME front and rear coils:
Hi,
Can you please tell me some technical info about the products you sell for R50 pathfinders (my truck is a 1997):
1) Pathfinder Rear Shock - Item # N61. What is the compressed/extended length?
2) Pathfinder Front Coil Springs - Item # 923 - What is the spring rate?
3) Pathfinder Rear Coil Springs - Item # 922 - What is the spring rate?
Thanks.
Hi,
1) N61- Open:607; Closed:367
2) OME923: 200 lbs/in
3) OME922: 140 lbs/in
Hope that info helps!
Matt Glass
ARB USA
Tech and Marketing Assistant
-
tekazgtr1984, I thought you want to run 33x12.5R15's on 15x8 wheels with 3.75" backspacing? Those should clear your strut fine. I have 31x10.5R15 on my truck right now with the same spec wheels and it looks like I have plenty of room to fit 33x12.5's and I've read the same statement around NPORA a few times... If I were you I'd just get the tires/wheels you want and see how they fit, if you need to you can run your existing tires/wheels while you order up spacers. You gotta remember that if you space your tires/wheels out too much than they're gonna hit the outer parts of the fender when you try to stuff them...
ps. those viper wheels you're interested in look sweet.
-
I got the 35's on! Took it out for the day on Saturday... Everything works awesome! Little underpowered when yanking other vehicles out (when I got traction and the other vehicle was stationary)
Rode nice on the road, no power lost when passing cars. The only down-fall was braking. But other than that, everything works awesome! Very impressed with the truck at this point

I had get longer wheels studs and 1/2" spacers made to stop rubbing the strut. Now I need some serious flares t okeep me from getting pulled over hahaha
WOW! The truck looks HUGE. Good work.
-
Ok, so by what I understand, the measurements listed in the pictures on page 5 are wrong..
They show the subframe spacers as 2.5" underneath the pics and 63.5mm in the pictures.
From what I understand, they are supposed to be 2"W x 4"H x 6"L (or 50.8mm W x 101.6mm H)
The measurements listed on page 5 are not wrong, shift220 used 2.5" x 3.5" tube, cut to be 6" long. The measurement missing in his drawings is the 3.5" tall measurement, which he listed in text.
new4x4r used 2"x4" tube (and also 3"x4" tube), cut to be 6" long, so that's why the confusion...
-
Looks great! Nice work Fleurys.
-
Yes, its a 27mm or you can use 1-1/16" socket, that's what I use.
-
If you live in Vancouver then you are basically in the middle of the 2 wheeling areas of the lower mainland. You can either head up to Squamish or you can head out to Mission and Chilliwack. If you go up to Squamish you can run some trails around Squamish Valley Road/Paradise Valley Road.
From Highway 99, north of Brackendale, exit left at the Squamish Valley Road (opposite Alice Lake). Follow it 2.5km and over the train tracks to the main fork for Squamish Valley (left) and Paradise Valley (right).
If you head east out into the valley you can try up around Stave lake but it is a very busy place. Head East on Dewdney Trunk Road until you come to Stave Lake Powerhouse, turn left up the gravel road (Burma road I think-on the west side of the lake). Follow this road for 5km or so and you will come to a fork, you can go left up the mountains or right onto the Stave Lake mud flats.
You can also try out in Chilliwack at Vedder mountain or around Chipmunk Creek. Head east on Hwy 1 and follow the signs to Cultas Lake. After passing through the town of Yarrow you can turn onto the Cultas Lake road and go a few km and you will see a turnoff to the right just before you get into town, this goes up Vedder mountain. Careful cause there's lots of mountain bikers and dirt bikers around there.
If you want to go to Chipmunk Creek/Mt. Thurston area you would pass the Cultas exit and cross the little bridge and then turn right onto Chilliwack Lake Road. You can follow this road for a while (like 20km) and you will see signs to turn left to go onto Chipmunk Creek FSR and others.
I spend a lot of time around Chehalis Lake and Cultas Lake. Head east on Lougheed past Mission and Deroche and you will come to "Sasquatch Pub" - turn left. You'll see signs for Hemlock Mountain ski resort at this turn too. Almost immediately you come to a 4 way stop. Turn left and you will be taken towards Chehalis Lake. Go straight and you pas the Hemlock road turn-off and will eventually come to the beginning of Harrison West FSR. Lots to explore around there. There was a big landslide near the north end of Chehalis lake so you can't pass by this now but you use to be able to go all the way up the west side of Chehalis and then turn right and head east down to the Harrison West Road.
If you're not already familiar with BC4x4.com check out their board and click on "trail talk" to see what people are talking about for trail conditions etc. Also, they have organized trail runs that you could go on with them to learn a bit about the area. It's usually listed under upcoming events:
You will read about Eagle Ridge, which is close by in Coquitlam, but if your truck is stock there isn't much for you to do there..
These are just some suggestions off the top of my head. Good luck. Have fun. Oh, and get a back road map book for this area so you can have a look just to get familiar with the names of locations that people refer to, it'll help. You can get a book at Canadian Tire and elsewhere.
-
 2
2
-
-
Don't forget the coolant "bypass hose"!!! I just did my timing belt and water pump last weekend. I had a coolant leak. Turns out it was the "bypass hose" that was leaking. It's the hose that goes from the back side of your thermostat housing to up around the top of the thermostat, it is short hose with a 90deg turn. The previous owner had the timing belt done at the dealership and they changed the timing belt, tensioner, water pump and cam shaft seals but neglected to change out the bypass hose or the other short coolant hose on the other side of the thermostat. Tough luck for me. Since I was in there I did the timing belt and water pump (only had 90,000km on them), but I didn't bother with the cam seals or the tensioner or the thermostat. They all seemed to be in good shape so I left them alone... Just my 2 cents...
-
1
-
-
Bad upstream (at header) O2 sensors will definately affect your gas mileage. $95 is about right. Replace the other one and you should be better.
-
are you sure its 21 gal? i've never been able to put more than 19 in, and thats even with literally pushing it to the pump cause i ran dry.
I think I put 19-20 gal in one time when i ran out, but I stopped as soon as the filler clicked and didn't try to "top up" the rest so I think u might be able to get the full 21 gal in there...
-
don't forget about the air filter. it might look pretty good but still be effecting your gas mileage.
as for gas remaining in your tank, the tank is 21 gal so compare that to what you are putting in (assuming it was full to begin with)
my mileage is much worse in the winter too..
Stripping of 97 R 50
in 96-2004 R50 Pathfinders
Posted
I'm interested in the steering linkage that goes from the Rack to the gear box (located at end of steering column). This is where I've extended mine for the SFD. I'm also interested in the clock spring located under the steering wheel (it gives electricity to the airbag and cruise control and horn). If you msg me your email I can send pics.
Thanks.