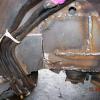
BrianD Posted September 7, 2011 Share Posted September 7, 2011 Here's a some info and what to expect when removing an old rad support and installing a new one. U will need: Hand drill and drill bits Tap and die set (for retapping broken bolts) Lot of metric wrenches and sockets A mig welder 8 Hours of time if your really fast Removeal of all parts attached the "lower rad support" which of course shud B called, major front lower and upper rad support that holds the bumpers - fenders - coolant bottle - washer reservoir - hood release -horns - lights - tow hooks - wire harness and lots of other things. Once U have all the parts removed - U'll have to find all the spot welds and then centre punch and drill them out about 1/2 way thru and use a chisel and hammer to get the remainder separated. There's a lot! Use a needle nose pliers to remove the clips that attach the wiring harness to the rad support and push it back out of the way. U will need to hang your rads from the hood catch so U won't damage them. I used a broom stick to hold open the hood while doing this. U can see that I missed a few spot welds and the damn thing still doesn't what to come out so I busted it out and removed the remaining spots afterwards. I used a bolt to plug the antifreeze line seen hanging. Once U have it out U clean up all the 1/2 drilled holes with a Dremel so they are smooth and clean and then bend straight what U messed up while getting the old one off - I used a body dolly and hammer to do this. Make sure U have a clean surface to weld to. Short bursts with a mig works great to fill the holes. The new one( which was primed black) was painted with silver before installation - I didn't have to grind off the new paint off for welding because U will B drilling 1/2 way thru the new part into the tabs that are behind for welding - Use a marker and then centre punch before drilling - make sure U sheild your rads and battery from welding sparks to prevent damage and/or explosion. I started at the bottom and worked my way up with the welds - use Lots C clamps to make sure U have it positioned properly BEFORE welding. Look closely at the C clamp on the left and U'll see the holes we drilled before welding. I took a little extra time to clean and paint a lot of the brackets before reinstallation - I cleaned the spot welds after with a rag and painted over them to prevent rust. The fenders will have to be installed here cause the antifreeze bottle bolts to it. The plastic grill and filler strip went on next followed by the bumper and tow hooks - signal lights and everything else. This wud have cost a lot at a shop - $1200 - $1500 maybe more - This cost me $140 for the "part" and 12 hours of time - I cud do it a lot faster now that I know what to expect but I DON"T want to do another one - ..unless I was paid $1200 to $1500 LOL! Link to comment Share on other sites More sharing options...
MAXPATH Posted September 7, 2011 Share Posted September 7, 2011 Well done and thanks for the pictures and the write up. Link to comment Share on other sites More sharing options...
BrianD Posted September 7, 2011 Author Share Posted September 7, 2011 Well done and thanks for the pictures and the write up. Oops - I forgot the last picture Link to comment Share on other sites More sharing options...
Trogdor636 Posted September 7, 2011 Share Posted September 7, 2011 Nice write up. I did this long ago on my old 87 Nissan 2WD truck to replace a damaged core support. I drilled out so many spot welds I wanted to commit suicide. Link to comment Share on other sites More sharing options...
Recommended Posts
Create an account or sign in to comment
You need to be a member in order to leave a comment
Create an account
Sign up for a new account in our community. It's easy!
Register a new accountSign in
Already have an account? Sign in here.
Sign In Now