

ThomasMoore
-
Posts
21 -
Joined
-
Last visited
Content Type
Profiles
Forums
Calendar
Posts posted by ThomasMoore
-
-
The Fsm says there is an idle ajustment screw below the intake manifold collector. I don't have a good picture of that for you.
Cheers. I'll have a crack at this on the weekend and post photographs if I get it to work.
-
Hey guys,
Probably a dumb question, but how do I go about upping the idle on my pathy? She's running a little low at stop lights. Probably around 600rpm, but i'm not sure as the tach is a little out at lower revs...
Cheers,
Thomas
-
I haven't the slightest about what it would take. Why not just replace with another 2 door interior?? Parting out vehicles is not uncommon...

B
Sorry, I just saw the "Australia", I have no idea of spares availability there...
almost all the interiors here are in really, really bad condition. almost as bad as mine. i've been meaning to do a 'refit' on the interior for a while (new carpet, seats etc), will post a few updates over the coming weeks.
-
just looked at the auction pics, i would bet those seats will work just fine, they look to have a flat bottom, just bolt your rails and brackets on the bottom where they need to be and enjoy!
for a hundred bucks or so, I might just give it a shot. If I do, i'll post what I find here and let you know how goes. if it needs fabbing, so be it. as always, thanks all for the advice.

-
Hey Team,
The front seats on my 1990 WD21 (3 door) are pretty tired. I found a good (cheap-ish) set of R51 seats on Ebay (http://cgi.ebay.com.au/Front-Seats-Nissan-Pathfinder-R51-D40-Navara-C55_W0QQitemZ160399415710QQcmdZViewItemQQptZAU_Car_Parts_Accessories?hash=item25588cd99e) - how easy would these be to retrofit to my truck? Also, any suggestions on what to replace the rear seats with?
-
Awesome, another one. Welcome aboard mate. Your the first QLDer as far as I know. Get some pics of the truck up.
Second Queenslander right here - Brisbane, WD21 1990 Pathfinder. Will upload pics after the paintjob (which is long overdue thanks to unexpected dental bills...)
-
Hey Guys,
I was going to rebuild the console (speedo & tachy) on my '90 pathfinder, but figured it'd probably be easier to re-wire / retrofit something a little more modern. I figure my first stumbling block is going to be the analogue speedo on the car. How easy / expensive is this to replace with a digital sensor? I figure I can find a digital sender unit / wiring from a local wreckers. Any experience with how to do this at the tranny end?
(Update - Z24 engine. Looking around PartsTrain doesn't look too optimistic for a matching speed sensor...)
Cheers,
Thomas
-
The horn is a GROUND switched circuit, which is causing the confusion. Most circuits in a car are hot switched. No worries, just need to wire it up a bit different.
On the NEW relay:
Pins 30 and 85 need to be connected to a 12V source. Can be hot all the time, or a switched source, depending on whether you want your horn to be be usable when key is off. Stock config would have it hot all the time.
Pin 87 goes to the + input of the horns
Pin 86 goes to stock horn switch in the steering column.
Which is the effectively the same as what you described, but reversed. So how you hooked it up WILL work equally well.
Is it not working?
If so, then I would suspect the contacts in the steering column. The pin that wipes on the copper ring does wear down over time.
Thanks for the reply - very much appreciated. I've just spent the last hour trying varying configurations, but still no joy - at least when it's hot wired I can get some sound out of it before it dies 10 seconds later. The first problem seems to be that the +ve input on the old 3 pin relay is burnt out, so I wired a new +ve direct from the battery to pins 30 & 85. This still doesn't resolve any issues:
Following your instructions, it should look like this, right?

I'll double check the contacts in the steering column, but i'm doubtful that this is the issue. How would I check the contacts in the steering column? I'm assuming the button here is hot?
Thomas
-
Screw it dude, get an airhorn.
I did

Heh, would love to and will do, but over here they are considered "novelty" and aren't allowed as primary horns.
Anyone?
-
Hey there,
Can anyone help a newbie with what is probably a really simple question? I replaced the horn on my truck (the old stock one had died a long time ago, somehow managed to get it through the roadworthy minus a horn), wired it in place, worked like a charm and then died in the ass. From what I can tell the horn relay died. Went looking for another relay (the old one is a 3 pin 12V 15A that looks something like below):

Apparently the only three pin relays are for indicators (i.e. they flash), and no-one has heard of a three pin relay for a horn. I got hold of a stock lighting/horn relay (four pin, 12V 30A) which looks something like this:

Question is, how do I wire this together? I thought it would be pretty simple, i.e. wiring (1) - (85), (3) - (30), (2) - (86/87). I connected 86 and 87 together before putting pin (2) on (86). Sorry if this is a really basic question, but it's been bugging me all weekend as it should be really, really simple. Happy to provide photographs if need be (yes, it definitely is the horn relay), and it worked fine before the relay blew out. Any suggestions would be really appreciated.
Thomas
-
How did they get stripped? Hopefully you dropped the Pathy off with them stripped and hes not just jerking your chain....
Yeah, definitely stripped on the top of the heads (not the manifold, sorry) - spoke to the mechanic today who says that the head might have to be removed to re-thread these - is this reasonable? I'm kinda surprised - is this standard? Still waiting for a quote for the labour though...
-
Hey,
Pathfinder is sitting in the local garage waiting on a thread guy to come tommorow to quote for re-tapping the header bolts (stripped threads, usual story) - i've no idea how much to expect for this. Anyone have any experience and $0.02?
Thomas
-
Well, the costs for everything so far is about $340, including the purchase and disassembly of the manuals plus renting a duplex scanner for the FSM and the architectural scanner for the wiring diagram. If I can get that back, I'll happily hand it out to all comers including giving it to PhatG20 for free distribution.
If you're wondering why the wiring diagram needs a superlarge format/blueprint scanner, see: http://npora.ipbhost.com//index.php?showto...=wiring+diagram
Edit: Did the math wrong.
I'd be more than happy to shill $$$ for this - do you have a paypal account or similar? See how many people would be willing to recoup costs for you here on NPORA before releasing it into the wild via hosting (which inevitably would mean recouping no costs at all - there aren't too many philanthropists outside of these circles who would be willing to click that donate button). After this, setting up a torrent would reduce bandwidth and remove any issues of DMCA notices. Let us know what we can do.
Thomas.
-
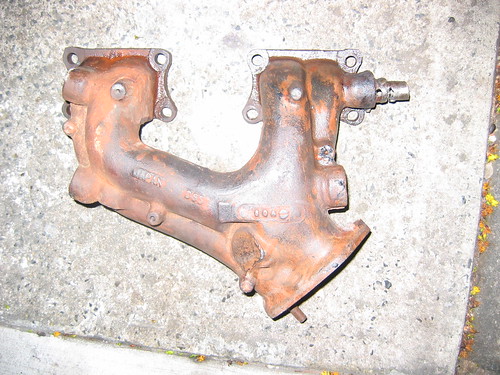
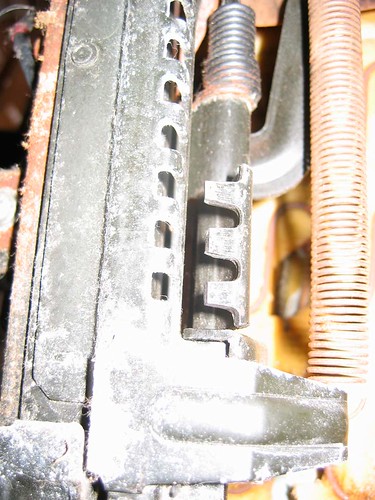
So, I removed the exhaust manifold from my 1990 WD21 (the threads are stripped on the bolts). First image (anyone had a competition for most rusted component on their pathy? Will post pictures of the muffler / catalytic elsewhere at a later date
 )
)
The entire process was a pain in the @ss - as you can see from the picture below, after trying to remove in-situ, the spanner completely stripped the thread. Enter trusty hacksaw:
So now the exhaust manifold is out, and I still can't shift it - the threads are rusted firm. I've tried WD40, rust remover, locktite ice-spray, tapping with a hammer, over the period of a week or so, and still no joy.
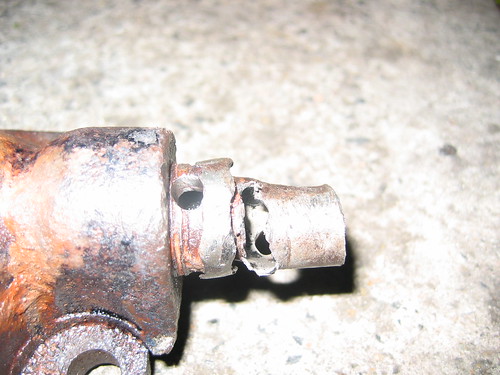
So with no grip on a spanner, earlier this evening I drilled a 6mm hole (as you can probably tell, the first one didn't work out too well, pipe is too soft...) and have snapped several screwdrivers and steel rods attempting to twist loose. Any suggestions? Getting close to just ditching the entire thing and replacing it, but the rust clears up well and any $$$ saved go back into restoration.
-
White, soon to be turned into Snow Camouflage.
-
I have a client that's a print shop, they have photorepro gear as well as access to a tabloid scanner. It won't happen until next year, though.
As a 1990 WD21 owner, it'd be great to see a copy of this - any updates on scanning?

-
YOu'll notice on older vehicles the seats are often cocked/crooked towards the inside(cause by people looking over theire shoulder) This is because the rails get out of alignment one is further forward then the other. Check to see if your rails are still square. (measure diagonally) they probably aren't
Took the rails off the seat and measured the diagonal distance of the bolt holes - slightly out of alignment. After 'tapping' it into alignment with a hammer (ok, it was slightly more violent, but hey) and bolting the rails back on it sits firmly in place - thanks for the heads up and advice!
-
Hey Simon,
I think you may have been looking in the wrong spot. The wire between the two rails is there to allow the 1 adjustment handle to move both rails.I'd look at the springs on the bad side, to ensure they have enough tension to interlock the rail on that side securely with the teeth.
Checked the springs - they still have ample tension and give plenty of bite, but they don't fall into the rail on one side - i'm not entirely sure why. When the seat is removed both teeth interlock with the rail securely, but when bolted in place the teeth on one side fail to lock into place (the teeth rest partially) - any advice?
Cheers,
Thomas
-
Hey guys,
First on the list of interior issues with my new project (1990 WD21) was to fix the seats - the passenger seat refused to click into place, instead sliding around on the rails. I took the seat off, fairly straight forward:
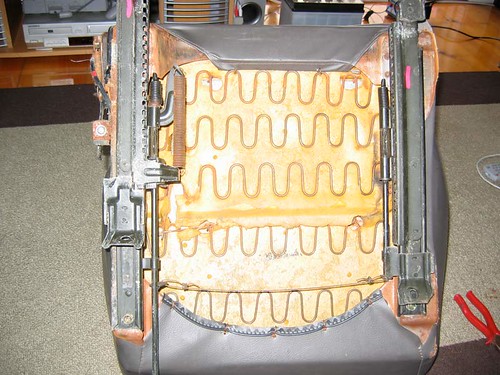
and adjusted the tension of the wire connecting both sides of the seat rail:
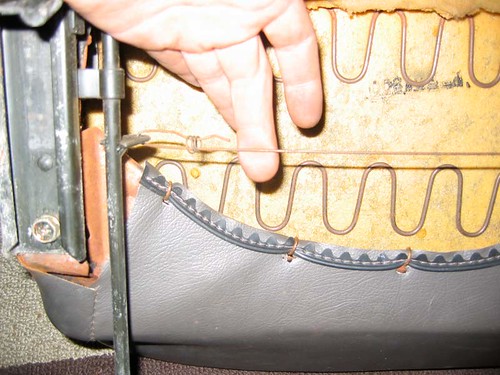
so that the teeth gripped to the rail as such:
This worked fine - the teeth (ratchet?) on both sides meshed seamlessly with the seat rail. So i lubed it up, bolted it back in place, and nup, same problem again. The side with the problem is the one away from the lever - it doesn't seem to be a tension issue as the lever extends both of the 'claws' (sorry about the terminology), but it refuses to latch fully in place on one side. I thought it might be a problem with the positioning of the rails before bolting in place but i'm out of ideas. Anyone else had this issue or have any suggestions?
Cheers,
Thomas
-
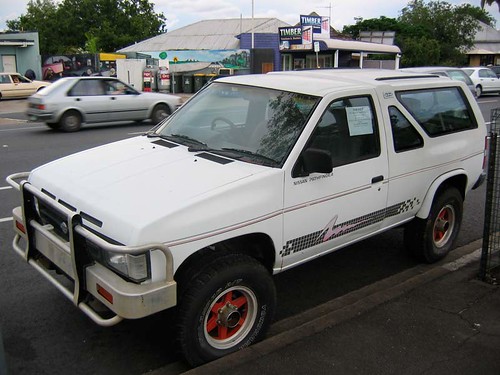
Hi All,
After a considerable period of time i've gone out and purchased my first car (>27yrs) after coming across a 1990 Pathfinder parked by the side of the street that I fell in love with almost instantly. Purchased for $600, and not without it's fair share of problems (the list is pretty enormous). Problem being in Australia, that the car is unregistered, therefore uninsured, making it pretty damn difficult to figure out what might be wrong. This being a project car, I was looking to do as much as I could prior to taking her to the mechanics for the 'problem' stuff (again, i'm far from a mechanic as this is my first car). Tracked down a copy of Chilton's at the local library and have spent almost all of the Christmas holidays inside, under the hood, or under the car. Was beginning to give up hope untill I stumbled across the NPORA forums - will be posting quite a few idiot questions over the coming months, in return i'll post as many "How-to" guides with photo's as I can on. Might even start a Pathfinder "blog" - from old - new.
Uploading pictures doesn't seem to work, so:
http://www.flickr.com/photos/22259221@N06/?saved=1
Thomas

Are These Stock Flares?
in The Garage
Posted
Yeah, they are stock not custom. What you are looking it is the stock flares with rubber trim added as an extension to cope with the big tyres.
Check this link for details on how it screws onto the wheel arch. I'm 99% sure this is the story.
I threw out my only original flare last weekend, but I can make photographs of my 1990 if you want to see how the rubber flare extensions look.
Where are you at in Australia? I have a spare roll of the rubber if you need it.
Thomas