- Sign In Changes: You now need to sign in using the email address associated with your account, combined with your current password. Using your display name and password is no longer supported.
- If you are currently trying to register, are not receiving the validation email, and are using an Outlook, Hotmail or Yahoo domain email address, please change your email address to something other than those (or temporary email providers). These domains are known to have problems delivering emails from the community.


siggy
-
Posts
4 -
Joined
-
Last visited
siggy's Achievements
NPORA Newbie (1/5)
1
Reputation
-
Buying a new ('94) front bumper piecemeal for an '87 WD21
siggy replied to flickertheory's topic in 90-95 WD21 Pathfinders
@Slartibartfast has brought up good and accurate information. There are machine screws and course screws involved in fitting this together, and the foglight deal is kind of a menace with extra trim pieces that are not included with the bumper insert you show. I don't think you absolutely NEED those extra trim pieces though, they just make it look better. @Mr_Reverse is also completely correct regarding the fog light brackets, trim pieces and bumper brackets. I bought a bumper and brackets off a pre-facelift truck, maybe a 1992 or something for my 1994. Long story short, there was a bracket issue and I had to get...creative. It involved the 4 lb hammer and a bit of cursing (my truck had been involved in a front end wreck at some point as well so the bent frame horn and sheetmetal didn't help...) Pay attention to how the bumper brackets mount to the frame. It's not exactly what I would call intuitive and would be easier with a second person. Just my .02 ...Oh! And you may want to prioritize fixing that fuel leak! It has the tendency to explode, though the smell will be nice till that happens! -
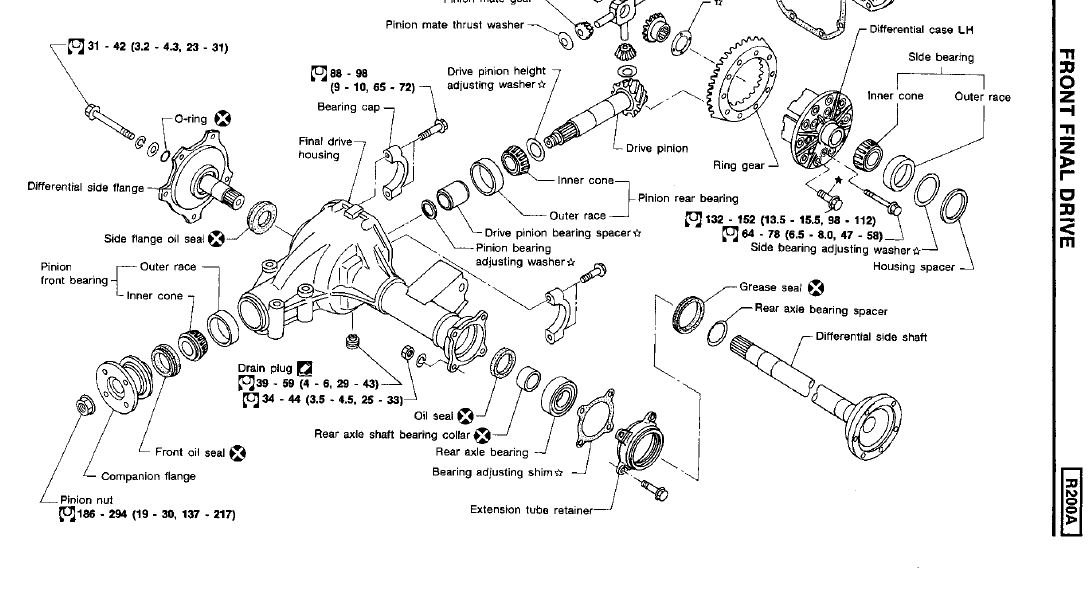
Hello all! I am in the middle of a front end refresh (CV axles, repack bearings/replace seals, rotors, pads, TRE, ball joints, sway bar bushings) and have hit a snag: When I peeled off my passenger side CV axle, I saw what I believe to be some nasty gear oil leaking out of the flange of the differential side shaft. I have a couple of questions regarding this discovery: - how could gear oil make it to the flange of the side shaft (where the CV axle mates) as the seals are inboard on the extension tube (this is the side opposite the pumpkin)? -is this just CV axle grease that has leaked out of the blown CV axle? smells a bit like gear oil however... but that could have been my gloves, that smell sticks around forever. The bottom of the extension tube doesn't appear to have a leak, just tons of old grease from the blown CV boots. -if I want to replace the grease and oil seals in the extension tube, can I remove the whole side shaft assembly from the extension tube by removing the four bolts on the extension tube retainer and pulling the shaft out, no need to mess with the internals of the diff. I don't see a retaining clip in there on the FSM diagram like is common on rear differentials to keep the shaft in place. The FSM for the R200A front axle (what I believe to have, 94 SE 4x4, MT, HG43 axle code in door jamb) has a single frame of a diagram showing a hammer tapping the side shaft assembly but is short on instructions. Attached is a frame of the manual showing the assembly I'm talking about. Thanks in advance. siggy