
pathfinder1990
-
Posts
30 -
Joined
-
Last visited
Content Type
Profiles
Forums
Calendar
Posts posted by pathfinder1990
-
-
Sounds awesome. Can you tell me which sensors are available for monitoring
-
Was wondering if anyone has installed any of these monitoring systems for their 3.5. Not a huge fan of mechanical style oil pressure however.
Are there any ob2 plug in style that could acess these readings, or do our trucks even have these sensors running. Surely voltage is there though.
Thanks
-
The led may be shorted internally itself. Test for continuity
-
Which interior bulbs are you changing. Cam you link to which ones you purchased (all though sounds like I don't want those ones lol)
-
Love this truck. The video was great. What have you done to your exhaust? No cats?
How much spring/spacer lift did you have that caused you the CV trouble? I'd like a set of flurry style spacers for 2inch all around but will just drop the sub frame from day 1 if it will save me the trouble.
-
No emmisons testing here. Just looked it up real sorry. That sounds like a true pain. Can you find a "better" mechanic. Someone less anal about 1ppm
Not sure if he has to report and record but at 1ppm you might have passed a second test done back to back..or failed worse.
-
I feel foolish saying this after how much thought went into your post however.
I have bank 2 02 codes as well..and I simply clear the codes and continue driving. Never done or heard of a test pattern drive (so maybe I'm out of my element) however..I have excellent gas milage and the truck runs like a top...clear codes and go.
-
So I tackled this yesterday, just need to upload the pictures. My PCV was absoultly plugged solid, no rattle what soever along with a blockage in the hard line after the PCV. Found all my oil too, caked and cooked into both the upper and lower intake manifolds.
Cleaned them like new and changed the spark plugs as well (the old ones looked okay, no signs of oil caked on them, refering to the Haynes manual spark plug pictures showed they were running "too hot."
I run premium gas because I found it does run more smoothly with it (also thought I was seeing less oil consumption with premium gas but I think that was a placebo effect. I did have/have O2 sensor codes on bank two, maybe forcing it to run to lean? After seeing my intake plenum I can only imagine what the o2 sensors look like.
Does anyone know what the average 2001.0 MANUAL pathfinder idol is? I used to sit at just above 950, now seems to sit around 970rpm. I believe this only because I had the battery disconnected. I manged to do this job without disconnecting any connectors on the throttle body.
Also my pictures are not the best as once my hands were dirty I just kept working and took a few, but for anyone looking to find how to get down to the PCV valve I recommend not searching for PCV threads, but rather the threads for applying lock-tight to Power valve screws for automatics, as those threads are very detailed in removing the intake Manifolds.***HOWEVER*** After doing this job once, i strongly believe replacing of the PCV could be done by removing ONLY the upper intake manifold and reaching behind by feel and removing the valve, but this would only be a comfortable way to do this job if you knew where it is, and how to remove it. This will not allow you to check hard lines for blockages and cleaning.
-
 1
1
-
-
Hey just looking to see how many people are running NGK Plugs, but mostly which sub-brand. I know NGK Laser Platinum are the OEM Spec, but at local shops they run $18.00 each.
The NGK G-Power is platinum tip plug as well, but are closer to $7.00 each.
There are also NGK Iridium plugs, for about $10.00 each
Just wondering how the G-Power plugs hold up, run, if any one has dared to venture outside the OEM specs.
Thank you -
How is the fluid level/colour?
But it sounds like a vacuum leak/brake booster issue. Do you hear a hissing sound at all? This guy has a general brake booster break down which might help you decide. Maybe check for seized on brake calibers, and your rear drums to see if they are fully seized as well. Safely raise and front, then rear and spin wheels by hand to feel for drag.
https://www.youtube.com/watch?v=LQj6jUn4-U0 -

Pictures for a bump? Here is the gaskets, valve, grommet ready to go. Any spark plug recommendations, middle of the line$. -
I have read quite a few threads (although they are hard to find and very old) on getting to the PCV valve to change it. Going to tackle it this weekend, recently got all the gaskets/valve/grommet. Just had a few questions.
It is for a 2001.0 Pathfinder SE
1) Do i have to disconnect or open the cooling system in any way. This is a manual transmission so i don't believe any coolant lines run through the throttle body. My truck had some nightmare like overheating issues due to an air bubble in the cooling system a year ago, we eventually got it burped but I basically never want to open that system again:|.2) The gaskets for the most part, is there an up and a down, should gasket tack spray be used to help hold them in place while reinstalling the plenums.
3) I have read a few people complain about strange idol after doing this work, and having to do an idol re-teach? Could anyone speak about this or any other "after the job" issues that arise?
4) Change spark plugs while i'm there because of the ease of access, any other "while your there" (Again i'm not going to touch the cooling system if possible, so the water control valve is not something I am willing to change.
Thanks very much, ill be sure to take lots of pictures of the procedure and my findings, if anyone has a few good links where someone else has done the same I like flipping through them all before I start my own work. I have read *PCV valve replacement, a horor story* which was helpful.
Thanks-
1
-
-
So i tackled this project today, and the first bit of advice you need to know going into this job is...
Have a new set of sway bar links ready to go in. return them if you don't need them.
But i got up to the shop early this morning ready to start, only to be stopped by the sway bar link. Mine is the allen key style, which requires it to be held with an allen key, and the nut spun with a wrench. I manged to get it started but the inside of the sway bar link bolt must have snapped and would free spin inside even though the allen key was being held.
So now i have one very loose front sway-bar link, going to pick new ones up tonight. I had to fill the gap from the threads i had manged to losen with medium size clips so it doesn't bang around too bad. I hope i can make it to the city okay. ill take it easy.(the old ones will need to be cut off)
-
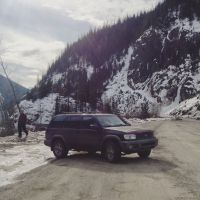
Hey everyone, I recently did my rear suspension and now its time for the front. I had a few extremely helpful tips last time and id like to start a topic on the how to as well. I have the haynes guide and read it but still like to hear and talk about personal experience and tips before starting.
So i have new springs, struts, spring insulators, strut mount, and bearing. But am reusing the metal spring seat and mount plate. I have all new hardware.
1. I just looked at the struts installed and noticed the "Notch" In the metal spring seat is randomly placed on bothsides of my truck from whoever installed them last. I believe this notch is suppose to line up with the lower strut mounts facing outward. true?
2. The strut mounts themselves are marked with a L and R. Im assuming this means left and right, but should the R be facing outward on the RIGHT side, and L face out on the left side? Or does the R face inward on the Left side (pointing to the right) and the L face inward from the right side (pointing towards the left) Im sure that paragraph is confusing but im sure someone knows what I mean without a picture.
3. Is everything tightened close to torque spec, then lowered , and then properly torqued when the truck is on the ground?
4. Any other secrets while rebuilding/replacing? Why does it require an alignment after. I understand it may sit a little higher than it does now (the struts it has are bad but not shot)
Thank you very much -
I've been searching around and seen a few different methods, some easier than others.
Changing out my rear springs and shocks this week and have a few questions.
1. Are spring compressors necessary? (Installing replacement original springs) I can see how easy it would be with them, but does anyone have a write up where none were used. I will be using them if i can find a set. or wait until i have them if it is better to do so.2. Also I can see a thick plastic coating on the bottom of my old springs, my new replacements do not have that, but are lightly coated in rubber/paint. I was thinking about using a layer or two of shrink wrap as in insulator, any other options.
3...is there a top and a bottom
Any other tips while i'm there. Thanks alot -
On second though thanks to 97pathfinder, I will likely install all stock suspension and let it settle to see what kind of natural rake the stock suspension leaves, then using the proper measurements I have seen some where in this forum will order the correct spacers for a level ride, Maybe 1.5 in the front, and back to stay level.
-
Those kits are are awesome(looking)! I like the fact they come with new strut plates with extended studs pre-installed.
I know its easy to bang out the old studs for new ones, but if you wanted to replace the top plates they're nearly 30Cdn each.
I see they have some rubber in the center of them, does anyone know how reusable they usually are?
How awkward/stressful would it be on my truck if i installed the 2 inch lift in the rear before I change out my front suspension? I only ask because my rear springs need to come out ASAP, and if i order the lift spacers they will arrive a good time after my suspension does. -
thanks would be intrested
-
are they 1.5" the ones that give the proper 2 inch lift due to the geometry, or are they true 1.5?
-
Sweet so I'm next to all set, but now that flurey is no longer making the spacers I've lost some motivation towards anything but stock. Any other topmount style spacers anyone else liked?
-
Now that your spacers are unavailable is there someone else you could recommend
-
If i decide to go the 1.5-2inch spacer lift on oem suspension, are the rear shocks going to be to short.
-
Front Right

CAD$77.97CAD$77.97
Front Left
CAD$77.97CAD$77.97 Suspension : Shock AbsorberRelated PartsShock Absorber BushingShock Absorber Nut ToolSpring CompressorSteering & Suspension Repair ManualSteering Damper
RearSelected: [Wholesaler Closeout] (Only 4 Remaining) (CAD$34.94) [Regular Inventory] (CAD$42.76)
CAD$42.76CAD$85.52 Suspension : Strut MountRelated PartsBearing Race / Seal DriverSteering & Suspension Repair Manual
Front; Mount, Bearing and Boot
CAD$61.28CAD$122.56 Suspension : Coil SpringRelated PartsCoil Spring BoosterSpring CompressorSteering & Suspension Repair Manual
Rear; Constant Rate Spring
CAD$41.46CAD$41.46
Front; 4WD; Constant Rate SpringCAD$582.52
This is what i have in my shopping cart for purchase. I can get Monroe Struts locally but are $170.00 a piece. Id love to hear more about KYB vs Monroe, but for light of roading i like to think the KYB will work well. Also i will purchase OEM Strut Mounts/bearings as per your post if MOOG are considered similar to KYB. How does this look.
Now with all the above parts, all I need is spacers? Not sure of the condition of the rear spring seat insulators or front and other possibly common forgot parts while changing out the suspension. How much and where can I find some trusted spacers, how high can I go before requiring "camber kits" i have been reading about? Thanks! Can be a little overwhelming with SO much info out there it seems easier to start my own case. Tire spacing,camber bolts,longer brake lines,cv axel angel,locking hubs to fix...haha. almost ready to hit purchase. -
Thanks for the read. Sounds like a nightmare really. So going this route is a spring lift, rather than using the spacers I see. Sounds like a better way to go about achieving a small lift.
The parts in the link are mainly steering. I have already changed my mind and will avoid purchasing the EBAY brand. Now steering toward the MOOG Rockauto kit. Does anyone have any experience with the MOOG control arms, balljoint, tie rods.
The OME (took a while to figure out it means old man emu and not a Orignal Manufacturing Equipment.) 1.75inch lift complete package looks to run about 900American. Does anyone know what the complete kit contains (Strut mounts, all the extras.) It says the lift will require 3.75backspace rims. What is this all about? why would the stock 16s becoming unuseable. *although after the lift, new tires/rims would be next but one thing at a time would be ideal.And finally, would spacers be a considerably cheaper option, if not using for hard-off-roading. *although this is cause the topping out*
The final word on lifting the R50 at a low Cost
in 96-2004 R50 Pathfinders
Posted
So excited to hear that. I see some cold days in my driveway coming.