

Bubbley11
-
Posts
848 -
Joined
-
Last visited
-
Days Won
6
Content Type
Profiles
Forums
Calendar
Posts posted by Bubbley11
-
-
You should run the same size tire as the geometry could change, might be a little or alot but it changes. They look good for a bit of travel, ive seen far worse. But for you being in the PNW, like me, it gets squirrely with flat tires. Plan on changing them soon with the winter coming up quick.
-
 1
1
-
-
So my fifth gear bearing went too long without me looking for the overfill thread. So I think I will be in need of a new one soon. I want to swap a 96+ one in that is a manual, if I can find one. What a I want is the 1-3 gears, in my old one, in the new one and the 4&5 to be the new ones. As the new one has a smaller ratio. Can I swap them or are they different width's?
I want my crawling gears but it might just be better to just swap the tranny. So what do you think am I crazy or just itching to screw something up?
-
I know some of you have them or some form of it. I want to get it from a junker but would like to see the whole route and trace it to be sure.
-
If I had a real computer to use I would, but stuck with what I have. 17 days till im back home tho, almost done with training. Ill try to get some when I return.
-
Too bad I get home at then end of Aug. Ill have some pics when I get back home. Havent seen the thing in over four months.
-
I see you are a fan of two tone also. Hope you have fun here.
-
As I can't seem to find it ill just ask another question. What are the work differences? I can name a few, shifter and radiator, but what is the entire list? Thank you in advance.
-
Chitty chitty bang bang, when I got it, to a nice version of The Boxer- Carbon Leaf.
-
Looked at pictures of it because in stuck 2000 miles away. Only three months left till im done with my training.
-
Get the wire long enough and put it on the ceiling. I think that sounds cool but might be to impractical.
-
1
-
-
R&B with Celtic and Irish Pub Rock not far behind.
-
They did come with 15 gallon tanks. Mine is a 15 and it shows it just fine.
-
Nervous is what I ment for previous. Stupid phone
-
Boarding the plane right now. Getting real previous. Hope it goes well. AIT will be more fun as I can walk the base and go fishing down there. I will be back around the first of September. Thanks for the support.
-
Well today I leave for basic training and AIT. This will be my last post for a long time. I hope my pathfinder is sound when I come back. See you guys soon.
From Jordan
-

Here you go. Hope this helps other people more
-
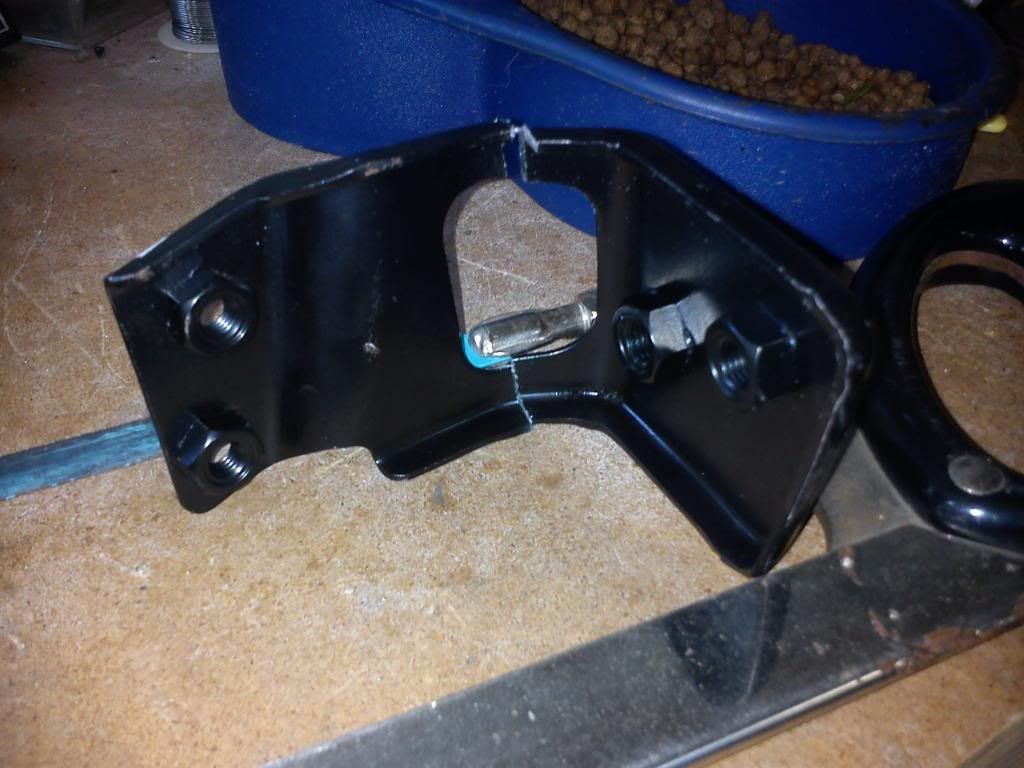
Yeah I know I could have done its cheaper and a bit cleaner. But it still is very strong, tested it. I never saw how you guys did the mount with four nuts. I tried for hours to get the top mounts in with out cutting but in the end it was easier. I feel it is very good for what its going to be for. Its mostly going to be closed, but I needed the room in the back.
Nunya, did I go to far with the cutting? Feels right but I but ive been wrong before.
-
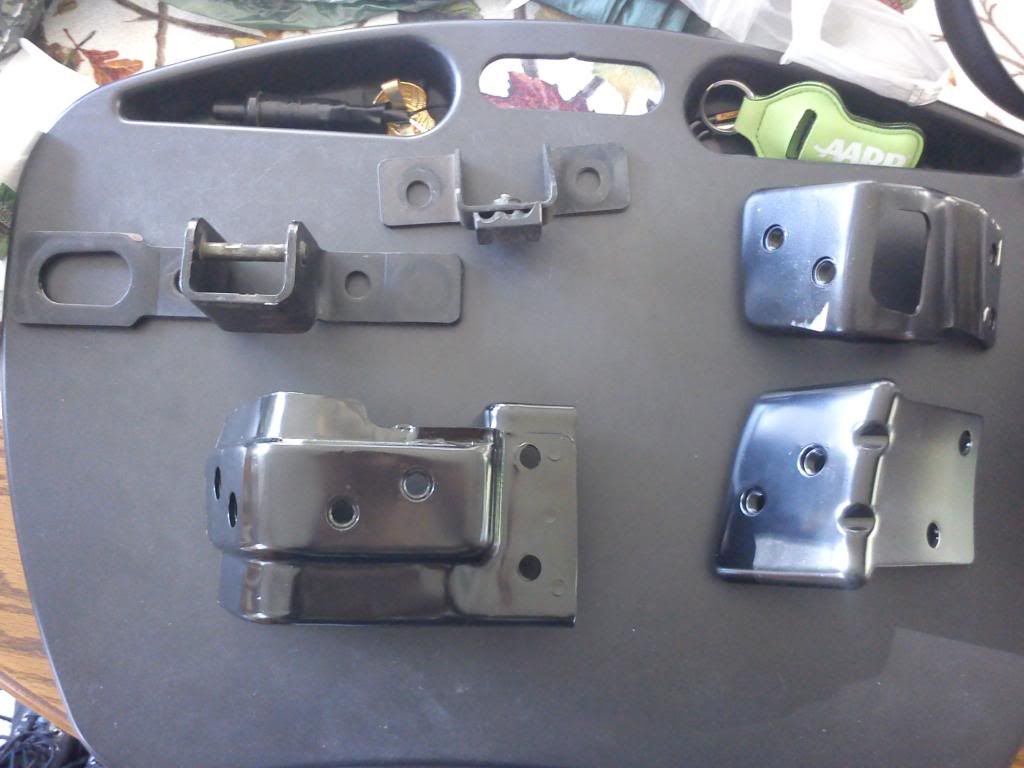
The most flat mount is outer top. The other small one with the lip goes rear top, and long POS one is the bottom.
-
Bubbley11

-
Now to Install the rack itself. This is when you want to take your time, and go slow.
Drill the holes and test fit the mounts.
Then after you have those mounts and hole lined up so they work and thread easily. Slather some caulk or silicon sealant on the rack part of the mount and install.
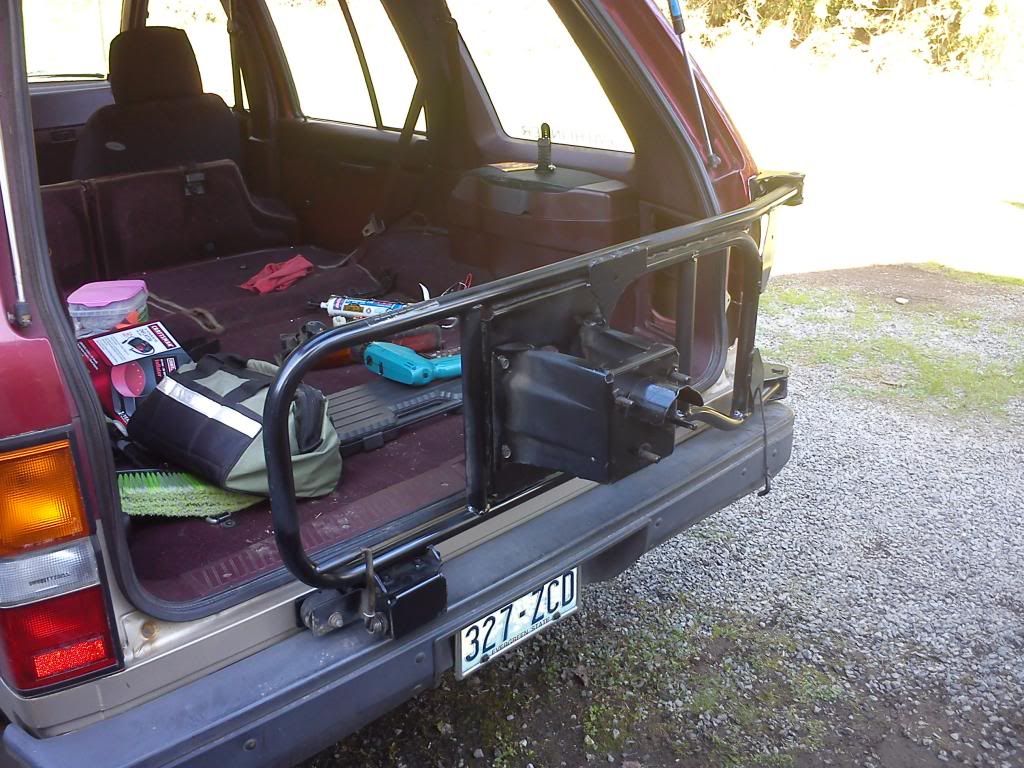

Stand back and look how it came together and looks now. Total money spent right around 100 bucks total.
Hope you all enjoy your new tire rack.
-
1
-
-
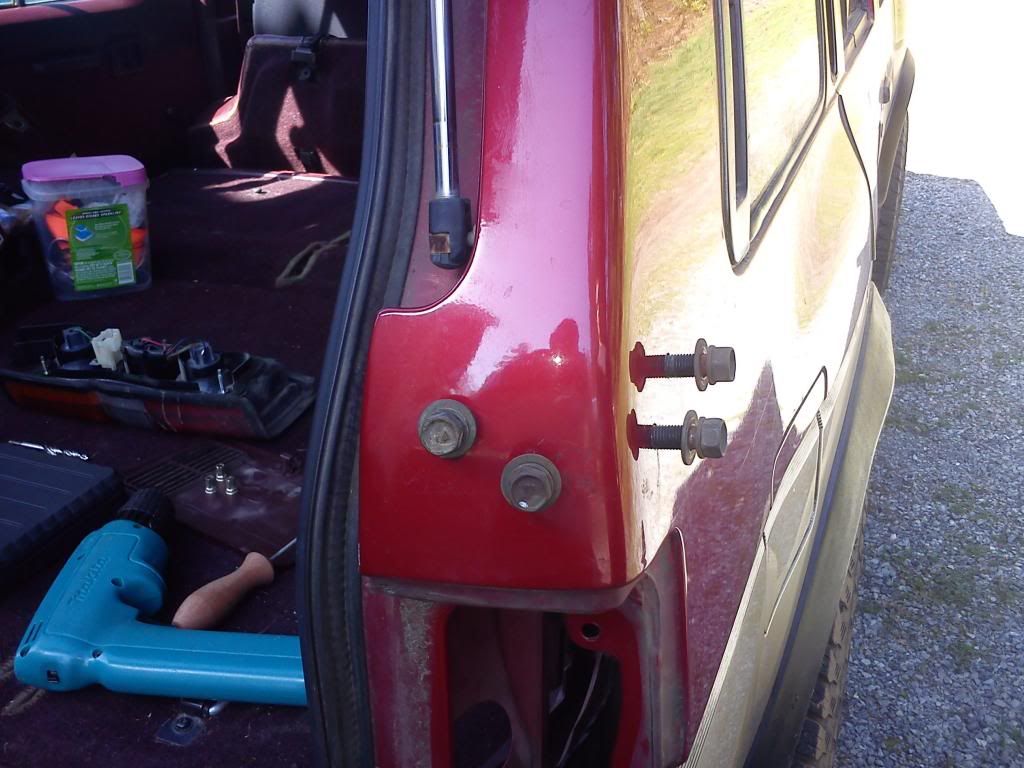
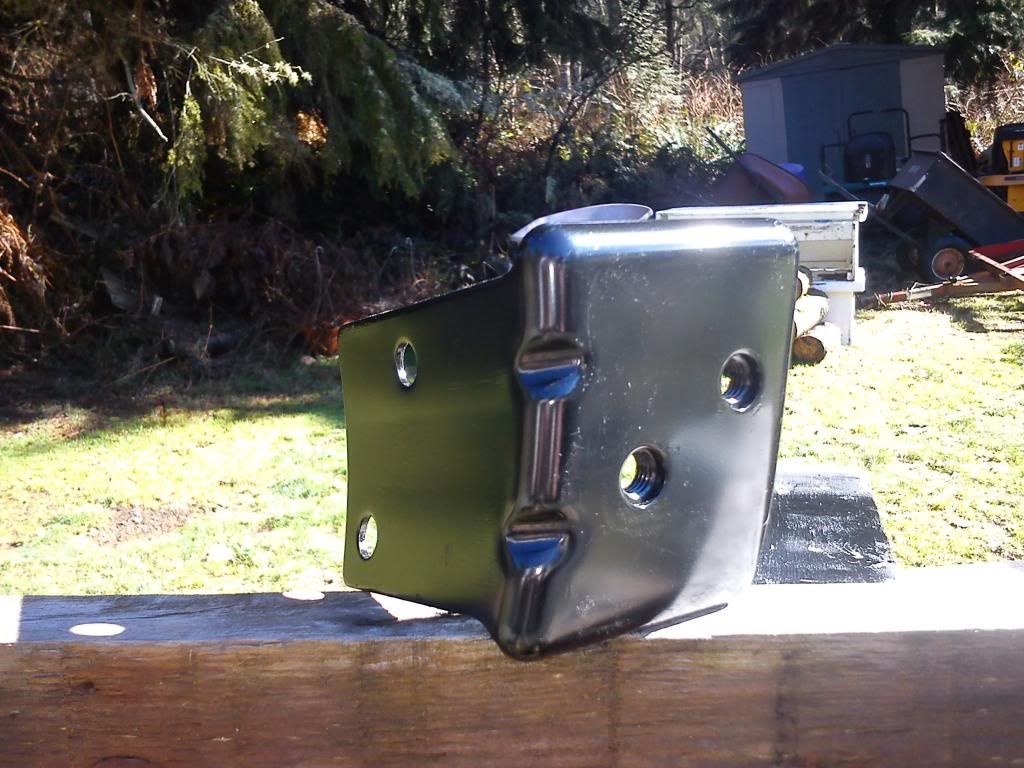
Now to cut the mounts as they will not go in easy. This is one of the hardest parts, because it takes time to cut if yo have a hack saw. My friendly neighborhood hillbilly has a band-saw so it went by faster. These are where I cut.

Seem to have forgot one well on this one just cut off the little part of thin metal.
-
So I've decided to to bring my pain and agony to you guys, so you can have an easier time then I did. Now if it looks a tiny bit sloppy its because I had to rush this, as I will begone for over six months for the Army. So don't make fun of my awkward fast but effective work.
Ready for the pics....Alrighty then
Fist get yourself a Tire Rack from the junkyard. Then get the mounts, be it from the JY rig(old) or from Rob(new).
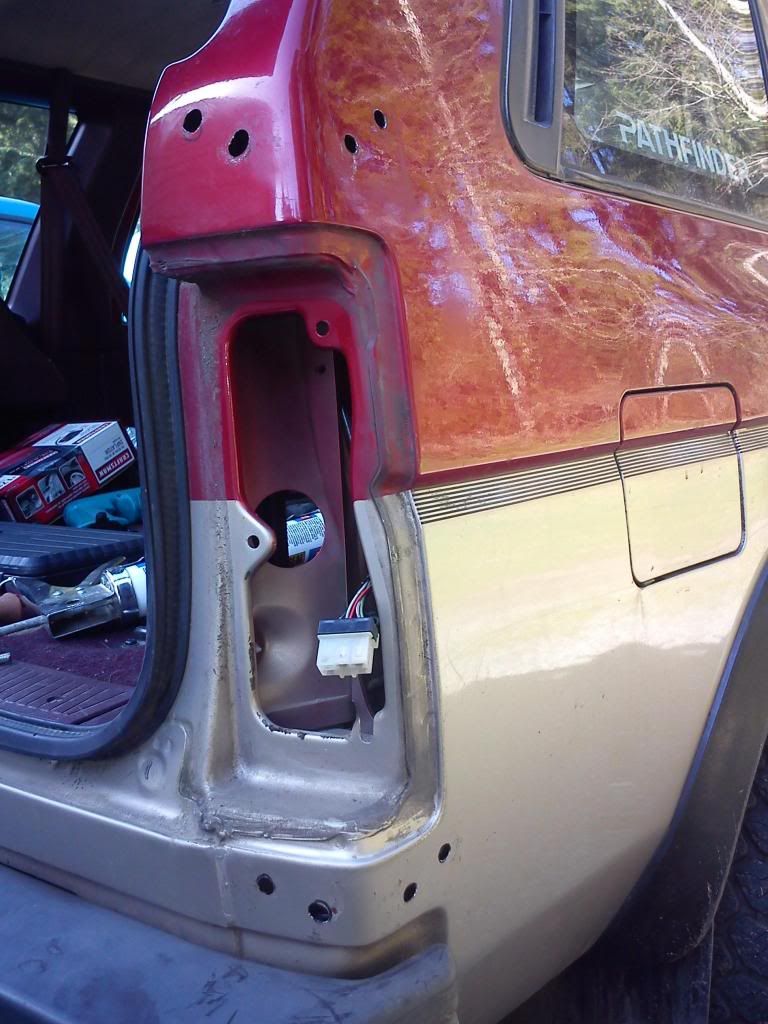
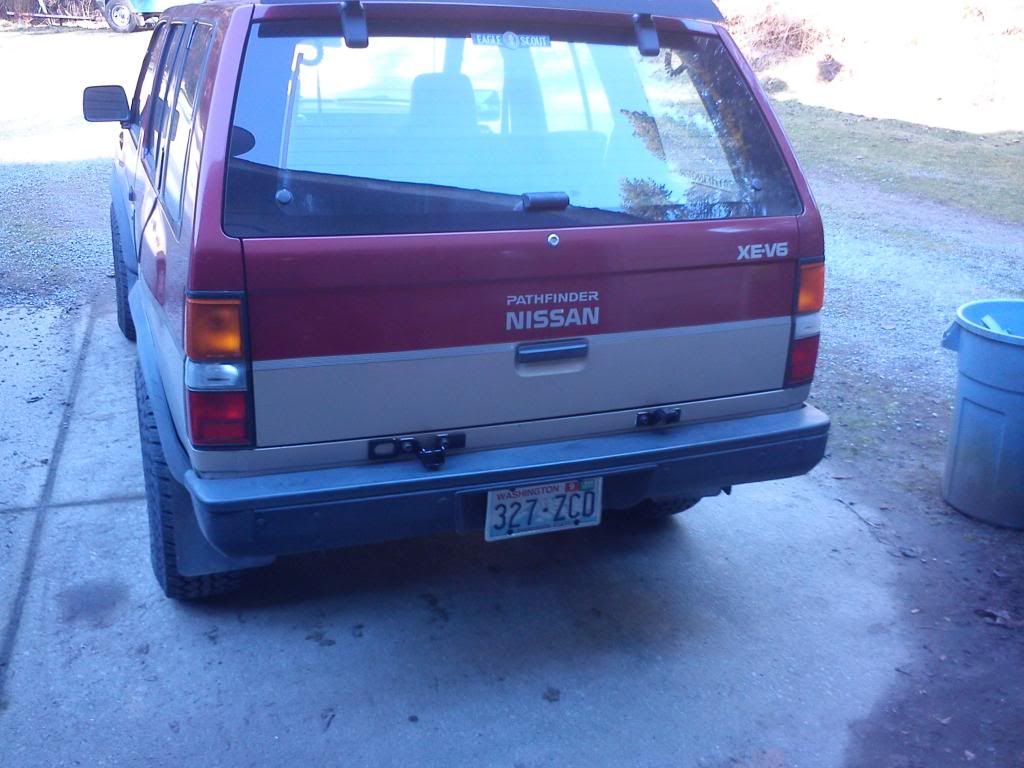
Find the dimples under the rear door, this is where you have the mounts for the lock and rest positioned. Drill the holes till the bolt slides through the hole will minimal rubbing.


-
1
-
-
Ummm, way to bring back the dead.

-
Welcome, hope you find the info you need here. Feel free to post pic's if you like, we love pics.


September 2014 TotM Nominations
in Truck of the Month
Posted
Bubbley11