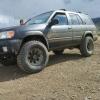
AkPrecision Posted September 27, 2015 Share Posted September 27, 2015 Here ya go fellas. Idk if there is aNY way to get it any lower and it is rock solid 5 Link to comment Share on other sites More sharing options...
till44 Posted September 28, 2015 Share Posted September 28, 2015 Conduit fasteners? What are the bolted to the rail with? 1 Link to comment Share on other sites More sharing options...
AkPrecision Posted September 28, 2015 Author Share Posted September 28, 2015 Yes they are and there are 5 factory 10mm threaded plates inside the track. Find the right length 10mm bolt and screw them right in Link to comment Share on other sites More sharing options...
Megaton Posted September 28, 2015 Share Posted September 28, 2015 Well duh (on my part). Since I made my safari rack out of 3/4 in electrical metallic conduit,your solution will work perfectly. I've been trying to think of a way to use the existing track to mount it. I guess the answer was so simple it plum evaded me. Thanks AkPrecision. I just love this forum! Link to comment Share on other sites More sharing options...
AkPrecision Posted September 28, 2015 Author Share Posted September 28, 2015 Of course! Always glad to help. This forum has provide me with mountains of information and I wouldn't be this far along without it Link to comment Share on other sites More sharing options...
01Pathmaker Posted September 29, 2015 Share Posted September 29, 2015 Looks good AK! Hey Megaton, do you have any details on the build of your rack? Been thinking about this for a while. Link to comment Share on other sites More sharing options...
till44 Posted September 29, 2015 Share Posted September 29, 2015 (edited) Also interested in the conduit rack plans. And AK, thanks for the explanation. One further question though. The factory 10mm mounts, are they just the mounts from the 2 main bars and the 3 smaller supports bars of the OEM rack? Edited September 29, 2015 by till44 Link to comment Share on other sites More sharing options...
Megaton Posted September 29, 2015 Share Posted September 29, 2015 You'll need about 100 feet of emt conduit(whatever diameter you choose),8 90 degree elbows,and 16 connectors(I bought the contractor pack of 25 cheaper than 16 individual connectors). I bought a tubing notcher but you can smash the ends flat in a vice if you want. It's up to you how big you want it. Of course,the bigger you make it the more tubing you'll need. I'll try to post photos when I learn how to do it(I'm an old dog so it's hard for me to learn new tricks). Get it how you want it then weld it together. That's were I am now.I just haven't had time lately. 1 Link to comment Share on other sites More sharing options...
Zero Posted September 30, 2015 Share Posted September 30, 2015 That's pretty brilliant! I was looking for an alternative to my stock roof stilts on my qx Link to comment Share on other sites More sharing options...
AkPrecision Posted September 30, 2015 Author Share Posted September 30, 2015 Thanks everyone Nothing was screwed into them when I purchased this truck except a couple little black screw tabs and they are just floating in there. If you run your fingers through the track you should feel them in there. they are the only screw points inside the track. I'll find a picture of what they look like. The are stainless squares inside a plastic sliding guard with a 10mm hole in the middle Link to comment Share on other sites More sharing options...
hawairish Posted September 30, 2015 Share Posted September 30, 2015 Yeah, those anchor points that AkP mentions weren't used on my truck either, but they are there. I had been looking for whatever tie-down piece was supposed to be there, but could never find a part number for them. It wasn't until the other week while pulling a newer style rack for Kyle (ferrariowner123) that I realized that they were only included with the cross bars on the older R50s. Though, I measured the bolts as being M6x1.0. I pulled the crossbars from the junkyard and installed them on the truck, too. 2 Link to comment Share on other sites More sharing options...
Megaton Posted September 30, 2015 Share Posted September 30, 2015 One other note. EMT is galvanized. When welding something galvanized you must remove the coating with muriatic acid or the fumes generated can be deadly! There are videos on YouTube that show how to do this. I used a length of 1 1/2 in PVC capped off on one end filled with acid to dip in in. I used the same filled with baking soda and water to neutralize the acid on the part. After the coating is removed the part should be primed pretty soon or it will rust. 1 Link to comment Share on other sites More sharing options...
01Pathmaker Posted October 1, 2015 Share Posted October 1, 2015 Yeah, those anchor points that AkP mentions weren't used on my truck either, but they are there. I had been looking for whatever tie-down piece was supposed to be there, but could never find a part number for them. It wasn't until the other week while pulling a newer style rack for Kyle (ferrariowner123) that I realized that they were only included with the cross bars on the older R50s. Though, I measured the bolts as being M6x1.0. I pulled the crossbars from the junkyard and installed them on the truck, too. Very good point Patrick, and yep, my 96 has 3 of the crossbars you have pictured (in addition to the 2 elevated bars), my 01 just has 2 elevated bars and 4 of the little black tiedowns (but there are a few more of those threaded plates in the rails). Also, I'm pretty sure AK is referring to the size of the head being 10mm, good info though, as I was curious as to the thread size and pitch, but too lazy to unscrew one of those little guys to investigate. Link to comment Share on other sites More sharing options...
01Pathmaker Posted October 1, 2015 Share Posted October 1, 2015 One other note. EMT is galvanized. When welding something galvanized you must remove the coating with muriatic acid or the fumes generated can be deadly! There are videos on YouTube that show how to do this. I used a length of 1 1/2 in PVC capped off on one end filled with acid to dip in in. I used the same filled with baking soda and water to neutralize the acid on the part. After the coating is removed the part should be primed pretty soon or it will rust.VERY GOOD SAFETY INFO HERE! Sorry for yelling, just wanted it to get noticed, because yeah, welding (or burning off in any manner) a galvanized coating is no bueno. Some choose to grind it off (just a light kiss with a mild abrasive disc in the areas that will be welded), but there to, proper PPE needs to be worn to protect your respiratory system and full goggles should be worn as well. Link to comment Share on other sites More sharing options...
deltaR50 Posted October 10, 2015 Share Posted October 10, 2015 i did this and i just reused the oem mounts. and yes it is very sturdy. i love it 2 Link to comment Share on other sites More sharing options...
Recommended Posts
Create an account or sign in to comment
You need to be a member in order to leave a comment
Create an account
Sign up for a new account in our community. It's easy!
Register a new accountSign in
Already have an account? Sign in here.
Sign In Now