CDN_S4 Posted June 3, 2015 Author Share Posted June 3, 2015 One more, Pathy camping with its cousin 1 Link to comment Share on other sites More sharing options...
CDN_S4 Posted June 3, 2015 Author Share Posted June 3, 2015 next in the build: - Air bags for the rear coils - Cold Air Intake - SFD - New exhaust Link to comment Share on other sites More sharing options...
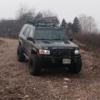
CDN_S4 Posted June 14, 2015 Author Share Posted June 14, 2015 Air bags have arrived. Dropped it off for SFD but the bolts on the frame are spinning and not extracting. This is going to become a much more costly process than I had hoped. Air intake is in. Don't wanna call it cold air as the temps under the hood get so hot. Will likely get hood louvers to aid in cooling. Here some more pictures from the last adventure. This is why I need air bags and the SFD. Saw this on Expo. Similar to my trunk setup but I like lableing it all with name tags. 1 Link to comment Share on other sites More sharing options...
hawairish Posted June 14, 2015 Share Posted June 14, 2015 So you pulled the trigger on the SFD? Hope those spinning bolts get sorted. Also, if there's any tip I can offer, it's to leave the suspension intact when dropping the subframe. Do one (strut spacers or subframe drop), then do the other. Having the suspension still in place helps keep the subframe lined up when lowering it, and helps support other parts. 1 Link to comment Share on other sites More sharing options...
ferrariowner123 Posted June 14, 2015 Share Posted June 14, 2015 (edited) Don't have much advice on the SFD but I may be able to give something on the intake. I've seen other members on different forums who utilize some of the stock air box, to make a sort of "ram air" style. They use the hole below the stock air filter box and plumb a tube that gives the filter more direct air. Maybe that can provide some sort of a cooler air solution? Also, isolating the filter from the rest of the engine bay is something that alot of high end, aftermarket air filter companies incorporate into their designs as some sort of an attempt to get inlet Temps down. Maybe you could attempt to replicate something like that of what the K&N filters offers to VQ equipped R50's, karmann has one on his, check his thread for a better visual incase I'm bad at explaining. Looking forward to seeing further updates! That back seat you showed is awesome! Really want something like that, but don't want to put stuff on top of that when I have to haul stuff around. -Kyle Edited June 14, 2015 by ferrariowner123 Link to comment Share on other sites More sharing options...
CDN_S4 Posted June 14, 2015 Author Share Posted June 14, 2015 Yeah though about closing it in as well. Now that I know the new one works I might dare to destroy the oem one. Or find a way to build a custom enclosure. The kit actually came with one but it doesn't fit the pathfinder. Was designed for the Xterra. I've also finally realized that there is something really bent in my front axle assembly. I've leaned out the window and watched my tire wobble. That would explain the shaking in my steering wheel lol. And it would explain why 2 alignments didn't take care of it. This also means that those 2 shops are junk since none of them picked up on it. Then I saw this: Hard to see in this vid but: https://vimeo.com/130699159 Link to comment Share on other sites More sharing options...
ferrariowner123 Posted June 15, 2015 Share Posted June 15, 2015 (edited) Time for some Rockford thermoplastic boots! Such a good upgrade for lifted R50's, but a HUGE mess! -Kyle EDIT:Is the Xterra one that differ that you can't modify that? Probably easier than hacking up the stock box? Idk, maybe you're thinking of something I'm not. Edited June 15, 2015 by ferrariowner123 Link to comment Share on other sites More sharing options...
CDN_S4 Posted June 15, 2015 Author Share Posted June 15, 2015 You're probably right that I could just modify the Xterra one. Just hadn't taken the time to look at it yet. How are te Rockford boots a MESS? I've never done these before so I have no idea. Link to comment Share on other sites More sharing options...
Rebelord Posted June 15, 2015 Share Posted June 15, 2015 It can be messy cleaning up the old CV axle. Getting the grease off and such. Unless you have a parts washer. Then it make life a lot easier. If you get the rockford ones, when you put the new grease in, just cut a corner to squeeze it out. Also, on my rockfords. The clamps I had little success with. Ended up using hose clamps. BTW, you may need a press to get the outer end axial part off. Depending on current grease condition and contamination. Link to comment Share on other sites More sharing options...
fleurys Posted June 16, 2015 Share Posted June 16, 2015 You're probably right that I could just modify the Xterra one. Just hadn't taken the time to look at it yet. How are te Rockford boots a MESS? I've never done these before so I have no idea. There are no that bad really... just make sure you have a small bucket with paint thinner and a roll of shop rag before you start... Then clean up as you go and drop the parts in the bucket to remove the grease as you go.... http://s435.photobucket.com/user/steve_fleury3/slideshow/RockFord-cv-boot?sort=2 1 Link to comment Share on other sites More sharing options...
ferrariowner123 Posted June 16, 2015 Share Posted June 16, 2015 Okay so maybe did it wrong then, but all i know is that i did it at a buddies house, in his garage. About 4 years later he moved (to Korea believe it or not). When we were pulling out the work bench and tool chest, we found bits of blue grease from when we did my half shafts... So yeah, maybe i did it wrong, but the shafts are great, really love how thick the material was. It was a set and forget mod for sure. Steve's write up was all i needed to have the confidence to tackle this job, so thanks again for that Steve! -Kyle Link to comment Share on other sites More sharing options...
clkindred Posted June 16, 2015 Share Posted June 16, 2015 I had an issue with the clamps that Rockford sent with my boots as well. All the small ones and the big outboard clamps were fine, but the big inboard clamps were a hair too large. With the clamp set into the smallest notch, I crushed the bump completely with pliers designed for these clamps, but no dice, not quite tight enough. It will look tight enough, but it oozed grease and made a huge mess. I replaced them with the "smooth band" hose clamps, mostly because they were the correct width to fit in the clamp channel. Link to comment Share on other sites More sharing options...
ferrariowner123 Posted June 16, 2015 Share Posted June 16, 2015 I had an issue with the clamps that Rockford sent with my boots as well. All the small ones and the big outboard clamps were fine, but the big inboard clamps were a hair too large. With the clamp set into the smallest notch, I crushed the bump completely with pliers designed for these clamps, but no dice, not quite tight enough. It will look tight enough, but it oozed grease and made a huge mess. I replaced them with the "smooth band" hose clamps, mostly because they were the correct width to fit in the clamp channel. Strange, maybe you got the one that was packed on a Friday, using the tool Steve suggested, i had zero issues installing my RF's. -Kyle Link to comment Share on other sites More sharing options...
96Pathfinder4x4 Posted June 16, 2015 Share Posted June 16, 2015 Where do you get these Rockford boots? New shafts needed also? I think I'm going to need to replace my steering box this summer....might as well put in new CVs while I'm at it. Link to comment Share on other sites More sharing options...
96Pathfinder4x4 Posted June 16, 2015 Share Posted June 16, 2015 (edited) deleted - carbon copy post Edited June 16, 2015 by 96Pathfinder4x4 Link to comment Share on other sites More sharing options...
lerch641 Posted June 17, 2015 Share Posted June 17, 2015 Buddy, I've been gone for a bit but just updated myself on your R50 and well done on the work you've put into it! Seriously, kudos! 1 Link to comment Share on other sites More sharing options...
CDN_S4 Posted June 18, 2015 Author Share Posted June 18, 2015 Thanks man. I've definitely put a lot more into this than I had ever set out to do. But I just fell in love with it. Link to comment Share on other sites More sharing options...
ferrariowner123 Posted June 18, 2015 Share Posted June 18, 2015 Where do you get these Rockford boots? New shafts needed also? I think I'm going to need to replace my steering box this summer....might as well put in new CVs while I'm at it. http://www.rockfordcv.com/ BOOM! But if i remember correct, you have to use the crazy thing call a telephone to order. They are pretty old school, but worth it. If my memory also serves me correct, they have raised their prices a little, i think it was $80 for a full set (too lazy to check my folder), and now its a little more, i think. And nice to see your still around on the forum! -Kyle Link to comment Share on other sites More sharing options...
CDN_S4 Posted June 18, 2015 Author Share Posted June 18, 2015 Thanks man. I've definitely put a lot more into this than I had ever set out to do. But I just fell in love with it. Link to comment Share on other sites More sharing options...
96Pathfinder4x4 Posted June 18, 2015 Share Posted June 18, 2015 CDN_S4: Your rig looks nice and mean with that Jeep bumper! I like it. Kyle: Thanks! House remodel and life changes turned the PathGrinder into a Trailer Queen....literally...towing a trailer. My plan is to get some repairs and upgrades over the summer and be ready for the winter/desert season. Link to comment Share on other sites More sharing options...
CDN_S4 Posted June 25, 2015 Author Share Posted June 25, 2015 My front axles have been replaced and it still shakes!!! WTF?! The shop says due to my lift the wheels just won't align. But there is hardly a lift in the front since the bumper weighs it down so much. I have a SFD kit but nobody seems to be able or willing to install it due to seized and rusted / spinning bolts. At this point I'm getting really fed up. Pumped so much money into this and nothing fixes this shake. Might just have to sell it after returning it close to stock Link to comment Share on other sites More sharing options...
hawairish Posted June 25, 2015 Share Posted June 25, 2015 That sucks, man. Which bolts are rusted, seized, or spinning? I'm assuming it's only the rear subframe bolts. Link to comment Share on other sites More sharing options...
xxLOUDOGxx Posted June 25, 2015 Share Posted June 25, 2015 Tires and axles are what usually cause a shimmy. I had a shimmy at 65mph. it was my front drive shaft. that's easy to diagnose. just remove it. and drive it. Are you wheels hub centered?(centric) Link to comment Share on other sites More sharing options...
CDN_S4 Posted June 25, 2015 Author Share Posted June 25, 2015 Hmm...never thought of the driveshaft. Mechanic tells me it's the alignment, but with no more than 2" I can't see that being the case. I've literally replaced every part now of the front end suspension and steering components, minus the driveshaft. And no, rims are not hubcentric, but the bolts are supposed to center them. Link to comment Share on other sites More sharing options...
clkindred Posted June 26, 2015 Share Posted June 26, 2015 Do you have another thread where you describe your shaking problem in more detail? Link to comment Share on other sites More sharing options...
Recommended Posts
Create an account or sign in to comment
You need to be a member in order to leave a comment
Create an account
Sign up for a new account in our community. It's easy!
Register a new accountSign in
Already have an account? Sign in here.
Sign In Now