Leaderboard


Popular Content
Showing content with the highest reputation since 04/23/2023 in Posts
-
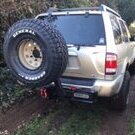
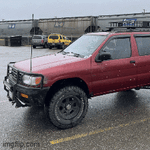
Hauling my 02 shell with a blown engine from cali to AZ. The pilot didnt like it too much but survived. Next to stock after i finished the first part of the build with a fresh JDM 3.5, new suspension and lift. Maiden voyage shakedown run doing what it was built for Found some mud in the desert this spring Went through some fairly rough stuff to get a nice pic at lake havasu Latest addition, halfway through a coastal offroads bumper, adding the swingout gate soon6 points
-
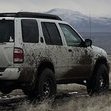
One dormant volcano and one R50 putting a new MAF to the test6 points
-
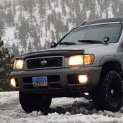
Beauty shot from camping this morning with the clouds below and Mt St Helens above. @zakzackzachary Should recognize this spot!6 points
-
Couldn't stand my stock headlights any longer. In the middle of retrofitting Morimoto D2S 5.0 HID projectors:5 points
-
I run a company that advertises vehicles for dealerships. Threw the pathfinder in the booth today for fun!5 points
-
Found a great spot for a photo![emoji3531] Enviado desde mi iPhone utilizando Tapatalk5 points
-
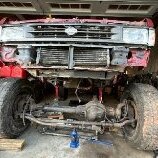
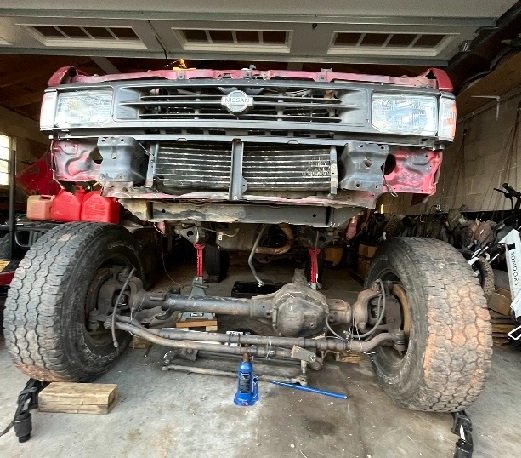
Time to give this subforum some love... In a couple weeks, I will have owned my Pathfinder for 10 years. I bought it as a birthday present to myself, having traded in a 2008 Wrangler 2-door several months prior for an SUV that could actually fit two baby seats (unlike a 2-door Wrangler). My kids just turned 10 and 11 the other day, so I'd say we're way past that point. Time flies. I purchased the truck with just under 166K miles, and in another 400 miles it'll reach 200K. It just turn 20 yrs old. Some milestones here. You could say I've done a few things to the truck over the years. As it sits today, it's got front and rear air lockers plus 3.97:1 crawler gears, among other things. I've finally sorted a few gremlins that have plagued me for the last year-plus. Sold the bumpers a few months ago; need to build new ones. But right now, I've been hankering for something significant, and if I don't spill it here, it may never happen. So, here goes! I think it's time to SAS my truck. I've been stewing on this for a long while. In August 2021, I bought an incomplete SAS project from a guy that included a Dana 44 axle, a bunch of new parts including matching gears for both the D44 and H233B diffs, an Xterra TX10, and even the 2000 Frontier everything was destined for. I mainly bought the SAS parts for $1000, but the truck with a blown headgasket was only another $700 so I bought everything. The axle was rebuilt (sorta). The truck overall was disgusting, but at some point I at least considering repairing the truck and possibly completing the SAS on it. I literally gutted the interior to clean out layers of filth in the form of dog hair and caked-in dirt to clean everything, but in the end, I didn't need a 3rd truck and sold it to a buddy. But, here I am with all the SAS parts still...and then some. Since then, I have properly rebuilt the Dana and bought and sold a few other parts towards the project. I've not officially started it yet, but I plan to soon especially since a few suspension and steering parts are already due for repair and replacements. At a very high-level, these are my project goals/objectives: Keep costs low. To date, I'm already in $2500 in parts (factors parts bought and sold), and another $500 in tools/consumables. I expect to spend another $1000-$1500 in parts and tools, but also probably recoup another $1200 in parts. $5K seems like a reasonable cap. I am tracking all my transactions. I've also bought several parts either on clearance, or from others who've abandoned their SAS projects. Restore gearing. I swapped in 4.63s long ago, but as we know, this is the end of the line for R50 owners. SAS opens up gearing options, and this might be the number one reason for me. Keep the ride reasonable. I am not doing this to go overboard on lift or tire sizes. In fact, I expect and want to end up a little higher than where I am (currently about 5" of lift between OME HD and 3" SFD up front, and 9448s and 2" spacers in rear for 6" lift). I do not ever expect, nor want, to run more than 35" tires, and I have plenty of life left on my 33" tires. Build confidence in parts. I've never had trail failure with CVs, TREs, shocks, springs, bearings, hubs, etc., which is great. But...I'm also at my max comfort limit. Without any beefier steering and suspension part options available, it may just be a matter of time. The axle, suspension, and steering options I have in mind will give me a ton more confidence. Not regress on things. I expect everything I install will be better than what it's replacing, though probably the most debatable part might be my choice of leaf springs vs. IFS in terms of ride comfort. But going to a straight axle will inherently change the ride comfort, regardless of the suspension type chosen. Breakdown of components: Axle: The D44 I have is from a 1981 Jeep Wagoneer SJ. It's the "narrow-track" version with a WMS-WMS width of 60.75". According to my notes, I measured 62.25" WMS-WMS on my current stance, but can't recall if that includes the 3" worth of wheels spacers I use (I don't think it does). So, this should be pretty close, and if I have to run spacers again, no sweat. It's also a low-pinion axle; the high-pinion R200A is preferable here, but the slightly larger D44 gears might make it an even trade-off. Suspension: The axle is set up for spring-under-axle (SUA) using leaf springs, and that is the approach I plan to take. I mulled over all the other suspension types, and while something like a linked or radius arm setup seems great, it's simply out of budget. I've read no shortage of past and current comments about how dumb leaf springs are, how dumb they are on a truck/unibody with 4-link rear, how old-tech they are...blah blah blah. I'm not trying to ignore such advice and comments, but realistically, it's how I want to allocate my money and effort, and it aligns wonderfully with what I want out of a finished truck. That said, the SUA approach greatly simplifies a lot of things for me and that's why I like it. I plan to use OE leaf springs for the Wagoneer (I have new Dorman units). With an offset center pin, they should allow me to move the axle about 3" forward from the current driveline. Instead of shackles, I will use leaf spring sliders. Mounting everything will be a challenge. I intend to make a subframe that uses the existing subframe mount points and has the provisions for the front leaf eyelets. The rear sliders may be incorporated into a new or modified transmission crossmember. Plan to make everything from scratch to keep costs down...plus I have a CNC plasma table and small press brake, so there's that. I will also not do a traditional u-bolt setup to attach the axle to the leaves. Instead, planning to make a u-bolt eliminator kit to minimize parts hang-down under the perches. I'd love to do a RA or linked setup, but the decision alone instantly adds $1K-1.5K to the budget between joints, coils/coilovers, and material. There are savings here and there, but it's not significant. I've also considered going to a spring-over-axle (SOA) setup, but this will also greatly introduce costs, namely needing to buy a high-steer knuckle, potentially needing to "cut-and-turn the C's" to correct pinion and caster angles, and also adding about 5" more lift than what I want. Gearing: I will be going to 5.13 gears. On 33's, it'll be about -3% over-geared, but on 35's, it'll be about +1%. The axle originally came with 5.89's installed and in-box for the H233B, but I sold those. Too much for my needs. Differential: I already run an ARB in the R200A, so of course I'm locking this one. Axle came with a Spartan lunchbox locker, but I sold it and bought an ARB instead. In between, I bought an Auburn eLocker/LSD combo (LSD when it's not locked), but it arrived with all sorts of damage so I returned it. Hubs: Axle came with old Warn Premium hubs, but bought some new Mile Markers on the cheap from Amazon Warehouse. Warns will serve as backups. Brakes: The axle came with all new/rebuilt brake parts, which is great. They're beefy. However, this setup means defeating ABS braking since this is axle is 40+ years old. Many people won't care and just plan to delete or omit ABS, but I don't like defeating or ignoring systems, especially not considering how pleased I am with the braking performance on my truck with the rear discs. Plus, I think the speedometer factors vehicle speed by the wheel sensors, since there isn't a speedometer pinion on the t-case. To get around this, I'm going to mimic a setup a guy uses where he machines down the Dana hub to accept a tone ring and use Hummer H3 rotors and calipers on it. A new caliper bracket adds the provision for the wheel sensor, and it's a perfect a solution. In my case, I would do pretty much the same, except I will keep the R50 calipers. Comes to find out, an H3 rotor is the same thickness as the R50 front rotor, and the diameters are very similar (H3 315mm vs R50 300mm) to the point I can just move the caliper out a little. Also worth noting is that on the Dana hub setup, the rotor is mounted behind the hub, kind of like our R50 setup. In taking this approach, the rotor will install over the hub, which will increase the WMS a small amount (about 1/2") and make rotor changes easier. Steering: The axle came with a 3/4" Heim steering kit, which is pretty beefy. But, I didn't like that it was essentially going to be a straight bolt in a tapered hole on the knuckle. No way that won't wallow out in time, and it seems most people suggested modifying the knuckle to make it double-sheer. Instead, I'm going with a GM 1-ton tie rods. These are beefy, too, and I have less worries about shearing. I will have to ream out the knuckles and pitman to get things to work, but I have the reamer. The kit also included 1.5" OD x .25" wall DOM tubing, and although the previous owner already got the tie-rod to the perfect length for the setup, I'll need to cut off the ends to weld on new bungs for the GM setup. For the steering box, I'm planning to use a one from a 2001 Jeep Grand Cherokee (WJ) 2wd. This will sit inside the chassis rail. Would've been nice to stick with Nissan and use a Frontier or Xterra gearbox, but those sit outside the their frames and I didn't feel like cutting through the wheel well. Fortunately, these WJs use metric fittings, so hopefully adapting the lines won't be difficult. Shocks: TBD. I have three pairs of shocks once fitted to R50s, including the last two longer sets from my own truck while lifted. I plan to use them if possible to keep costs down. Mounting them will be a challenge. Easiest approach would be making new plates that mount where the strut does, but I think it'll be too high up from the axle. I don't want to make the mounting tabs from it extend too low, but I have other ideas in mind. Subframe/Motor Mounts: This will be the most complicated part. Won't know my exact approach until the OE subframe and everything else is out. I also plan to make some new motor mounts using poly bushings I have around. ... Right now, I'm waiting for an engine support bar to get delivered sometime next week. I may start pulling things off the truck and get this going very soon.4 points
-
Finally finished the first half of my Coastal Offroad bumper. Now need to build the swingout tire carrier and jerry can holder.4 points
-
Only thing left to do is go have fun.4 points
-
Dusted off and bolted on the awning to keep the kiddies cool today4 points
-
One of my favorite topics. I'll take a different path to promote further discussion, but for starters I'll say an LSD (even a repacked one) isn't a true substitute for a locker. They're great for having a street and trail balance, and they can be made to do very well off-road, but they're simply not a locking differential. If there was a traction level chart that was specific to our trucks based on available device options, it might look something like this: Level - Front Diff, Rear Diff, Suitable Trail Use (Green/Blue/Red) 0 - Open, Open, Green 1 - Open, LSD, Green 2A - Open, Mechanical, Green/Blue 2B - Open, Selectable, Green/Blue 3A - Mechanical, Open, Blue 3B - Selectable, Open, Blue 4A - Mechanical, LSD, Blue/Red 4B - Selectable, LSD, Blue/Red 5A - Mechanical, Mechanical, Red 5B - Selectable, Selectable, Red Clarification points: For LSDs, there's obviously a scale between OE-spec LSD units and re-packed units, but they're still in the same traction level. "Mechanical" refers to auto-lockers (auto-unlockers, lunchbox, etc.) like Lokka (front) and Blokka (rear) units. "Selectable" refers to any locker that can be disengaged on demand, regardless of actuation (air, electric) : ARB, TJM, TRE Selectable lockers always have the advantage over a mechanical locker because they can be disengaged. This is particularly important when in tight steering situations, and everyday street driving. (This discussion ignores the use of manual hubs.) Levels 0 & 1 are still fully trail-capable, provided all tires stay on the ground. Once one tire lifts off the ground, especially on an incline, limitations immediately kick in. Notably, it's relatively easy to lift a tire with IFS. When coming from Levels 0 or 1, I advocate locking the front diff (level 3) before locking the rear (level 2), mainly because of issues that can occur when a front tire is off the ground and not rotating in unison with the other tire. That is, if you have a front tire spinning off the ground and you land on it, it's bad on the CV, mmmmkay? I'd skip level 2 for the most part. Level 4 & 5 do great for wheeling, provided you're mindful that an LSD is not a locker and that, at some point, it will start to act like an open diff. Red usage would basically warrant a re-packed LSD.4 points
-
Limited slip differentials are a more affordable way to get better rear end traction on most surfaces and in most driving conditions. However, in extreme cases such as rock-crawling or climbing very uneven and steep obstacles which could result in a rear tire having little to no traction, a locking differential provides the best solution in order to overcome the obstacle with the least potential for damage. Damage could be caused either by excessive wheel speed which could result in drivetrain damage, or excessive vehicle speed, which could result in loss of control, leading to undercarriage damage, body damage, and/or drivetrain damage. A very tight LSD could potentially cause some handling/cornering issues on pavement. If you do little to no rock-crawling, the LSD could be a satisfactory option. In my case, the effort/expense of pulling the third member, repacking the clutch pack to increase the breakaway torque, then reassembling it, was not worth the risk of discovering that it still might still not provide enough performance benefit for my style of 4-wheeling. It is for this reason that I opted to just go all-in with an ARB air locker. My R50 is air-lockable both rear and front, but it took a decade of wheeling for me to get to that point. Every driver's situation is different, so the approach to mods I would recommend is to run the trails you enjoy, get lots of seat time to learn how to drive within the vehicle capabilities, learn to choose good lines, and plan your vehicle upgrade path accordingly. Tires are probably one of the most important things to start with, with a lift being next. I would prioritize recovery equipment above drivetrain mods. A locking diff or tight LSD may only give you the ability to get you stuck further down the trail.4 points
-
Thanks all, turned out to be a simple fix- the hose had just pulled off the barb on the drivers side of the radiator. I reseated it and move the spring clip to where the hose wasn't indented from it. Thanks also for the tip on fill-run-fill-run. It took quite a few times of letting the fluid work through before the dipstick continued to read full. I think that when I backed up in the deep snow, the plastic under guard scooped up a bunch of snow and ice and pushed the hose sideways until it popped off. A good thing to keep in mind for the future- it would have been worth it to dig the snow out.3 points
-
appreciate this forum!!!3 points
-
For sure you'd need an older #1 coil. For the other coils: 2a: It's possible to swap the boots older-->newer, but you also need the spring 2b: You'd need to lengthen the boots, which would prevent spark plug contact, so this is a no-go. 2c: Since the older coils were intended for the older covers (aluminum), this is the most correct route. That's what the guy did in that Nico post (man...I barely had the truck 2 years when I was chiming in on that...how things have changed). That said, I did some R&D for you... Newer coil on left, older on right. When aligned by the mounting tabs, the older is about 1/2" longer. When aligned by boot length, they are the same length. The older coil's mounting tab sits above the plastic valve covers mounting hole by 1/2". As mentioned earlier, you can probably still fit the newer style in cylinders 2-6, but the coil has to be turned enough to avoid the mounting boss on the aluminum covers. You could possibly use a screw and washer in the boss to retain the coil to some degree. Taken apart, you can see all the parts are different. Although the spring in the older unit is quite longer, it sits deeper in the hole in the module. All the tube parts are shaped differently enough that fitment isn't great if you were to swap things around, but it's somewhat possible. With springs in and aligned by mounting tab, the older coil is still 1/2" longer. If you put the older style boot and older spring onto the newer style module, the boot fits nicely and everything else seems to be the correct length and position. Not that it matters here, but the newer boot will not fit the older module unless the top of the boot is cut off. Now, since the springs are different, I have no idea what impact it has switching it. I also don't know if you can get the boots and springs. I'd say that if you're at a junk yard and pulling them, you may as well just buy the complete coils. Although my personal opinion is that the additional cost to do this project doesn't really have much ROI, unless it's just cheaper than buying new plastic covers. Hope this helps.3 points
-
Looks like I've talked myself into doing a radius arms setup at the 11th hour. I'll just have to keep things on the cheap affordable side as best as possible. Conveniently/suspiciously, my Facebook feed today showed a local Marketplace listing for an adjustable track bar (panhard bar) and OE sway bar with disconnects from a JK Wrangler. Met up with the guy, talked shop, observed the cringe-face when I mentioned "unibody", and made the deal for $100 for everything. Track bar could be a $115 Amazon knock-off, a $150 Rough Country unit, or $325 Teraflex unit because they are identical. Key thing is that it's shaped to wrap around the diff cover and it's adjustable...and within the range I'd need it. Does need to be freshened up and bushings replaced, but that's easy stuff. The JK sway bar is straight and beefier compared the R50 unit, which I was already planning to reuse but poses some complications because of the shape. I'll probably toss or sell the disconnects that it came with; they're worn, but appear to be a rather expensive Teraflex set. I plan to run disconnects either way. Engine support bar arrived the other day and the garage is as clean as it's getting. I may start tearing things down in the morning. To be honest, this project terrifies me more than any other I've done so I'm dragging my feet to dive in. Pulling stuff off is easy, but there will eventually be a point-of-no-return moment that I hope I don't dread.3 points
-
Got my lift on not long ago, AC coils in the front on KYB struts and nrc9447's in the rear. I love it so far, and the load carrying capacity has been awesome! Hoping to get some bigger tires soon. I also replaced the headlights and fog lights with led bulbs.
.jpg.5070bf3c97d25d63749cedcb8bd02b51.jpg) 3 points
3 points -
Did some shaking down this weekend, and so far so good.3 points
-
Looked better tucked into the hole IMO but I imagine the neck makes it easier to read and reach the screen. How's that pivot locked? Looks like something that could start working its way down after a few good bumps. I kept mine simple, basic single-din HU that I can plug an ipod into. I spend enough time swearing at touchscreens when I'm not driving. When I need maps, I just stick my phone in the ashtray. +1 for Dire Straits, though.3 points
-
The Pathy is on it's way. Paid 400 for it and it came with a hardbody I sold for 800 after pulling the motor. $1k in parts roughly. Pics and progress and videos coming soon. I'll be up there at my farm in Oklahoma to finish it for over a week coming up in a few days. the image size thing is wildly small. lol
 3 points
 -
Yes! I'll probably do a more in-depth post in my build thread when I can but these are headlight buckets that a guy in Australia designed & 3d printed, and allow you to swap in LED sealed beam style 5x7 lights. There are cheaper options for the 5x7 lights themselves, but I went with a set of Morimoto LED's.3 points
-
FYI, Bilstein 33-185569 are a slightly less expensive alternative to the recommendation above with similar performance. I have these on my 6" lifted R50.3 points
-
LOL, the computer's too old to replace the CV axles? I didn't mean to write a novel, but, well, here's the novel. It's been a while since I did my CVs, so hopefully some of this is right. Like I said before, you'll need a 12mm 12-point. Make sure it's impact rated. Use an impact if you can. If you have to use hand tools, put the transfer in low range 4x, with the other front wheel on the ground, to stop the axle from turning when you go to loosen the bolts. You'll need a 6mm Allen (and possibly a torch) to get the hubs off, and some snap ring pliers to get the snap ring off the CV. (Technically you're supposed to measure the endplay of the axle in the hub and select a snap ring of appropriate thickness to dial it in. I didn't bother, and I don't imagine most people do. The instructions and specs are in the service manual if you want to do it properly.) Wouldn't be a bad idea to replace the inner hub seals (seals against the CV to protect the front wheel bearing) while you're in there. You may need to unbolt the shock for access to the CV bolts, though this may not be needed if you're taking the whole knuckle off anyway. The ball joints unbolt from the arms, but you'll need pullers to get them out of the knuckles. I think I used a puller of this style, but a pickle fork would probably do the job. I picked up one of these for tie rod ends and it's great. Shouldn't need anything special for the sway bar links, but I remember screwing around with a jack or a ratchet strap or something trying to get the second side close enough to get the nut started. You may need some wiggle room for those, so get one side started, then get the other side started before tightening anything down. If the old ones are stubborn, it may be quicker to break or cut them out, assuming the kit comes with new hardware. Do you have a torque wrench? I wouldn't bother with it on the sway bar links, but it's a good idea for suspension work in general. I shoot for the low end of spec on castle nuts, then tighten more as needed to get the cotter pin hole to line up. Otherwise, shoot for the middle. IIRC the axle bolts don't have a torque spec in the manual, so I did mine to German spec with the impact. If you're rebooting, there's a special plier for putting the boot clamps on, though I think I brute-forced it with normal pliers. You'll also need a vise to hold the axles, and a big punch (preferably brass). And some gloves. And a lot of paper towels. You'll need an alignment after replacing steering/suspension components. I aligned mine myself because I wouldn't trust the guys at the Les Schwab to put training wheels on a bicycle. I checked camber with a digital angle finder and a piece of flat steel laid across the rim (while parked on flat ground, obviously). I haven't found an easy way to check caster yet, and didn't have room to adjust it anyway. Both are adjusted by adding or removing shims behind the upper control arm spindles. You may not need to mess with these if you're not changing the ride height. You can get the toe somewhere close by measuring the existing tie rod assembly, then adjusting the new assembly to the same length before installing it, but it'll still need adjustment afterwards. My go-to method for setting toe uses a tape measure and two lengths of angle iron (bedframe). With the truck parked on flat ground, not on a jack, set the angle iron on jackstands, tight against the front wheel sidewalls so it's parallel with the wheels. The usual method is to measure in front of the wheels, then behind, and the difference is your toe. I measure in front, and then the tires' diameter in front of that, because there isn't a truck in the way. Either way, I try to get the front measurement 1/16-1/8" shorter than the back. Adjust to where it looks about right, drive it around the block to let it settle in, then re-check and readjust as needed. You'll probably end up doing this several times before you're happy with it. If you're only replacing one tie rod end, start by adjusting only that one side. If the alignment was good beforehand, and the other work you did didn't change the geometry enough to matter, then you should be able to get the toe right and the steering wheel straight by adjusting just that one side. Make sure you've got a good set of jackstands, and use them. I slide a wheel under the truck as well, so if it falls off the stands, it has something other than me to land on. Do one side at a time so you can check the other side if you forget how something goes together. If the new joints have zerks, grease them. And clean out out the wheel arches before you get in there so you're not constantly showered in dirt while you're working. Provided nothing fights you--no broken bolts, nothing seized, no surprises--a couple of days should be easily doable. But have a plan B in case something does fight you or a part doesn't fit like it should. Speaking of parts not fitting--the tie rod ends aren't all the same for these. The taper size changed for some reason in '92. Probably July of '92. Check the date on the sticker in your doorjamb before ordering parts. I got burned on that once, and still have a '92 knuckle in the corner that I had 90% installed before discovering that my tie rod end was too big for it. Also make sure you get the correct thread--inner and outer TREs are threaded opposite where they go into the adjuster, and there's no guarantee the existing assembly is installed the right way around. There is a difference in the CV axles in four-cylinder vs V6 trucks, but they bolt up the same and take the same boots--I know because I have one of each on mine. Just don't get the early (two-door) 27-spline axles, those won't work with your 28-spline hubs.3 points
-
That will be KYB struts2 points
-
Correct, that 50 pin powers other similar accessories. If I'm being honest, though, I have the Homelink and don't use it because of how it's wired. It's basically always on. It should have been wired to be on an ACC or ON circuit, in my opinion. Aside from being in plain sight, just takes someone breaking the window or opening the door to press the button and access to the garage.2 points
-
The look on my dads face when I showed him the tool bag with the #6 tool was priceless. Had it out and replaced in 5 minutes, and any other R50 owner that hasn't used it is missing out!2 points
-
Not sure how long the forum was down, but it was caused by a PHP error on the server. And a thanks goes out to @adamzan for bringing it to my attention.2 points
-
Slow progress yesterday and today. CAD'd up the poly motor mounts and am going to try to get the pieces cut tomorrow. Made a bit of a drive today to pick up some FJ80 radius arms. Had been eyeballing a crusty set on eBay, but with tax and shipping they'd be about $250. Fortunately, the guy's not far from here so I got in touch with him offline...done deal at $80. They were as crusty as expected, so they needed some wire wheel'n. And now I have RAs, into them about $140 after gas and new bushings. And here's what we're shooting for... This orientation is how the FJ80/FZJ80 is set up. In that world, some guys will flip the RAs to be atop the axle, and I was hoping to do the same but the rear subframe mount would ultimately limit up-travel unless I put a lot more lift back in. But, this setup works fine for me. I need to drag the axle back out to cut and grind the leaf spring perches to tuck the arms up. Passenger side shouldn't be too bad, but the driver's side is integrated into the cast so it's just a big chunk of steel I'll need to get through. I'm going to see if I can move the arms outboard so that I'm just dealing with tube, but I think the tires will just scrub on them. As far as rear mounting goes, that bushing is almost directly under the transmission crossmember, which is perfect. Plan there is to build a new crossmember that has the mounting provisions, and also clears the driveshaft. I plan to reinforce the mounting area and add more attachment points.2 points
-
Ah yes, let me expand on that. This part of the project is one of the main reasons I became more willing to move forward on it. In short, I'll be using the R50 tone ring. I had a junk R50 spindle and hub laying around. Ring pops off with a little effort, and the ID is just barely large enough. The backside of the D44 hub will get machined down to about 1/8" thickness (about the thickness of the flat lip at the top). Since the H3 approach was already laid out at the time, I did look into using the GM ring initially. But it's 55-tooth vs. the R50's 48-tooth. Any mismatch would/should screw with the ABS and ECU. Tried to find suitable matching rings that could maybe be machined down to fit the rear axle shafts, but that sort of search proved difficult. One more notable about the brakes: whenever I've read about Nissan guys using the D44 brakes, they always need to jump to a larger brake booster and/or master cylinder. The D44 calipers are monster one-pots. I was stoked to see that the H3 rotors were the exact same thickness as the R50 rotors, and very similar diameters. Using the R50 calipers means not having to change anything about the system, which is huge. The next hope is that both the ABS and brake hose are long enough to support axle droop with my setup. It looks very promising considering that the lines snake around the strut and have a lot of slack. Thanks for the offer about the WD21 shaft dimensions. The FSMs have so far provided the base dimensions, except the slip distance. I was also really surprised to see in the FSM (and echoed by Nissan Nut) that the WD21 driveshaft also uses the oddball u-joints the R50 does. All the other trucks had the 1310 joints (same true for the rear shafts). What gives, Nissan?2 points
-
A few teaser pics... The axle and springs, all rebuilt and mostly painted up. Outer hubs. Nice part about this axle is that it has the same 6x5.5 pattern. Uses these smaller 7/16" studs, though. If I changed nothing, I could just put my current M12x1.25 spacers on it to adapt the thread pitch, but I will be changing these to use M12x1.25 studs. You can also get an idea of how the rotor is attached to the backside of the hub (the wheel studs press into the rotor, which has a tall enough shoulder to also press fit into the hub. Backside of the hub and knuckle. No space to squeeze an ABS sensor in. This is the idea on how to incorporate ABS into the axle: These are parts by a guy/company called THOR Parts. Very clever solution where he modifies the backside of the hub to accept a tone ring, machines the hubs down so Hummer H3 rotors can fit over the hub (note the studs pressed into the hub first), and then adapter plates to hold H3 calipers and a GM ABS sensor. Again, I plan to keep the R50 caliper and hopefully the 45° angle on the ABS sensor leaves room. End result should be something like this: GM 1-ton TREs. Pic doesn't do justice on how fat these things are. The treaded ends are 7/8", compared to the R50's 14mm (9/16") threads. And these may still be the weak link in the steering! ARB and 5.13s installed, new bearings, slingers, shims, everything: Beefier diff cover, nice deal on it from a local guy. Mock-up of leaf placement: The perch width on the axle is almost perfectly the same width of the radiator crossmember, so the spring would reside almost perfectly under the wheel well skirt, directly under the subframe spacers so to speak. Notably, when using the narrow-track D44 I'm using, it wouldn't leave a lot of space for a conventional coil spring between the tire and wheel well, which is one reason I like the leaf spring approach (coilovers aren't cheap). Less of an issue running the wide-track version, though. I do plan to retain the sway bar and I have a pretty good idea on how I'll achieve that. Another downside to using leaves is the loss of clearance up front in small section. I'll likely lose a little departure angle unless I move the front hanger position back. With the low SAS, another issue is just exposure to the axle and steering. The tie rod will reside above the springs, but still be fully exposed in the center. I've hit plenty of obstacles with my skid grate, so it'll be a concern. Could go to full high-steer, but it's costly and doesn't do anything about the axle still be exposed. (Notably, these issues exist for any straight-axle truck, regardless of suspension type.) The rear mount will be interesting. The chassis starts to widen halfway between the rear subframe mount and where the leaf eyelet is, leaving mostly nothing directly above the eyelet. The transmission crossmember holes are still a good 12" past that, and there's no useful existing bolt holes and a bunch of overlapping sheet metal in that space (i.e., around where the OE jack pad is). I imagine I'll need to get a lot of that flattened out and cleaned up, then will probably weld in some sort of support plate. I'd like to tie it in with the cross member if possible. You can also see that my CV boot has given up the goods and slung grease. I don't want to deal with that any more.2 points
-
Fixed! Turns out I’m just stupid. Slartibartfast had the correct solution with the RCA plugs. I was confused because the stereo I set up before did not use them (despite having a factory amp) and they are not colour coordinated to the proper female ports on the headunit. I plugged them into the RL, FL, RR, and RL ports then used the balance/fader while playing music to determine which plug corresponds with which port since it isn’t labelled. Often times the correct solution is the most simple or easiest overlooked… Thank you Slarti!2 points
-
It depends on the year. AFAIK this is only valid for throttle-by-wire Pathfinders. Here is the procedure: https://www.nissanhelp.com/diy/pathfinder/projects/nissan_pathfinder_idle_air_volume_learning.php Notice that before doing the air flow reset, you must do a couple other procedures beforehand. You feel like someone's trying to pull a prank on you, but that's really the way it's done.2 points
-
Thanks, I've been very happy with the truck. Still have a bit of a to do list; finish the rear bumper, front lokka, beefed up lsd, start welding the front bumper... Sorry to hear your VQ might go. I honestly couldn't tell you first hand how the swap went as I have a trusted mechanic and had his shop do all the heavy lifting but he did say there were a few things that needed to be slightly modified to have it fit correctly. It apparently had some components that weren't on the original engine, however, he said it wasn't a huge issue and got it done in just a couple days. Not sure what vehicle the "new" engine came from, but it was a much newer year model with only 55K on it and runs great. I got in there with him on some of the suspension work and that wasn't too bad either. Removing the tranny for the new clutch was a major pain in the ass, that thing is huge and heavy.2 points
-
I think I found it. Same place behind the pull out change compartment on driver side fue box. 3 relays, with the middle being the blower motor from what I found. I ended up replacing that relay and fuses but it didn't help. I purchased a $20 blower motor resister on Amazon and that didn't fix it. Then I purchased a new blower motor from AutoZone and that got the air running again. Put everything back together and then it kept blowing after I turned it off. So I had to take it apart again and put the new resistor back in. I had put the old one back in because I thought it was just the blower motor. So it ended up being the resistor AND the blower motor. $170 in parts and back in business.2 points
-
According to ARB, the R230 and H233B use the same 33-spline (both in spline count and axle shaft diameter). That front Patrol unit won't work because it's 31-spline. It's possible the 33-spline unit would fit an R230 carrier, given how close dimensionally they might be, but even if it does the R51 stub shafts use retaining clips to stay in place and it's unknown if it would clear the Lokka's side gears, or if the edges are chamfered to aide installation or removal, among other potential issues. Air locker options exist. ARB (RD137) or a cheaper TRE 4x4 (TR137), assuming you have 3.54 or higher numerically gears.2 points
-
The 26 psi is the spec for that vehicle. The 44 psi is the max pressure at the max rated load for those tires. Stick close to 26 psi and you'll be just fine. If you feel 26 is a bit too soft then you can bump the pressure up a few psi and see how it does. But be sure to check your tire tread wear pattern to make sure you're getting even wear across the face of the tread.2 points
-
Love the headlights Sent from my iPhone using Tapatalk2 points
-
Hi, this is my pathfinder! You need an 02-04 SE roof rack off of another R50. It will bolt onto your roof just fine, you'll have to remove everything that's currently on top of your 02 LE. For the white Nissan Lettering, that was a little more custom. All of those fairings come with raised black lettering, I just put some white plasti-dip on mine to help it stand out. Paint would probably work better. I would go looking for the roof rack in a junkyard, I doubt nissan still sells this. Ebay also might be able to help.2 points
-
@mcase, @Slartibartfast's spot on. You can even just pull the motor down pretty easily (it's 3 bolts I think?) and inspect the fan cage, give it a spin, check for debris or blockage, etc.2 points
-
If one bar of the motor's commutator is worn through, or one of the armature windings is bad, the motor will have a dead spot, and if it stops on the dead spot, it won't start again until something else moves it. I would guess that driving at highway speed forced enough air through the fan to move the motor past its dead spot. This would not explain it blowing for a couple seconds and then stopping, though--that could be a control issue. Still, I would check the cheapest/easiest thing first. If the voltage test doesn't point to the motor, you'll find troubleshooting info, parts locations, and wiring diagrams in the HA section of the service manual. It's got separate diagrams for manual, auto without navigation, and auto with navigation, so make sure you're looking at the right one. Also, looks like the auto systems use a transistor instead of a resistor pack, so, that's different. Allows it to change speed gradually, I guess. Probably less likely to start a fire if the duct gets packed with leaves.2 points
-
16" was stock for several years. I think even the pre-facelift trucks still had the 15" steelies and alloys that eventually made it onto the early Frontiers. Facelift LEs had the 17" wheels; SEs were 16". Doubt you'll have any issues.2 points
-
The Lokka is doing great. Just as good as the day I installed it. It's taken my rig through some incredibly challenging trails and never really gave me any reason for regret. Having driven HawaIrish's fully air locked rig, my Lokka equipped rig and a stock rig, an airlocker is hands down the best performance for trail use but may not be what everyone needs. A proper line choice, good spotter and quality tires will get an open differential truck through a lot of challenging terrain. The Lokka is the best bang for your buck if you want a huge gain in trail performance on a budget but comes at the cost of a substantial change in the driving requirements and limited street use. When it snows here I use 4WD on the street and highways without issue but that's the only time it sees use on pavement as my hubs stay unlocked and the truck in 2WD the rest of the year Still need to install my super packed LSD. I think HawaIrish set it up for 200-ish ft lbs? When compared to the OEM LSD it should be very nice improvement. It's been shelved with the 4:1 t-case gearset, 4.6 diff gears and my rear disc brake setup. I plan to get those installed for the next trail run in Colorado. Moab trip was a perfect example of where air lockers reign supreme but I'd wager the front Lokka and rear super packed LSD would have done well.2 points
-
Interesting. I may dig back into it. Lokkas are just fine up front, given manual hubs. I ran one for a while. I’ll ask Towndawg how his is holding up…I’ll see him in 5 minutes, lol.2 points
-
Aha. Maple syrup jugs a) was at hand and b) had the perfect handle to use coathanger to hang and catch brake fluid when I took the soft lines off. It’s well-labelled with skull and crossbones and has since found a new home. Here’s the manual page showing the location of slinger mounts: The front location is just above the alternator mount and below valve covers: The rear is on driver side and requires removal of a bunch of hoses for any kind of reasonable access. Because I had to patch my strut tower I also had the power steering reservoir removed which I think helped because I could reach from the front. Presumably if the engine is going to be moved at all most of this stuff will be disconnected anyways. I couldn’t reach down with the phone to grab a better photo I’m afraid but it’s down here rearward from the dipstick:2 points
-
Make sure the cups aren't gone. If they are you need to get them fixed before the alignment. If you don't it will never hold alignment.2 points
-
Good solid advice, the only real way to figure out how to build and upgraded your R50 is to test it in the areas that it will be used the most. For example my R50 build is geared towards camping and some moderate Off-Roading. Lately I too have been throwing around the idea of installing an ARB Locker in the future. Chris.2 points
-
I'm pretty happy with the LSD in mine, but I'm not climbing any trail class ladders with it. An LSD is just an open diff with clutches jammed in behind the spider gears to make them harder to turn, so if you're looking to build a rock crawler that'll spend half the trip with a wheel in the air, the LSD will probably disappoint you. Short of that, and on a budget, LSD is good, or at least a hell of a lot better than an open diff. The R50 LSDs were pretty nerfed, possibly for stability reasons (the WD21 LSD does make it pretty easy to get the rear end to step out in the snow). Hawairish did a great writeup on how to repack them to make them useful. Sounds like there's a limit to how tight you can go before you start breaking stuff. If I was going to throw money at my diffs, I'd leave the rear LSD alone and put a ratcheting or air locker up front. But, yeah, some of us is poor, and my truck needs a lot of things more than it needs a front locker I might use once every couple of years. I don't think I've had it properly stuck since I put a decent set of tires on it.2 points
-
@BeneficialI maybe able to help you source that break adjuster for your right rear drum on your 2003 R50 Pathfinder! DM me for more details. Chris.2 points
-
Yeah, so far so good but I need to drive it more to really consider this issue fixed. I took some photos of the whole process, mostly because I thought I would need them later to put everything back together, but it was so easy it wasn't needed. Still, maybe this will help someone in the future, especially if you don't know where the screws and clips are so you don't break any hard-to-find dash panel: First thing you need to do is take off the kick panel. It's held in place with one screw and a couple of clips. The clip shown here is very, very strong. You can see the other one in the next photo. You may have to remove the plastic door sill first. It's clipped on and just pulls up. The reason for removing that kick panel is that there's a screw holding the bottom dash cover just behind it, here (also, the other clip for the kick panel): There is another screw for the bottom dash cover on the other side, under the cabin temp sensor. Once you remove both, the panel slides towards the back of the car (don't pull down). Be careful as there will be plugs for the dimmer switch, temp sensor and electric mirrors still connected. You need to unclip all those: Once the lower dash cover is out, you will be able to remove the steering wheel cover. First thing you need to take out is this plastic ring highlighted in red. It's held in by friction and just pulls out, no clips and no screws. Just use something sharp: Finally, you need to remove the 5 screws at the bottom of the steering column cover. Once those are removed, be careful as the two halves of the cover are still clipped on. You can press on the sides of the upper plastic part to help release the clips. It's also easier if you loosen the steering wheel adjustment lever, gives you more room: With the cover away, you will have access to the ignition switch. Two small phillips screws hold it in place. Unclip the connector, remove the screws and put the new switch in the same position. Before putting everything back together, reconnect the new switch and test it.2 points
-
Lift kit finished. Now time to save my Pennie’s for 33s2 points