All Activity
- Today
-

what to do while top end of engine is off (vg33e)
Slartibartfast replied to NawNaw's topic in 96-2004 R50 Pathfinders
When I had the intake off my VG30, I did the plugs, cleaned up the casting around the plug holes so dirt/water could escape more easily (the drains into the valley were mostly blocked by casting flash, so there was a lot of junk packed in around the plugs), did the valve cover gaskets, and cleaned out some rodent mess. Look for rodent damage or anything else obviously scabby with the injector harness. Inspect anything rubber that you have to mess with--I don't remember finding much wrong, but your climate may be harder on rubber than mine. Look for cracks, look for coolant residue. If the vacuum lines to the EGR and FPR are original, go ahead and replace those while you're in there. Might be a good time to replace the rubber line between the two fuel rails, or at least check the clamps. Make sure you mark where the distributor was before you pull it out. If you pull the lower intake, make sure you get the right gaskets. The VG33 lower intake gaskets are thin and made from stamped steel. Make sure you don't get the VG30 gaskets that are thicker steel with rubber seals. (If you get the wrong ones, nothing will line up. I made the opposite mistake and got to take it all apart again.) While the lower intake was off, I relocated the knock sensor to the back of one of the heads. I'm not sure if this was a good idea, but I didn't want to have to dig back down to it if it acted up later. Make sure you bleed the coolant properly afterwards. Should be a marked bleeder bolt on the intake. I did my timing belt at the same time--but that's the front of the engine, not the top, and having the top apart didn't make it easier. If anything it just made for a larger jigsaw puzzle. -
Sounds like the hubs to me. Backing up is supposed to disengage them, driving forward in 4x is supposed to engage them. Sounds like one of them isn't disengaging all the way. The CV axle installation may be related, if the shop put the hubs back together wrong, or if they attempted to service them while they were apart. I made that mistake on my '95, hoping that a wipe-down and some fresh grease would make my worn-out hubs a little more reliable. My attempted half-ass rebuild turned an unreliable hub into an outright malevolent one that randomly tried to engage while I was driving and made me think the wheel was about to fall off from the godawful noise it made. What I did, and what I recommend, is to chuck the auto hubs in the bin where they belong and replace them with manual hubs. Hawairish started a comparison thread for the various manual options. While you're in there, check your wheel bearings (play, smoothness) and brakes. Most of your symptoms match the hubs, but I don't remember mine feeling bound up when the hubs were playing games. Your gearbox oils shouldn't have anything to do with this. That said, if the rear end has LSD, did you use the additive for it? Without it, the clutches in the diff can bind and chatter when you turn, though from what I've read the synthetic oil may be nerfing them anyway.
-
From what I've read, no, it should be a simple plug-and-play. Limp mode puts it in third IIRC. Does the light in the E-AT switch flash when you start the truck? Check your transmission fluid level when the transmission is warm. Too high or too low can both make a slushbox act weird, and they're easy to overfill. I filled mine to what seemed about right when it was cold and had to drain about a quart once it warmed up to get the level correct on the dipstick.
-
 Hello all, I'm stuck at what could be the problem with my 1995 XE V6, 5 speed manual. For a while, I couldn't figure out why the front passenger wheel would seem to be stuck in 4X4 when starting to drive. When beginning to drive, the wheel has a clunking noise and I can feel obvious resistance. Placing the vehicle in 4X4 then back to 2X4 puts everything back to normal, until the next trip. I recently found out that it's the process of going in reverse that causes this. When everything is fine in 2X4, and I back up several feet, the noise / clunking returns until I go forward, place it in 4X4 and then back to 2X4. I hadn't noticed this before, as I generally just back into a parking space. I purchased the vehicle in September of 2023, and everything was fine, until needing to use the 4X4 for the first time in Jan 2024. Since then, it has been a daily occurrence. Between September and November, both front axles have been replaced (along with multiple front end components by a shop) and I've replaced all the fluids for the differentials, transmission and transfer case with synthetic. I'm beginning to thing the hub is the issue but could this problem be caused by the fluids or mechanical linkages? I've researched the best I could with no luck, as well as read the shop manual for the truck. I Used Red Line MT90 GL-4 for the transmission and transfer case and Red Line 57905 75W90 Fully Synthetic GL-5 Gear Oil for the differentials (For LSD). Any help or guidance would be greatly appreciated. Thanks
 - Yesterday
-
Chippers joined the community
-
NPBAJA joined the community
-
Hey guys, first post on the forum even though I have been using for the past year or two. Got a vg33e r50 and I'm taking off quite a lot with plans to do rocker cover gaskets, spark plugs and leads, and also doing a egr/btc delete as mine is stuck open. while I'm doing all this, what else should I do, and look out for? Is there anything i should replace while its off? and also what things could break as it comes off eg gaskets, piping etc.
-
NawNaw joined the community
-
 PatrickBowe changed their profile photo
 -
I looked up some part numbers on nissanpartsdeal to see what was up with this. The short version is I don't see why they wouldn't fit. I've heard of people doing dash and interior swaps, and I don't remember anyone complaining that the seat belts didn't bolt up afterwards. If you want to be sure, you could pick up a few grey belt parts from a wrecker or a part-out to confirm that they mount up the same before you shell out for fresh ones. I swapped '95 seat belts into my '93, but they were the same parts, just cleaner (PO was a smoker). For the most part, they're not that tough to work with, but be careful with the belt guide clips halfway up the B pillars. Gotta ease those out gently. And take a picture of the rear belts before taking them out, so you don't mix up the three in the middle. The long version: I looked up the same part (left-hand front belt buckle, color code K) for '87, '90, '93, and '95, and found three part numbers. '87 is 86843-03G60. '90 is 86843-12G60, but the listing suggests that the 12G60 replaces the 03G60, suggesting it's just a minor design change from the original. '95 pulled up 86843-61G00, which for some reason isn't listed as a replacement for 12G60. '93 pulled up 12G60 and 61G00, because transition year, but searching with my VIN pulled up 61G00 only. NPD has an actual photo (for a change!) of 12G60. I compared it to my grey 61G00, and so far as I can compare a low-res picture on a laptop screen to a scuffed-up original IRL and determine which one is which shade of grey, I'm like 90% sure the 12G60 is in fact the brown one. I don't think they changed the part number just for the color, though, because the blue and red buckles also have early and late variants listed for '93. So, yeah, as is often the case with part numbers... something changed around '92/'93. Give it a shot, let us know if it works!
-
PatrickBowe joined the community
-
I swapped an Xterra Transmission into my 4x4 and when the car warms up, it won't go into higher gears...is this a limp mode condition...do I need to get the TCM from an Xterra, and install it on my 94 Pathfinder...Thank You
-
Streetracerx1911 joined the community
-
Juanzo12 joined the community
-
TacR50 joined the community
-
KNOW that the valve cover gaskets are leaking?
Slartibartfast replied to peejay's topic in 90-95 WD21 Pathfinders
Mine were hard and brittle when I took the covers off, and that was mid '10s IIRC. If yours are original, then yeah, I'll bet they're dribbling like an excited puppy. -
KNOW that the valve cover gaskets are leaking?
Strato_54 replied to peejay's topic in 90-95 WD21 Pathfinders
Probably the best method, it will likely go towards the backside of the engine at the bottom corner of the head. Both sides on mine were pouring before the fix. - Last week
-
Should we no reason that any of the WD21 seat belts wouldn't fit.
-
KNOW that the valve cover gaskets are leaking?
level9 replied to peejay's topic in 90-95 WD21 Pathfinders
You can put UV dye in the oil, drive it for a bit then check with a blacklight if you must know definitively. If the gasket is bad and you are planning on keeping the car a good long while, you may as well replace both gaskets; however you'd probably want to go ahead and refresh the coolant, vacuum hoses and intake gaskets while you have the intake off if you have not done so already. Probably do the fuel pressure regulator as well. -
I'm looking to get some new OEM seat belts for my '90 Pathfinder. Due to an interior color change, I'm looking to get the gray version (color code: K). My understanding is the earlier years (90-92?) the gray is more of a gray-brown whereas the later years (93+?) have more of a pure-gray. I'm looking to get the pure-gray version but does anyone know if the later years (94-95) seat belts would interchange with a '90 ? From the few pictures I can find online, the design appears different but it's hard to tell...
-

KNOW that the valve cover gaskets are leaking?
adamzan replied to peejay's topic in 90-95 WD21 Pathfinders
Stick your finger on the edge of the valve cover just above the exhaust manifolds. If you feel oil or oily residue then you have your answer. also they are 30 year old trucks now, so if they aren't leaking I'd be surprised. -
billyhawke420pfseor joined the community
-
Ohh dude, your content is great.
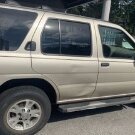
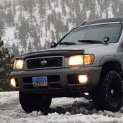
Just getting to the point where I can shoot pics of my 55KM original 2003 SE
in BC Canada. It has been a 1 year rebuild with a low km find. Drives nice.
Colin
-
Greetings, all, Before I go through the trouble of replacing the valve cover gaskets, Is there a sure-fire way to KNOW beyond a shadow-of-a-doubt that they are leaking? I've got (some/most of) the tell-tale signs: - smoke coming from the areas between the valve cover gasket/cylinder head mating surface and exhaust manifolds - vehicle had been sitting for about 3 years - i shoulda changed 'em for good measure when i replaced the injectors (aka, the 3-year injector replacement!) i tried poking around with a flashlight in the dark around the suspect areas, and i could never actually see oil on the manifolds (would i ever be able to?), but my gut is telling me go ahead and replace 'em. (edit...should i replace the passenger's side one first, if the smoke stops, proceed with confidence to do the driver's side one? or pull my pants up and do 'em both????)
-
Thank you very much, got a better understanding now. But first I have to change both CV axles. One started growling at me. Least they are simple to figure out. Wiring is a nightmare.
-
Is it going to be quite simple. First unplug your wiper motor. Go to activate it and see if it pops a fuse. If it does follow the harness and go to the next plug. Unplug it. Try to activate the rear wiper and see if it pops a fuse. If it does not you at least eliminated a lot of work of where it could be and now you know where you need to look. Of where it could be and now you know where you need to look.
-
Thanks for all the help. I have a replacement motor and after I plugged it in the fuse blew. So on to the hatch wires and relays.
-
Pascal joined the community
-
I had a look at the manuals. Not sure if yours is VG or VQ, but the diagram is on EL-37 in either manual, and looks about the same. They sure crammed a lot of crap into that circuit, and amusingly, power to the bulbs still isn't properly relayed. It's just the WD21 wiring, but backwards, with a battery saver module riding it piggyback. The relays are how the battery saver control unit turns the headlights off if you leave them on for too long with the ignition off. Battery positive goes through two fuses to the two headlight relays. These relays are controlled by the headlamp battery saver control unit. That unit controls both relays together (single trigger wire that Ts off to the two relays). When the relays are engaged, they supply + to the common pin on each headlamp. The high/low filaments in the bulbs are grounded individually through the headlight switch. I'm ruling out the module, because it can't turn on one relay but not the other (if that was bad, it would take out both sides at once). If the switch was bad, I'd expect it to drop one filament at a time, like the WD21 headlight switches do. But each fuse and relay does one headlight, so one bad fuse or relay would take out high/low on that one headlight. Just like with the headlight bulbs, I'd check for any obvious heat/corrosion on the components and the fusebox, and maybe give them a wiggle to see if the light flickers. If it all looks good, you could try swapping them side to side to see if the issue follows the relay. If you're lucky enough to catch it while it's acting up, you could tap the relays to see if that brings it back on, or test for 12v+ at the common pin at the bulb to verify that the problem is on the + side.
-
After all the hype of how amazing AI was gonna be, it's kinda depressing to see it in action.
-
.thumb.jpg.3b55d9a307419d052e117782307fc17d.jpg) commodorehat changed their profile photo
commodorehat changed their profile photo -
What exactly do the two relays do? Is it just for the auto settings?
-
RedPath88 offers a novel solution to refine forum searches by allowing users to block specific forums or sub-forums from search results. While it doesn't directly enhance the search feature, it effectively narrows down search results by excluding irrelevant forums. This customization empowers users to tailor their search experience to their preferences, potentially saving time and frustration.
-
Only option is the auto feature,
-
Pulled distributor not on tdc.. marked nothing. Please help
Jacob1717 replied to Jacob1717's topic in 90-95 WD21 Pathfinders
Thanks! I’m gonna try it today and see where I get -
Help Removing Clutch Master Cylinder
Slartibartfast replied to peejay's topic in 90-95 WD21 Pathfinders
I've found that my mityvac pulls air in around the bleeder threads. I'm never sure where the bubbles are coming from. I hate bleeding brakes. Sounds like you're on the right track, though!