Guest Posted May 25, 2020 Share Posted May 25, 2020 26 minutes ago, RainGoat said: I should have known, you arid climate bastards! Southern CA & AZ - oh, I’m green with envy. Speaking of, I want to see a Sandstone Cyn shot of a Pathy in the next 2 years. Good to know the Rugged Ridge hubs fit the LE too (did it require a spacer?) No spacer required! What @Slartibartfast said about vdc and manual hubs is very interesting. My model has vdc which is probably why I have never had a 4wd light come on during long drives. Link to comment Share on other sites More sharing options...
Dbot Posted May 26, 2020 Author Share Posted May 26, 2020 On 5/23/2020 at 4:13 PM, R50JR said: Mine Sent from my Pathfinder I was soooo close to buying those since I have LE wheels. Read a couple reviews somewhere that complained about how it was a frustrating experience to get those warranty replacements in case they broke. I went ahead and ordered new Warn 29091 hubs. 1 of 2 things will happen in the next few days: I'll fix the 29091 junkyard hubs (2 attempts made) and return the new ones that are being shipped to me or I'll fail to fix the old junkyard hubs and use the new ones. Might try to wait a year and see if I can do a warranty claim on the old junkyard hubs with my new receipt and throw those on my other R50. I also learned that ARB is getting behind on their OME coils. At least for the OME 2928 Front HD coils. Bilsteinlifts.com says "Looks like part is on a big backorder now due to covid, about 8-12 weeks, let us know if you want to cancel". I refuse to let that get in the way of this lift since I've already arranged childcare and took off from my night job for this. I went ahead and cancelled that order and grabbed a pair from Ebay. Ebay 2928 coils should arrive next monday or sooner. Either way, I'm starting this project this friday and expect to have it done by the following friday. 1 Link to comment Share on other sites More sharing options...
Guest Posted May 27, 2020 Share Posted May 27, 2020 I was soooo close to buying those since I have LE wheels. Read a couple reviews somewhere that complained about how it was a frustrating experience to get those warranty replacements in case they broke. I went ahead and ordered new Warn 29091 hubs. 1 of 2 things will happen in the next few days: I'll fix the 29091 junkyard hubs (2 attempts made) and return the new ones that are being shipped to me or I'll fail to fix the old junkyard hubs and use the new ones. Might try to wait a year and see if I can do a warranty claim on the old junkyard hubs with my new receipt and throw those on my other R50. I also learned that ARB is getting behind on their OME coils. At least for the OME 2928 Front HD coils. Bilsteinlifts.com says "Looks like part is on a big backorder now due to covid, about 8-12 weeks, let us know if you want to cancel". I refuse to let that get in the way of this lift since I've already arranged childcare and took off from my night job for this. I went ahead and cancelled that order and grabbed a pair from Ebay. Ebay 2928 coils should arrive next monday or sooner. Either way, I'm starting this project this friday and expect to have it done by the following friday. Those warn hubs will not fit factory le wheels without modification to the center bore or spacers. Also, I bought the rugged ridge because I had some spare change but the ones on eBay are the exact same thing for less money. https://www.ebay.com/itm/401303481727 Sent from my Pathfinder Link to comment Share on other sites More sharing options...
PathyGig12 Posted May 27, 2020 Share Posted May 27, 2020 (edited) 1 hour ago, R50JR said: Those warn hubs will not fit factory le wheels without modification to the center bore or spacers. Also, I bought the rugged ridge because I had some spare change but the ones on eBay are the exact same thing for less money. https://www.ebay.com/itm/401303481727 Sent from my Pathfinder Ummm, are you sure about that? The Warn hubs fit perfectly through the center bore on my factory LE 6 spoke wheels Edited May 27, 2020 by PathyGig12 Link to comment Share on other sites More sharing options...
Guest Posted May 27, 2020 Share Posted May 27, 2020 Ummm, are you sure about that? The Warn hubs fit perfectly through the center bore on my factory LE 6 spoke wheels I didn’t think I had to specify the years since my statement went along the photo I previously posted. Sent from my Pathfinder Link to comment Share on other sites More sharing options...
jjmwilkinson Posted May 27, 2020 Share Posted May 27, 2020 Ummm, are you sure about that? The Warn hubs fit perfectly through the center bore on my factory LE 6 spoke wheels Aren't those SE wheels? At least that's what came on my SE, the LE wheels are the ones with all 6 spokes the same size and has a small center cap that doesn't cover the lugnuts like the SE wheels.Sent from my SM-G973U using Tapatalk Link to comment Share on other sites More sharing options...
Dbot Posted May 27, 2020 Author Share Posted May 27, 2020 6 minutes ago, jjmwilkinson said: Aren't those SE wheels? At least that's what came on my SE, the LE wheels are the ones with all 6 spokes the same size and has a small center cap that doesn't cover the lugnuts like the SE wheels. Sent from my SM-G973U using Tapatalk I think the 17” LE wheels (that don’t fit Warn hubs) are 2002 - 2004 wheels for LE models. The 16” wheels in question were for LE and SE models prior to 2002. My 01 LE has those 16” wheels but I’ve seen them in SE models too 2 Link to comment Share on other sites More sharing options...
jjmwilkinson Posted May 27, 2020 Share Posted May 27, 2020 Just now, Dbot said: I think the 17” LE wheels (that don’t fit Warn hubs) are 2002 - 2004 wheels for LE models. The 16” wheels in question were for LE and SE models prior to 2002. My 01 LE has those 16” wheels but I’ve seen them in SE models too Ahhh I see, didn't realize the LE wheels were only offered on the later R50s. Link to comment Share on other sites More sharing options...
PathyGig12 Posted May 27, 2020 Share Posted May 27, 2020 (edited) 2 hours ago, Dbot said: I think the 17” LE wheels (that don’t fit Warn hubs) are 2002 - 2004 wheels for LE models. The 16” wheels in question were for LE and SE models prior to 2002. My 01 LE has those 16” wheels but I’ve seen them in SE models too Gotcha, that makes sense. Mines an 01 with the 16” wheels, didn’t know they switched to 17s after that year Edited May 27, 2020 by PathyGig12 Link to comment Share on other sites More sharing options...
Dbot Posted May 28, 2020 Author Share Posted May 28, 2020 On 5/19/2020 at 5:10 PM, BamaQX402 said: I did a write up on replacing rear bushings, you will have to remove the locating tabs inside the front pocket for the lowers, I tried to grind the 1st one with a dremel, that took a long time, then just used a small chisel/hammer on the remaining 3, quick & easy. I still have to do my panhard, swaybar, shocks, & I have the 9447s on the way to complete the rear, then on to the front! I've yet to order front lift, but am planning to use the same set-up! I couldn't find your write up on bushings. Is it on another site? Link to comment Share on other sites More sharing options...
Dbot Posted May 30, 2020 Author Share Posted May 30, 2020 (edited) Dinner time update: So I’m apparently not getting OME HD coils for the front. I ordered through Bilsteinlifts.com because their website said they had 2 in stock. After a few days of nothing shipping I reached out them and a few days later they said ARB is backlogged through July. I spent a few days calling vendors who claimed to have stock to find out by phone they don’t actually have any on hand. Ultimately switched to 2” AC lift coils since those are actually in stock. Should get those Wednesday. Anyway, today I started working on the trailing arm bushings This morning and I still haven’t finished. I chose the upper driver side trailing arm to start with. I removed the sway link that’s in the way and started hammering away with the corded impact gun. Trailing arm bolt wouldn’t even budge despite several days worth of WD-40 being applied. Used an extra longer breaker bar with a wrench on the the back side of the bolt/nut to get it. Once removed, I gouged the rubber bits and put it in the vice to meet the sawzall. Started sawing with a precise cut. Flipped it 180 and started on the next precision cut. It suddenly started vibrating really bad and I cut into the trailing arm itself. I made an effort to punch out the bushing with the two cuts but it wouldn’t come out. Must be rusted together or something. Thankfully, I plan ahead sometimes and I had a set of trailing arms https://www.amazon.com/gp/aw/d/B00H9EL176?psc=1&ref=ppx_pop_mob_b_asin_title I measured the bushing sizes old vs new to see the inner diameter is 49.xx mm and the poly bushings have a diameter of 50.xx mm. Since our diameters are good, I ran the trailing arms to my nearby truck tuning shop and had the dude press out the rubber bushings from the new arms. I don’t think the dude had the right equipment because it slightly warped on of the cylinders but he got them out. I ran it home and cleaned up the inner bores with a wire brush, acetone and a coat a rust converter. Bushings push right in by hand. Feels like about 10 lbs of force is needed to squeeze them in. I put the included grease where it goes and installed the first trailing arm, using the provided new bolts. I left the nuts and bolts loose for the tightening that happens when it’s sitting level. And I ran out of daycare time so that’s all I have. Hopefully I’ll knock out the other three and get the rear lift installed tomorrow. Edited May 30, 2020 by Dbot Added images 1 Link to comment Share on other sites More sharing options...
Dbot Posted May 31, 2020 Author Share Posted May 31, 2020 On day 2, I got the other 3 trailing arms out. The rubber bushings were cracked and split which obviously explains the death sway it's been having. The lower trailing arm bolts were much more stuck than the others. Those bolts came out with a sawzall. BamaQX402 was right about the locating tabs on the body end of the lower trailing arm. Filed those down with a belt sander, wiped with acetone and hit it with rust converter before greasing. Getting bolt holes to line up was a bit of a tedious endeavor but a jack and ratchet strap will eventually get it right. Tomorrow, I'll see about removing the old shocks and coils to put in the replacements. Hopefully the Bilstein 5100 bushings don't give me any trouble. If everything goes into place, I'll rest the weight of the vehicle on it's axle and tighten those trailing arm bolts. Then I'll wait until Wednesday to install the AC coils and Warn hubs. 1 Link to comment Share on other sites More sharing options...
Dbot Posted June 1, 2020 Author Share Posted June 1, 2020 Day 3 Installed last trailing arm. All trailing arms bolts are hand tight. I supported the axle with the jack, and started unbolting the first shock. It compressed really easy and took several seconds to fully expand as it lay on the ground. So it turns out on this 02 model, the lower shock mount stud on the axle is about the diameter of the rubber bushing on the 5100 shock. I added a metal washer on the stud mount, sprayed some silicone lube on the stud and pushed the shock onto the stud, put more silicone lube and the original washer and nut back on. For the top mount, I wasn't happy with the extra slop from the 11mm-ish bolt sitting inside the 12.xxmm metal sleeve. So I went to the hardware store and bought some 1/2 diameter bolts that are only threaded at the end. This bolt is the perfect diameter to fit that provided metal sleeve. This did require expanding the shock mount tabs on the body. I took a 1/2" drill bit to the sheet metal to open the holes up a bit more. Some rust converter coating was sprayed on the exposed metal to help mitigate new rust. I stacked some washers to fill the gaps in the shock mount thickness and used a healthy dose of silicone lube here too. Swapping in the9447 coils was pretty uneventful other than working around having *just enough* brake line slack to work with. Getting the panhard bar back in was a doozy because lifting straight up on the diff wasn't lining up the bar hole with the body mount hole. I could get it almost lined up by using the jack to compress the passenger size but the newly installed 9447 coils seemed a bit too stick and actually did not let it flex out. I lifted the entire back end off the jack stands by jacking up the passenger drum brake and the bump stops still didn't touch anything. So i resorted to pulling laterally with ratchet straps on the axle but that was only good for almost pulling it off jack stands. Ultimately resorted to having an anchor vehicle attach to the receiver hitch to act as a brace as another vehicle on the other side acted as an anchor for the hi lift jack winch. This did the trick and got the bolt back in. I think I'm going to take a day off until Tuesday where I'll see about deconstructing the struts so their ready to rebuild when i get the AC coils on Wednesday. 1 Link to comment Share on other sites More sharing options...
PathyGig12 Posted June 1, 2020 Share Posted June 1, 2020 Nice progress! Ive been considering the bilsteins forever but never figured out whether my 01 would be able to fit them and how much I would have to modify. I’m very intrigued by your solution and I wonder whether mine could be tackled in the same way Oh and it’s worth mentioning for next time because I noticed you undid the panhard from the left side, I’ve had much better luck undoing the panhard from the right side rather than the left because when you go to bolt it back up, you can hammer the end back onto the tapered stud rather than needing to line up the bolt holes perfectly like you would for the left. Link to comment Share on other sites More sharing options...
Dbot Posted June 3, 2020 Author Share Posted June 3, 2020 AC coils arrive tomorrow so I pulled my struts out to help myself tomorrow. On one of these struts, that orange gasket that sits on top is cracked. I really don't want to wait for the dealership or another vendor to special order it, so I'm wondering what substitute I can use there. I was thinking about cutting my own out of some material. I'm thinking about rubber from a mud flap or inner tube. Fel-Pro makes sheets of gasket material but I don't know which one to choose https://www.autozone.com/sealants-glues-adhesives-and-tape/gasket-material/fel-pro-3075-gasket-material/67682_0_0?cmpid=PLA:US:EN:AD:NL:1000000:IEN:71700000043798118&msclkid=c4e81f142360158358b141c321e14e81&gclid=COny6NHE5OkCFRSyZQodZiYNGQ&gclsrc=ds I'm hoping you all had some suggestions. Thanks guys Link to comment Share on other sites More sharing options...
Guest Posted June 3, 2020 Share Posted June 3, 2020 You don’t need that gasket Sent from my Pathfinder Link to comment Share on other sites More sharing options...
jtchal Posted June 3, 2020 Share Posted June 3, 2020 (edited) I re-used mine even though it was split. On another note, keep up the photo updates, they're great! Edited June 3, 2020 by jtchal 1 Link to comment Share on other sites More sharing options...
Dbot Posted June 6, 2020 Author Share Posted June 6, 2020 As of today, it's driveable. For the struts, I rented two pairs of spring compressors from O'reilly and Autozone. They were identical other than the color of their plastic case. Compressing the OEM coil seemed easy enough other than the jack screw rods invading the same physical space as the strut coil cap. Upon removing the coil, it was apparent the gas struts were shot. Compressible by hand with about 5 lbs or less force. It didn't really want to rebound. Later during the reassembly, the gas strut rod kept sagging down until I held it up and put the nut on top. It's weird because I haven't felt or seen any signs of bad front suspension behavior on the vehicle. I assumed the struts were good since my '01 R50 nose dives with brake pedal use whereas the '02 doesn't. Since it rides ok as far as my tastes go, and I really don't want to wait for KYBs to ship from Rock Auto, I just moved on to the reassembly stage. Compressing the AC coils by hand sucks. The coil is slightly tapered but when it's being compressed, the taper becomes exaggerated which changes the geometry of the jack screw rods on the compressors. They push into the strut foot and/or cap depending on how they are oriented. You have to use a set and compress it, then when you run out of room, Use the other pair of compressors on different coil sections to continuing compressing. Repeat this a few times until you have the spring squished enough with enough cap clearance. Then when you start decompressing, you have to play musical chairs with the compressors at different spots just to get them off the spring. Half of the time, there's not enough clearance to fit a socket on the rod so you have to use an open end wrench. So for the second strut, I paid a local shop to swap the coil for me. I set masking tape sections on the components so all they had to do was align the tape when they reassemble. New oem strut bearings were also installed during reassembly and the orange triangular gaskets were reused. Once I reinstalled the struts on the vehicle, I put the wheels back on the front and back before I tightened the 3 top strut bolts. With the vehicle being supported by it's tires and wheels, I used a ruler to measure rear end height, took the rear wheels off, then used a jack to lift the back up to the previously measured height using the diff as the jack point. At this point, I used my torque wrench and tightened all the trailing arm bolts, panhard bolt and sway bar link bracket bolts. The lift is definitely noticeable in the rear. Old suspension yeilded 14.8" at the bottom of the hitch vs 19.4" now. Back end of running board height: 11.8" vs 16.0". Somehow I failed to record the original front running board height but with the lift, it's now 15". I'm curious how much of that I'll lose when everything settles in. So I drove it around town a bit and the rear end feels amazing. I've become so accustomed to death sway that I now have to relearn how to drive without anticipating sway over road irregularities. I also don't hear the thump in the rear end where the bushings shift under torque load changes at a low speeds. The coils are great too since now I can cross intersections at full speed without kissing the bump stops when the whole family is in the car and I have no complaints about the Bilsteins. I don't feel any harshness or bumpiness from the AC coils yet. The front feels a bit funny, but I suspect that's because my camber is off until I get it aligned tomorrow. Once it's aligned, I'm going to throw on the steelies and my Warn hubs. Additionally, I extended the rear diff breather hose from 16" to 5'. It now routes up and over to the fuel door area. 1 Link to comment Share on other sites More sharing options...
PATHYNDH Posted June 7, 2020 Share Posted June 7, 2020 On 5/17/2020 at 8:57 PM, Dbot said: 2002 4x4 Auto LE I've owned it for about a year and I'm behind on lifting. I had always wanted to build up something beyond stock for over a decade and now is that time. I had always assumed I'd start with the lift then make a build page, but I'm gonna start this now since I have about half the parts in my garage and the remaining parts are in the mail right now. This will give me some opportunity to take feedback and suggestions from you all more knowledgeable folk before I start turning wrenches in a week or two. About this vehicle, I picked it up last April when I needed something to replace my high mileage Altima with a slipping cvt. With my wife out of work at the time, I only had limited funds and for whatever reason vehicle prices were stupidly high at that time of year so I ended up with this 02 for $1500.00. The exterior is riddled with flaking paint, rust spots, dents, scuffs and scratches. The inside had grime, torn leather and lots of broken plastic. The death sway was very noticeable and I couldn't hear it's exhaust leak over the whiny pulley but there was no check engine light, water damage and the strut towers looked good. It was good enough to get around town for pizza deliveries by night and get me to my day job. Throughout 2019 I gradually spent dozens of hours and hundreds of dollars fixing it up. It and it's 2001 R50 companion can be found on Instagram as @dospaths where I document the endless repairs. So the fun stuff: Jeg's 16x8 steelies 555-681034 https://www.jegs.com/i/JEGS/555/681034/10002/-1?trk_msg=F4DEA4K0TBPKT67FKEGNHFHHLC&trk_contact=QLBQ2TEVQI0OU4FL6Q069HD5DS&trk_module=tra&trk_sid=HU0HF1BKBUHB8U969NPQKH3I9C&utm_source=listrak&utm_medium=email&utm_term=Product&utm_campaign=Transactional&utm_content=Shipping+Confirmation General Grabber AT2 265 70r 16 (used - but free) 100mm - 108mm hub centric rings https://www.amazon.com/gp/product/B07N97VFY8/ref=ppx_yo_dt_b_asin_title_o01_s00?ie=UTF8&psc=1 4x4 Parts Polyurethane split bushing kit for rear trailing arms https://www.4x4parts.com/i-18981266-complete-split-design-trailing-arm-bushing-kit.html Bilstein 5100 shocks https://www.amazon.com/gp/product/B00BYNJ7KG/ref=ppx_yo_dt_b_asin_title_o03_s00?ie=UTF8&psc=1 Camber Adjust bolts https://www.amazon.com/gp/product/B000CB2GOU/ref=ppx_yo_dt_b_asin_title_o02_s00?ie=UTF8&psc=1 NRC9449.c8 coils https://www.lrdirect.com/NRC9449-supplied-by-britpart-branded-britpart.html OME heavy duty coils https://www.bilsteinlifts.com/shop/nissan/nissan-pathfinder/front-5-inch-ome-heavy-duty-lift-coils-for-1996-2004-r50-nissan-pathfinder/ Strut bearings https://www.nissanpartsdeal.com/parts/nissan-bearing-strut~54325-5v000.html 1" SFcreation front spacers https://sfcreation.com/products/front-spacers Possibly Warn 29091 hubs Most of the above parts are in the garage. The rest (coils and shocks) are in the mail. The Warn hubs are from a salvage yard and were in rough grimey shape. They are diassembled and sitting in a jar of degreaser for the next couple of days. If they look ok when it's down to just the bare metal, I'll order a service kit from Warn to rebuild them. If not, I'll be checking out the Mile Marker hubs online. My tenative plans are to start with the trailing arm bushings. I've been tagging the bolts with WD-40 about every other day and I'm going to borrow a heavy duty 120v impact gun for that. I'll use the sawzall to remove the existing bushings and assuming the trailing arms are oem or oem equivalent, they split bushings will fit right in those diameters.\ After that, I'll pull the shocks and coils out then put in the 9449s (hopefully without spring compressor), then put in the Bilstein 5100s. Any tips or advice for coil and shock installation (orientation etc) is welcome. After getting warmed up on the rear, I'll do the struts next. I'll install the OME HD coils and the new strut bearings. Now, I know somebody on here will advise to not use a 1" spacer with those coils but I'm also open to the collective group opinion on that considering I'll be using manual hubs. So I'll either install the spacer with the struts or leave it out for a few months before revisiting the strut to put it in once the coils have worn in. Any installation advice is welcome too. Install manual hubs. I'll then put in camber adjust bolts and find a shop that understands what I've done and get an alignment. We have a very similar lift combo with same tires and size lol Link to comment Share on other sites More sharing options...
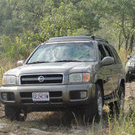
Dbot Posted June 7, 2020 Author Share Posted June 7, 2020 Alas the post I've been striving to get to: Finished product below. So yesterday, I drove it around a bit and by the end of the night I noticed a slight pop/clunk in the rear end that is repeatable by 1) coasting 2)getting back on the throttle instantly. I crawled underneath to triple check my trailing arm bushing bolts and found nothing. Driveshaft felt just as secure as my 01 parked next to it. I noticed I had a worn out rear sway link so I replaced it to find that it didn't fix the noise. Perhaps the noise was always there but not noticed by myself as the old rubber bushing clunk was much louder and more noticeable. I guess I'll have to keep an ear out for it to see if it gets any worse. Also, driving yesterday, the Service Engine Soon light came on. Its a code for the evap system. I had disconnected a hose (reconnected when finished) above the drive strut and zip tied an extended diff breather hose to the fuel filler hose as well. I also blasted the undercarriage and wheel wells really well at a car wash too. So I supposed I either messed up a hose or got water on something that should stay dry. So about the Warn hubs, there was no need to replace the factory studs despite Warn providing replacement studs. Installation was very easy and straightforward. I also noticed on my other Warn hubs from the junkyard, that the gold color on the lockout knob is some sort of transparent amber coating. Soaking the cap in acetone for a night turns that coating to jelly that wipes off with your finger exposing a brushed steel look. I've seen some discussions around the internet about how many people dislike the gold color so I though I'd mention that. So some visual geometry notes I've made about this configuration: The back driver's side wheel protrudes a bit further than the passenger likely due to the panhard bar setup. Not a big deal but you can see it if you go looking for it. Also, the AC coils give some noticeable positive camber. Due to having 26 hours of dad duty this weekend and a limited number of shops that want to mess with non factory suspension, I'll have to wait until some weekday after work to get it aligned with the camber adjustment bolts. I left my running boards on initially because they serve as a decent reference point for height mesaurements but after seeing my 5'2" wife and four year old comically struggle to get in the new height I've decided to keep them on as "disposable rock sliders." If something happens to them on the trail... oh well. Below are some old vs new measurements: As far as ride quality goes, it is now starting to fell a little truck like. It's very startling when the struts slam. I think they top out really easy with the AC coils. I just know my wife is going to accuse me of messing up the front. The transfer case light hasn't come on yet and I've done about 20 miles of interstate driving so far so hopefully the automatic transfer case doesn't mind unlocked hubs. I can't wait to actually get it on the trail later this month. Lastly, you can't have an excessively long post without a special thanks. So special thanks to PathyDude17 for answering weeks of questions 2 Link to comment Share on other sites More sharing options...
PathyDude17 Posted June 7, 2020 Share Posted June 7, 2020 Always happy to help! Top-out is a funny one. Personally, I think I have a high tolerance for noisy clunks, and have just gotten used to some of the "off road noises" that happene when I leave the pavement. I'm sure in off road situations, I do experience top-out. At least on pavement, I can't think of a single time where I was certain the struts had topped out, or where a noticeably loud "clunk" was heard up front. For that reason, I've always assumed that "top-out" was a litle over-reported. I also beleive that my coils dropped a solid .75-1" of height in the first few weeks, eventually settling to ~2". If your top-out keeps happening alot after that initial settling, then that would definitley be different than the experience that I've had with the AC coils. Link to comment Share on other sites More sharing options...
Dbot Posted June 15, 2020 Author Share Posted June 15, 2020 (edited) 1 week update: So I finally got around to getting the alignment fixed. I gave the shop guy 4 camber bolts to work with and he only needed 2. The tires a little quieter now they aren't riding on the outside corner of the tread. Something I've noticed is that at highway speeds, I can hear a noise from what I think is the transfer case when the hubs are unlocked. The noise is similar to a worn out bearing or something. It's very faint and can't be heard unless passengers are quiet and the music is low/off. I can't hear it below 55 mph though. No 4x4 warning lights yet. So I took it wheeling on some moderate stuff nearby in Missouri. With the bigger tires and more ground clearance it took some of the excitement out of the easy stuff as it wasn't much different than driving a car down a dirt road. Struts didn't top out much and never dragged anything over rocks. I got a bit ambitious and tried to go up a steep, off camber hill with sloppy mud, peppered with embedded rocks and tight trees on either side. I almost made it to the top but ultimately got the tires hung on rocks and it crab walked about 6 inches sideways into a tree. I used a hi-lift jack as a winch to pull the rest of the way up. So the silver lining of that trip was, that I found the limits of the tires on mud... That's burned into my memory. I also found no issues with the suspension components and the cv axles held up on rocks just fine. Also, I carried an adult passenger, two kids and a bit of weight consisting of tools, spare cv axle, chains, coolers and drinks. The NRC9449s didn't even show they were doing double duty. I can now compare this ride to a stock xterra with the same exact tires and say this r50 is now superior as it sits higher therefore giving me about the same approach, departure and breakover angles. The r50 articulates better but the slightly longer wheelbase makes turns between tight trees a bit trickier when inches matter. The offset of the new wheels makes more vehicle to squeeze between trees but several times, the wide tires made an effective bumper which kept the tree an inch away from my fender flares as the tires stick out now. In a few days, I'm going to take it to an offroad park to get a better feel for it as there is more diverse difficulty and the density of the terrain is much better. Edited June 15, 2020 by Dbot 4 Link to comment Share on other sites More sharing options...
01Pathmaker Posted June 15, 2020 Share Posted June 15, 2020 NIce work & great to follow along! These are fun little animals... Link to comment Share on other sites More sharing options...
RainGoat Posted June 16, 2020 Share Posted June 16, 2020 ...also noticed on my other Warn hubs from the junkyard, that the gold color on the lockout knob is some sort of transparent amber coating. Soaking the cap in acetone for a night turns that coating to jelly that wipes off with your finger exposing a brushed steel look. I left my running boards on initially because they serve as a decent reference point for height mesaurements but after seeing my 5'2" wife and four year old comically struggle to get in the new height I've decided to keep them on as "disposable rock sliders."Interesting note on the Warn hubs - did you do that? If so, pictures please.I think you’ll find the running boards useful over time, especially with kids, women or a roof rack. They are fairly stout & provide some measure of protection. Personally, while I don’t care for the “nerf bar” look of the tubular ones, I think those low profile ones give the truck a more finished look than when they’re off. They were well styled to fit the trucks aesthetics. Link to comment Share on other sites More sharing options...
RainGoat Posted June 16, 2020 Share Posted June 16, 2020 I used a hi-lift jack as a winch to pull the rest of the way up. I’ve carried one for decades “just in case” but I think you’re the first that I know of other than a recovery instructor that has actually used the HiLift as a winch. Pictures? Link to comment Share on other sites More sharing options...
Recommended Posts
Create an account or sign in to comment
You need to be a member in order to leave a comment
Create an account
Sign up for a new account in our community. It's easy!
Register a new accountSign in
Already have an account? Sign in here.
Sign In Now