PathyGig12 Posted November 13, 2019 Author Share Posted November 13, 2019 I’ll try to take measurements after the tires go on, and get pictures of the camera mounting point. Its surprisingly decent quality for the price, and the wireless makes it convenient. I just had to run wires to the socket under the center console to power the camera and the monitor came with an adapter to plug into the 12 socket in the dash so the install was ridiculously easy. I gave up on trying to tap into the 4Wd light, and besides it’s nice to be able to switch it on whenever I want to. This particular model had the option to overlay lines on the screen but has a feature to turn them off as well, which I personally chose to do. I wish I could have gotten the front facing camera now that I know they exist. Ha, I guess I just jumped on the first one I thought I could make work. 1 Link to comment Share on other sites More sharing options...
Guest Posted November 13, 2019 Share Posted November 13, 2019 Glad you got install all sorted. It’s too bad you could not get the spring compressor since it pays for itself the first time you use it and you probably will need it again in the future. For the camera, it does sound like you got the wrong type. I had thought about it but figured you already had done your homework about image orientation and it being specific to a back-up cam kit you knew image would be reversed. Maybe you can order a front facing camera and solder it into existing wire. Sent from my iPhone using Tapatalk Link to comment Share on other sites More sharing options...
PathyGig12 Posted November 13, 2019 Author Share Posted November 13, 2019 3 hours ago, R50JR said: Glad you got install all sorted. It’s too bad you could not get the spring compressor since it pays for itself the first time you use it and you probably will need it again in the future. For the camera, it does sound like you got the wrong type. I had thought about it but figured you already had done your homework about image orientation and it being specific to a back-up cam kit you knew image would be reversed. Maybe you can order a front facing camera and solder it into existing wire. Sent from my iPhone using Tapatalk Well if it ends up causing me problems on trails, I’ll go ahead and get myself a new one. But as it stands, the mirror issue isn’t as bad as you’d think. Your brain can compensate for a lot Link to comment Share on other sites More sharing options...
joshrichard Posted November 13, 2019 Share Posted November 13, 2019 (edited) Did you end up using the camber bolts that you stated you bought? I needed them for my spacer lift, but I know with springs they arent as necessary Edited November 13, 2019 by joshrichard Link to comment Share on other sites More sharing options...
PathyGig12 Posted November 13, 2019 Author Share Posted November 13, 2019 2 hours ago, joshrichard said: Did you end up using the camber bolts that you stated you bought? I needed them for my spacer lift, but I know with springs they arent as necessary Yeah I used them, but I’m having trouble getting them to work properly. I’m just going to tell the guys at the alignment shop about the bolts and let them sort it out while they are aligning the front 1 Link to comment Share on other sites More sharing options...
RainGoat Posted November 13, 2019 Share Posted November 13, 2019 We ended up not using the camber bolts on mine Link to comment Share on other sites More sharing options...
PathyGig12 Posted November 14, 2019 Author Share Posted November 14, 2019 Today I got the tires mounted and set about organizing / cleaning the interior. I tidied up the back and added an axe and fire extinguisher, plus a small shovel mounted on the rack. Good news is the tires don’t rub except mildly when I’m at full lock in reverse. I’ll see what I can trim to make this go away, but it’s not too bad as it is. My alignment is scheduled for tomorrow at 1, I’m sick of this crazy camber and ready for it to be gone I’ll get some better pics during the day tomorrow. And take measurements. After all the organizing I ran out of daylight. The last pic is the undercarriage monitor. 3 Link to comment Share on other sites More sharing options...
jlduthie Posted November 14, 2019 Share Posted November 14, 2019 Looking good! Link to comment Share on other sites More sharing options...
RainGoat Posted November 14, 2019 Share Posted November 14, 2019 Looks good. That undercarriage view looks pretty good. Do you know it angle of view? Also, can you take a pic of how & where you mounted it.Consider securing that load with Cam straps. Those bungees won’t prevent those tool boxes from becoming lethal projectiles. Also something more secure for that fire extinguisher. Link to comment Share on other sites More sharing options...
PathyGig12 Posted November 14, 2019 Author Share Posted November 14, 2019 7 minutes ago, RainGoat said: Looks good. That undercarriage view looks pretty good. Do you know it angle of view? Also, can you take a pic of how & where you mounted it. Consider securing that load with Cam straps. Those bungees won’t prevent those tool boxes from becoming lethal projectiles. Also something more secure for that fire extinguisher. I’ll get to it eventually, money is pretty tight right now so I’m just happy it’s organized back there. I’m planning on more secure cargo solutions in the future. Does anyone know how to get behind the plastic on the left side so that I can bolt the fire extinguisher mount? Or another way it could be done securely? Link to comment Share on other sites More sharing options...
PathyGig12 Posted November 14, 2019 Author Share Posted November 14, 2019 I’ll grab a pic of the camera today for you. Its actually mounted on the sway bar just to the right of the rear diff using zip ties and then coated in some epoxy to keep it from changing angle. Again, not an ideal mount but I warned you guys not to look for perfectionist tendencies in my build lol It hasn’t budged in the last week and I’ve gone over some nasty pot holes Link to comment Share on other sites More sharing options...
RainGoat Posted November 14, 2019 Share Posted November 14, 2019 Home Depot has some decent 6’ cam straps $9 for 4. https://www.homedepot.com/p/Husky-6-ft-x-1-in-Locking-Tie-Down-4-Pack-FH0898/206802389 I put a 2” wide industrial velcro strip down my fire extinguisher & then have it vertically in the angle between the rear seat back & the driver’s side rear wheel well with something against it to prevent ejection upwards/backwards - though I’m not thrilled with it. I’ve looked at some hard mounts but at $40-60 I’m disinclined. There’s a less expensive way to hard mount it to the front seat bolts (by bracketeer) but I haven’t gotten around to it yet. Here’s the area behind that plastic. [mention=37543]TowndawgR50[/mention] & I were contemplating MOLLE rack mounting points but never really moved forward on that project yet. That mounting location below the center of the window looks most promising. I also highly recommend tapping the metric upper cargo retainers with 1/4-20 & putting in metal anchors. Link to comment Share on other sites More sharing options...
Guest Posted November 14, 2019 Share Posted November 14, 2019 Looks great! Which extinguisher are you guys using?Sent from my iPhone using Tapatalk Link to comment Share on other sites More sharing options...
PathyGig12 Posted November 14, 2019 Author Share Posted November 14, 2019 I just went with a random one from harbor freight. Couldn’t tell you what it is, but it seems to be good enough to me. It’s red and puts out fires. Rain goat, the fire extinguisher I have came with a plastic hard mount for screwing into a wall, and attaches to the extinguisher with a plastic clip by the neck of the bottle plus a strap around the middle, so I’m considering just screwing the mount into the plastic but I would prefer to use nuts and bolts if I could get behind it. Ideally I’d drill holes into the metal behind the plastic but that’s quite an involved job and I have no idea the layout of what’s under there. It’s hard to tell from those pics what a suitable spot would be 1 Link to comment Share on other sites More sharing options...
PathyGig12 Posted November 14, 2019 Author Share Posted November 14, 2019 How did you go about taking off the plastic? Link to comment Share on other sites More sharing options...
Guest Posted November 14, 2019 Share Posted November 14, 2019 How did you go about taking off the plastic?Once you remove all the bolts, the panel just snaps off. I don’t recall exactly but I think you have to remove the top first to get the bottom one off. Sent from my iPhone using Tapatalk Link to comment Share on other sites More sharing options...
PathyGig12 Posted November 15, 2019 Author Share Posted November 15, 2019 (edited) As you can see, the camera is a really basic set up. It could be refined in about a million different ways, but what I have right now works for me so I’ll leave it alone. The wiring goes up along the lower trailing arm to the underside of the running board, and then into the crack of the door (reinforced with plastic tubing and tape so it doesn’t get pinched). I also made sure to leave some slack in the wiring so that they don’t tear under flexing and compression. Ignore the clump of tape haha, I was trying to wrap more of the wiring quickly before going to work but it’s falling off already so I’ll have to find a better solution. I was pressed for time on the install, but I’ll revisit it soon. You can also see in the top picture that there’s actually a bit of rake front to back. I’m noticing it more now that I’m taking more pictures from the sides. For some reason it looks more level in person. Anyway, I don't think I mind it.This way I can still load up the back with people and camping gear without sagging Edited November 15, 2019 by PathyGig12 Added stuff 1 Link to comment Share on other sites More sharing options...
PathyGig12 Posted November 15, 2019 Author Share Posted November 15, 2019 Oh yeah and the alignment is done now. They said it was easily doable with just one bolt per side so I must not have been too far off. Ahhhhhhhhhh..... no camber feels good Link to comment Share on other sites More sharing options...
RainGoat Posted November 15, 2019 Share Posted November 15, 2019 The back of the diff has a mounting plate for I don’t know what that I’ve thought about sending a rigid arm off of to allow visualization of the rear diff as well or at least to have a good idea of what it would align with. You do realize, this means rock/undercarriage lights are next? 1 Link to comment Share on other sites More sharing options...
PathyGig12 Posted November 15, 2019 Author Share Posted November 15, 2019 (edited) 16 minutes ago, RainGoat said: The back of the diff has a mounting plate for I don’t know what that I’ve thought about sending a rigid arm off of to allow visualization of the rear diff as well or at least to have a good idea of what it would align with. You do realize, this means rock/undercarriage lights are next? Oh believe me, I’ve realized! Ive got way too many wants and way too little money my friend. Current to do list: -Manual hubs -New CVs (one boot is torn but both sides are probably in need of replacing anyway) -New front control arms, tie rod ends, lower ball joints, end links, and steering rack boots -New upstream O2 sensors -Getting the power valve screws tightened -Front Lokka -Bilstein shocks to replace the Gabriel ultras and give me more flex -Hi lift jack, Tow ropes, traction boards - Rock lights and reverse mounted LED bar - rock sliders -coastal off-road front bumper with 10,000lb smitty winch - limiting straps - custom swing out rear gas can carrier (mounted to a custom rear bumper) My wallet is crying. It’s telling me to run away from this forum My family lives in vegas so I’ll be there for thanksgiving. Pray for me fellow pathfinder nuts, if I hit even a minor jackpot I can check quite a few things off the list! Lol Edited November 15, 2019 by PathyGig12 2 Link to comment Share on other sites More sharing options...
PathyDude17 Posted November 15, 2019 Share Posted November 15, 2019 8 hours ago, RainGoat said: The back of the diff has a mounting plate for I don’t know what that I’ve thought about sending a rigid arm off of to allow visualization of the rear diff as well or at least to have a good idea of what it would align with. You do realize, this means rock/undercarriage lights are next? I believe the mounting plate is a carry over from the Load sensing Valve that was present on earlier model pathfinders, mine has it too. 2 Link to comment Share on other sites More sharing options...
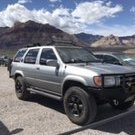
PathyGig12 Posted November 15, 2019 Author Share Posted November 15, 2019 finally some daylight pictures! I went ahead and sprayed the OE wheels black. Bear in mind I’m a horrible painter, but they are indeed no longer silver. So I count it as a success I loved the look of the black wheels on everyone else’s rigs so I figured I’d like mine better in black as well. Makes the tires look bigger and the truck more aggressive. Next up is probably removing the running boards for more clearance on the sides 4 Link to comment Share on other sites More sharing options...
PathyGig12 Posted November 15, 2019 Author Share Posted November 15, 2019 I looked into the service history and confirmed that the power valve screws have not been tightened in the past, so I think that’s going to be my next shop visit You all have convinced me that it’s not worth rolling the dice on this one, so I’ll see about getting into a Nissan mechanic next week to do the work. What’s a fair price do you think? 1 Link to comment Share on other sites More sharing options...
RainGoat Posted November 15, 2019 Share Posted November 15, 2019 I believe the mounting plate is a carry over from the Load sensing Valve that was present on earlier model pathfinders, mine has it too.That makes sense Link to comment Share on other sites More sharing options...
RainGoat Posted November 15, 2019 Share Posted November 15, 2019 I looked into the service history and confirmed that the power valve screws have not been tightened in the past, so I think that’s going to be my next shop visit You all have convinced me that it’s not worth rolling the dice on this one, so I’ll see about getting into a Nissan mechanic next week to do the work. What’s a fair price do you think? Perfect - I was going to say, I only see One To Do on that list. People generally say it’s 2-3 hours labor. I also think it’s generic enough anybody could do it. Nissan May disassemble it & then refuse to put it back together without a costly part. A shop can replace the screws. I would consider getting the Altima screws & remove the washers & have them ready or grab some plus a butterfly plate or two from the JY. Power Valve Butterfly Valve Screws8 in NumberAltima Part#14511-8J00Bthey come with washers on them which are kind of a pain to remove but need to come off. Three Bond 1375B, Nissan Part#14511-8J01B. Link to comment Share on other sites More sharing options...
Recommended Posts
Create an account or sign in to comment
You need to be a member in order to leave a comment
Create an account
Sign up for a new account in our community. It's easy!
Register a new accountSign in
Already have an account? Sign in here.
Sign In Now