Bax03SE Posted March 2, 2019 Share Posted March 2, 2019 I don’t know that I would go so far as to call this a build thread, but I figured it might be good to organize some things into one place! My R50 is a black 2003 SE, that I’ve had for a little over 4 years now. At the time, I was trying to get away from car payments, so I made the decision to sell my one year old car that I was making payments on and then look for something I could afford to pay cash for. I had always liked the R50 platform, and I’d had good experiences with other Nissans in the past so I set out to find a good late model R50 with the VQ35. Most of the low mileage trucks I was finding at dealerships were still asking between $10k and $11k and craigslist private listings just had a bunch of junk. Then I found a recently traded in truck sitting at the back of the Nissan dealer just down the road from me. I stopped to ask about it, and it only had 70k miles and overall looked pretty decent but a bit neglected. They had literally just taken it on trade the day before, and said that since it was older than what they liked to stock on their used lot they were planning to just send it to auction as is. I asked if I could look at it and they handed me the keys and said “have at it”. I spent a good 2-3 hours looking it all over and crawling underneath it. It was the epitome of a soccer mom suv, all the way down to the “proud parent of...” stickers still on the back. It was full of Cheerios (literally), and didn’t appear to have been washed or vacuumed in years. But under the dirt it looked solid. The only mechanical issues I could find were a small oil leak from the oil cooler fitting (very common on the VQ), and the front tires were chewed up from being out of alignment for a long time. I took it for a good test drive and the engine and transmission were both nice and smooth, 4wd shifted in and out smoothly, and every button and switch worked and did what it should. No lights on the dash, and I also scanned it for codes and everything checked out. Long story short, I ended up writing them a check for $7k and taking it home as is. I felt like that was a fair price based on the low miles (keep in mind this was back in 2014). I don’t have much for pictures from back then, but this is what it looked like when I brought it home. I picked up the O ring I needed for the oil cooler for like 6 dollars while I was still at the dealer, and the next day I took it in for a set of front tires and an alignment. Then after taking a full day to pull out the seats, scrub the carpet, clean everything up, change the oil and fluids, etc...it was looking pretty good! I then just drove it like that for about the first year. Sent from my iPhone using Tapatalk 4 Link to comment Share on other sites More sharing options...
Bax03SE Posted March 2, 2019 Author Share Posted March 2, 2019 After driving it for a year I decided I wanted to toughen up the image a little bit and decided to do a spacer loft. I wasn’t on here much at the time and had not heard of sfcreations, if I had I probably would have used their spacers. As it was, I bought a set of aluminum spacers off EBay for 2.5 inches of lift. Sent from my iPhone using Tapatalk Link to comment Share on other sites More sharing options...
Bax03SE Posted March 2, 2019 Author Share Posted March 2, 2019 Even though the truck was largely rust free, for whatever reason the lower radiator support had a strange amount of rust on it even though everything else on the undercarriage is nice and clean. I knew that when I bought it, but it wasn’t an emergency so I left it alone for the first year until I got some time to tackle it. This is looking up from the bottom of the rad support, and the pic was taken about halfway through the repair so some of the rust holes are already covered up. I used two pieces of angle iron to box in the bottom of the rad support and strengthen it back up. With this reinforcement this section is now much thicker and I think stronger than stock.Sent from my iPhone using Tapatalk 3 Link to comment Share on other sites More sharing options...
Bax03SE Posted March 2, 2019 Author Share Posted March 2, 2019 After that I added a trailer hitch and 4 pin harness to pull our 6x12 enclosed trailer that we use to haul props for dance competitions. Both of my kids are on a competitive dance team, so that’s fun....!Here’s a pic of it with the trailer. This is with the spacer lift front and rear, and 245/75/16 bfg KO2’s. The stock springs are very soft for towing, so I put air bags in the rear coils to level the ride. Without the bags it sagged a lot with even just a little weight in the trailer. Sent from my iPhone using Tapatalk 2 Link to comment Share on other sites More sharing options...
Bax03SE Posted March 2, 2019 Author Share Posted March 2, 2019 Not too long after I started using it for towing, I started looking for options for heavy duty rear springs to eliminate the need for the air bags. That’s when I stumbled on the info about Land Rover springs fitting the R50. I think I was one of the first to go this route, and ended up putting the NRC9448 springs in, with one coil cut off to match the ride height of my previous set up using the stock springs and spacers. The LR springs gave me about the same lift by themselves without the need for spacers, and the heavier spring rate handles the trailer without the need for air bags,Sent from my iPhone using Tapatalk 2 Link to comment Share on other sites More sharing options...
Bax03SE Posted March 2, 2019 Author Share Posted March 2, 2019 While upgrading the rear springs, I also went bigger on the wheel and tire package, moving up to 285/75/16 Kumho mud terrains mounted on 16x8 rims, with 1.5 inch wheel spacers to clear the strut assembly. I had to remove the front mudflaps and do some trimming on the inner fender and front bumper to clear the new tires. Sent from my iPhone using Tapatalk 1 Link to comment Share on other sites More sharing options...
Bax03SE Posted March 2, 2019 Author Share Posted March 2, 2019 Also did a mild diy panhard drop by relocating it a little down and to the right with a new hole drilled.The original mounting hole is circled. Sent from my iPhone using Tapatalk Link to comment Share on other sites More sharing options...
Bax03SE Posted March 2, 2019 Author Share Posted March 2, 2019 Somewhere along the lines I installed mile marker manual hubs to save my CV joints. I’ve been very happy with these. Please note that this pic is with the oem wheels still installed, and with the 1.5 inch spacers also on. The manual hub would not clear the center bore of the oem rim without the spacer. The hole in the center of the late model SE rim isn’t big enough for the hubs to pass through all the way.Sent from my iPhone using Tapatalk Link to comment Share on other sites More sharing options...
Bax03SE Posted March 2, 2019 Author Share Posted March 2, 2019 Another pic of how it sat with the lift spacers front and rear, stock springs, and 245/75/16 tires.Sent from my iPhone using Tapatalk Link to comment Share on other sites More sharing options...
Bax03SE Posted March 2, 2019 Author Share Posted March 2, 2019 And how it sits now.Sent from my iPhone using Tapatalk 2 Link to comment Share on other sites More sharing options...
Bax03SE Posted March 2, 2019 Author Share Posted March 2, 2019 There was also that time someone in a turn only lane decided to go straight and drove right into the side of me. This incident is actually the number one reason I still keep the oem step rails in place. The step rail took the brunt of the collision and directed the car up into the door instead of hitting the rocker panel. Without the step rail it would have gone into the rocker and caused a lot more damage. As it was, the damage was all contained within the door and I was able to fix it with just a used door from a salvage yard painted to match. The guy who hit me took off and was never found, so it was cheaper to fix it myself than to go through my insurance.The step rail took the hit with absolutely zero damage other than a scuff in the paint. Seeing how strong they are convinced me to leave them in place for the rocker protection. Sent from my iPhone using Tapatalk 2 Link to comment Share on other sites More sharing options...
Bax03SE Posted March 2, 2019 Author Share Posted March 2, 2019 Some stance pics to see how the wheels and spacers line up.Sent from my iPhone using Tapatalk 3 Link to comment Share on other sites More sharing options...
PathyDude17 Posted March 2, 2019 Share Posted March 2, 2019 (edited) 6 minutes ago, Bax03SE said: There was also that time someone in a turn only lane decided to go straight and drove right into the side of me. This incident is actually the number one reason I still keep the oem step rails in place. The step rail took the brunt of the collision and directed the car up into the door instead of hitting the rocker panel. Without the step rail it would have gone into the rocker and caused a lot more damage. As it was, the damage was all contained within the door and I was able to fix it with just a used door from a salvage yard painted to match. The guy who hit me took off and was never found, so it was cheaper to fix it myself than to go through my insurance.The step rail took the hit with absolutely zero damage other than a scuff in the paint. Seeing how strong they are convinced me to leave them in place for the rocker protection. Sent from my iPhone using Tapatalk Never thought of that. Makes sense that they provide some protection. I have the same exact pathfinder and took those boards off. Mine were pretty beat up though. Your truck looks super good though! Edited March 2, 2019 by PathyDude17 Link to comment Share on other sites More sharing options...
Bax03SE Posted March 2, 2019 Author Share Posted March 2, 2019 (edited) 20 minutes ago, PathyDude17 said: Never thought of that. Makes sense that they provide some protection. I have the same exact pathfinder and took those boards off. Mine were pretty beat up though. Mine were also a bit beat up. I took them off and painted them with bed liner to clean them up and visually blend them in with the truck a bit. Also, if you get down and look straight under the truck, there are other parts of the frame and cross members that hang down at the same level of the lowest point on the step rails, so technically the rails don’t really hinder the overall ground clearance much if at all. Some of the steel step rails that came on the earlier R50s were not as strong and tended to rust out, but these late model aluminum rails are surprisingly robust. Edited March 2, 2019 by Bax03SE 1 1 Link to comment Share on other sites More sharing options...
Bax03SE Posted March 2, 2019 Author Share Posted March 2, 2019 I may or may not get it done this summer, but one of the next big projects I’m planning is to Raptor Line the whole truck. Even though it looks good in pictures, the paint is far from perfect in person. Plus, I’m planning to start getting it out on some trail rides, and black paint and tree branches don’t play well together. I think the industrial/military look of a well done bed liner paint job would suit the rig well. It isn’t my daily driver anymore, so I feel a little more free to experiment with it, lol! 1 Link to comment Share on other sites More sharing options...
Bax03SE Posted March 3, 2019 Author Share Posted March 3, 2019 I use a blue tooth dongle and the OBD fusion app to help monitor things while towing. It also makes a great diagnostics tool. Sent from my iPhone using Tapatalk 2 Link to comment Share on other sites More sharing options...
Bax03SE Posted March 3, 2019 Author Share Posted March 3, 2019 This should give an idea of the trimming I did to clear the tires up front. I cut out the lower portion of the wheel well liner, the inner edge of the flare, and a couple inches of metal off the inner bottom edge of the fender. Sent from my iPhone using Tapatalk 2 Link to comment Share on other sites More sharing options...
RainGoat Posted March 3, 2019 Share Posted March 3, 2019 The step rail took the hit with absolutely zero damage other than a scuff in the paint. Seeing how strong they are convinced me to leave them in place for the rocker protection. Just yesterday,[mention=39745]stpickens[/mention] and I were discussing the strength of the OEM step rails. We both have the simple slim black steps as opposed to the tube steps (‘02 & ‘03). He’s actually used them functionally as sliders, sliding along the step on breakover & protecting his rocker. Surprisingly little visual damage. I know[mention=36148]hawairish[/mention] isn’t happy with how the RRO sliders mount and he and[mention=37543]TowndawgR50[/mention] are working on slider adapters that utilize the stock step rail mounting points. I actually have had RRO sliders for about 9 months while I await their solution. 1 Link to comment Share on other sites More sharing options...
Bax03SE Posted March 3, 2019 Author Share Posted March 3, 2019 I didn’t quite dare take it too far, but I was curious once and put a jack with a block of wood under the step rail and put a little pressure on it to see if I could see any flex on the body at the mounting points. I didn’t see any give at all on the body/frame as the truck started to come up. I was afraid of breaking the step mount so I stopped short of lifting the wheels off the ground but I think the body side of the mount would have taken the load just fine. 1 Link to comment Share on other sites More sharing options...
micahfelker Posted March 3, 2019 Share Posted March 3, 2019 Great writeup man!! Looks like it's time to build some bumpers next (; Link to comment Share on other sites More sharing options...
Bax03SE Posted March 4, 2019 Author Share Posted March 4, 2019 1 hour ago, micahfelker said: Great writeup man!! Looks like it's time to build some bumpers next (; Lol, stay tuned! Link to comment Share on other sites More sharing options...
micahfelker Posted March 4, 2019 Share Posted March 4, 2019 Heck yeahhhhh brother Link to comment Share on other sites More sharing options...
Bax03SE Posted March 4, 2019 Author Share Posted March 4, 2019 I made one small change to my rear suspension set up today. I switched out the original LR 9448 (installed with one coil cut) springs for the 9449’s. I think the ride height is perfect for what I want now. The 9449 is just a tad taller than the 9448 was with the top coil cut, but still shorter than the 9448 would be uncut...so basically the Goldilocks of lift for me, lol. I didn’t bother taking any pics because there really wasn’t anything new to see. I will say I’ve gotten really good at swapping rear springs, I had the whole thing done in maybe an hour tops! Didn’t even feel like I was trying to rush.Sent from my iPhone using Tapatalk 2 Link to comment Share on other sites More sharing options...
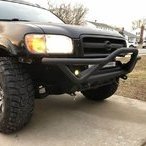
Bax03SE Posted March 9, 2019 Author Share Posted March 9, 2019 I finally got started this week on a front bumper project I’ve been planning for a while. As I’m sure you all know, there’s not much out there for aftermarket bumper options. After doing a lot of research on the various measurements of stuff made for other platforms, I decided to pull the trigger on trying a rock crawler tube bumper for a TJ Wrangler. I picked this up for $235 from Amazon. First thing was to get all the old stuff off and out of the way. I rerouted the lines to my transmission cooler and moved the mounting location up a bit. The way I had it set up before it would have left the lines a bit exposed without the oem bumper cover. Sent from my iPhone using Tapatalk 3 Link to comment Share on other sites More sharing options...
Bax03SE Posted March 9, 2019 Author Share Posted March 9, 2019 The main bumper frame fits almost perfectly over the R50 frame horns with just a little tweaking, so I used that as a starting point by welding the bumper to those frame horns. I then got to work on fabricating brackets to tie the bumper in to the factory bumper mounts and the tow hook mounts.Sent from my iPhone using Tapatalk 4 Link to comment Share on other sites More sharing options...
Recommended Posts
Create an account or sign in to comment
You need to be a member in order to leave a comment
Create an account
Sign up for a new account in our community. It's easy!
Register a new accountSign in
Already have an account? Sign in here.
Sign In Now