mjotrainbrain Posted September 17, 2017 Author Share Posted September 17, 2017 Worked on some rust repair today, started with the wheel well that was in the best shape to test the method. Turned out pretty good, hoping to have the time to do the rest of the underside. Before and after shots of course: 2 Link to comment Share on other sites More sharing options...
Snowboarder12345 Posted September 20, 2017 Share Posted September 20, 2017 What product did you end up using? Did you wire wheel any of that rust off before you applied it or is that a rust converter? 1 Link to comment Share on other sites More sharing options...
mjotrainbrain Posted September 20, 2017 Author Share Posted September 20, 2017 What product did you end up using? Did you wire wheel any of that rust off before you applied it or is that a rust converter? I used some kind of black Rust-Oleum paint. I chipped/sanded the rust off with a chisel and a wire brush. 1 Link to comment Share on other sites More sharing options...
mjotrainbrain Posted October 2, 2017 Author Share Posted October 2, 2017 (edited) Yesterday marked two years with my QX4, and boy has it been fun! I also spent the day at an event called Wheelin' for a Cure, which raises money so kids with cancer can go to a summer camp specifically tailored to them and their needs. The wheeling wasn't anything too crazy, but it was unbelievably dusty, with many times where you couldn't see the rigs in front of or behind you. I really enjoyed my new struts and Old Man Emu suspension over the bumpy terrain; it really made the miles more enjoyable. Unfortunately the trees haven't started to change color yet here in Michigan, but the temperature was just about perfect; peaking around 60 degrees. Thankfully all I've got is perfect wheeling for the next few months; colder temperatures, snow, etc. Our group was the last to hit the trails, and had the most non-Jeeps; we were led by a 2nd gen Tacoma, I had my QX4, anther NPORA member (not sure if he has a username; he's Josh Myers) had his Pathy, and my dad had his 3rd gen Tacoma. Now, enough talking, on to the pictures! When we got home I checked my lug nuts, and thankfully none were loose! Finally solved that problem, thank goodness for hub-centric rings. Edited October 2, 2017 by mjotrainbrain 3 Link to comment Share on other sites More sharing options...
mjotrainbrain Posted October 2, 2017 Author Share Posted October 2, 2017 I should have a video out in a few days, I've got to figure out if I can do any proper editing with my new laptop instead of just slapping clips together on my phone. 1 Link to comment Share on other sites More sharing options...
micahfelker Posted October 2, 2017 Share Posted October 2, 2017 Make sure to link the video on here! 1 Link to comment Share on other sites More sharing options...
mjotrainbrain Posted October 2, 2017 Author Share Posted October 2, 2017 Make sure to link the video on here! Will do. Link to comment Share on other sites More sharing options...
mjotrainbrain Posted October 16, 2017 Author Share Posted October 16, 2017 One month since I did the rust work in the back right wheel well. Still looks perfect, so I'm going to move ahead and do more area when I get the time. Wheel wells first since they're easiest to get to. Currently toying with the idea of dropping it off at the body shop to have the quarter panel taken care of while I have a week off from college around Thanksgiving. Link to comment Share on other sites More sharing options...
micahfelker Posted October 16, 2017 Share Posted October 16, 2017 That's not a bad idea. Do you have a quote for how much it would cost? If it's not visible and not affecting anything structurally, it may be something you could save for later. Link to comment Share on other sites More sharing options...
mjotrainbrain Posted October 16, 2017 Author Share Posted October 16, 2017 That's not a bad idea. Do you have a quote for how much it would cost? If it's not visible and not affecting anything structurally, it may be something you could save for later. I was quoted $450 based upon visual inspection, but I'd have to get a proper quote first. It's not visible until you open the rear door, but it only has to spread a few more inches to be past the weather stripping on the door and I really don't want to let it get that far. How it is now there will have to be very little visible welding done so hopefully that will keep the cost down as opposed to waiting. Link to comment Share on other sites More sharing options...
Bax03SE Posted October 16, 2017 Share Posted October 16, 2017 Where is the rust exactly? In the door opening or is it coming out from under the flares? Mine had rust under both rear flares, but luckily it hadnt spread to be visible beyond the flare when I caught it. Since its hidden behind the flares, I just cut out the rusted areas and rebuilt it with fiberglass, then coated everything under the flares with bedliner. I pulled the flares off to check it a year after and it still looked good. Depending on how bad your rust is, fiberglass patching may be something to consider instead of welding. Just a thought. 1 Link to comment Share on other sites More sharing options...
mjotrainbrain Posted October 16, 2017 Author Share Posted October 16, 2017 Where is the rust exactly? In the door opening or is it coming out from under the flares? Mine had rust under both rear flares, but luckily it hadnt spread to be visible beyond the flare when I caught it. Since its hidden behind the flares, I just cut out the rusted areas and rebuilt it with fiberglass, then coated everything under the flares with bedliner. I pulled the flares off to check it a year after and it still looked good. Depending on how bad your rust is, fiberglass patching may be something to consider instead of welding. Just a thought. It's only on the rear left. The hole is hidden behind the flare, but the damage extends beyond that. I'll consider than option depending on what needs to happen for the stuff outside the flares; if it needs a whole new panel anyways then I'll just do all of it that way. Link to comment Share on other sites More sharing options...
mjotrainbrain Posted October 16, 2017 Author Share Posted October 16, 2017 Found an old Instagram post I made showing the damage. https://www.instagram.com/p/BViR07pgIN5/?taken-by=mjotrainbrain Link to comment Share on other sites More sharing options...
Bax03SE Posted October 17, 2017 Share Posted October 17, 2017 Yeah, seeing the Instagram I agree its beyond patching with a little fiberglass. Still fixable for sure, but to do it right you need to cut and weld in replacement panels like you said. 1 Link to comment Share on other sites More sharing options...
mjotrainbrain Posted October 17, 2017 Author Share Posted October 17, 2017 Yeah, seeing the Instagram I agree its beyond patching with a little fiberglass. Still fixable for sure, but to do it right you need to cut and weld in replacement panels like you said. Thanks for responding, I've never worked with fiberglass so the confirmation is appreciated. I guess I know what I need to do now. Link to comment Share on other sites More sharing options...
Bax03SE Posted October 17, 2017 Share Posted October 17, 2017 (edited) Thanks for responding, I've never worked with fiberglass so the confirmation is appreciated. I guess I know what I need to do now. Looks like you can get a lower quarter section with dog leg pretty reasonably at least. A good body shop can cut and splice that section in pretty easily, but you’ll want to get on it before it gets much worse. Sent from my iPhone using Tapatalk Edited October 17, 2017 by Bax03SE 1 Link to comment Share on other sites More sharing options...
mjotrainbrain Posted October 17, 2017 Author Share Posted October 17, 2017 That's not bad. I'll have to get quotes, might even see if the fab guy who did my bumper would be willing to do the work. I can always get it painted later, just so I can use the money towards more rust repair before winter. Link to comment Share on other sites More sharing options...
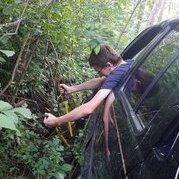
mjotrainbrain Posted November 29, 2017 Author Share Posted November 29, 2017 Time for another update. Haven't done a ton, but have spent plenty. With the end of the semester coming up I don't have a lot of time to mess around with fixing things on the truck, so when I tried to change the rear brakes and I couldn't get the drums off I decided to take it to a shop. Decided they could change the oil too as long as it was on the lift. Unfortunately it was found that my drums were grooved to hell and one of the brake boosters was leaking, and as long as they were going to have to bleed the brakes I had an extended brake hose I had lying around put on. Ended up costing around $400 which really sucked, but luckily my parents helped cover half of the expense since it was such a large and unexpected cost. I have also been working on trimming my rear fender flares so they tires don't rub as much at full flex. I can add pictures of exactly how I did it once it's done, it looks really clean but gives about an inch more room. Got the idea for it off the forum a few days ago, so thanks to whoever that was! I'll have to do the front just so it doesn't look like I have even more rake than I already do, but not right away; as I said, I don't have a ton of time this next couple of weeks, although I did have enough time to do some two-tracking. Largest group I've gone with so far other than the club I'm in, so this was fun. More people need to get CB's though, kinda hard to communicate when you have to stop and run down the row of trucks to tell everybody one little thing. Anyway, on to the pictures! *brrrrrrrrt* Ah, tire rub. It was a mostly Japanese group, only interrupted by one Jeep, but I'll let it slide since it has IFS. 3 Link to comment Share on other sites More sharing options...
Bax03SE Posted November 29, 2017 Share Posted November 29, 2017 Nice pics, looks like a fun trip! Glad to hear the flare trimming is working out. 1 Link to comment Share on other sites More sharing options...
mjotrainbrain Posted December 6, 2017 Author Share Posted December 6, 2017 As I was gearing up for my next upgrades, I got knocked down by something pretty awful. If you're from the south you probably won't understand and will just say I should replace it, if you're from the north you'll get it. So many difficult decisions to make, and none are cheap. All I was trying to do was rotate my tires (at least I got that accomplished I guess), and as I got to the last tire I had this ugly thing staring me in the face...wasn't there a couple months ago. I knew something was starting there, but crikey it got out of control fast.....anyway, if you have a weak stomach don't scroll down...here we go. Thoughts? Comments? Personal experiences? Talked to the guy who did my bumper tonight, and he's booked solid until early spring. I'd hate to wait that long, but he's confident that it'll be fine enough until then and I'm confident that he'll do a good job. Not interested in going to the dealership, if I'm going to fix it I want it fixed right and without any BS. Link to comment Share on other sites More sharing options...
Bax03SE Posted December 6, 2017 Share Posted December 6, 2017 Ouch! Im originally from Maine, so I get it. How does it look higher up around the top of the strut mount? Thats the area Id worry about. As long as that all looks solid you should be good to wait. It looks nasty, but if your guy is good with a welder and isnt shy about cutting out and replacing then its definitely fixable. Thats the one thing I dont miss about living up North. Link to comment Share on other sites More sharing options...
mjotrainbrain Posted December 6, 2017 Author Share Posted December 6, 2017 It's solid elsewhere in the strut tower area, most of the original paint is intact and not bubbling on the inside and outside, there's just a bad region in 3 of my wheel wells... Link to comment Share on other sites More sharing options...
mjotrainbrain Posted December 6, 2017 Author Share Posted December 6, 2017 I'm thinking for now I'll remove as much of the loose stuff as I can and use a rust inhibitor like por 15, then cover it with a big piece of rubber or something to minimize slush and salt getting in the engine bay. 1 Link to comment Share on other sites More sharing options...
Snowboarder12345 Posted December 9, 2017 Share Posted December 9, 2017 Hit it with a wire wheel while you are at it, the more rust you can get out before you treat it the better. 1 Link to comment Share on other sites More sharing options...
mjotrainbrain Posted December 9, 2017 Author Share Posted December 9, 2017 Hit it with a wire wheel while you are at it, the more rust you can get out before you treat it the better. Yeah, definitely want to slow the spreading as much as possible. Link to comment Share on other sites More sharing options...
Recommended Posts
Create an account or sign in to comment
You need to be a member in order to leave a comment
Create an account
Sign up for a new account in our community. It's easy!
Register a new accountSign in
Already have an account? Sign in here.
Sign In Now