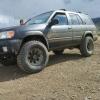
AkPrecision Posted July 24, 2014 Share Posted July 24, 2014 This is my 01 se when I first got it late last year. Since then I have done quite a bit and plan to do much more. I have been following many members threads here for about a year and love what I see. This is how she sits now I plastidipped the whole car. I h.i.d headlights and foglights. I did the k&n drop in filter, warn manual hubs bilstein rear shocks kyb struts. I plan to get fluerys front spacers and ac rear coils. New pro comp alloy wheels on the way and going to get 235/85r16 tires after lift. I also have a full true competition stereo. I worked for audio shops for years and im an audiophile. I have jl audio 500/1 amp and 300/4 amp. Pioneer head unit focal speakers and jl audio 10w7v3 in h.o box. Also added a rifle rack to the rear. I plan to do the rola vortex rack and hang a 40" led light bar on it and possible have a local shop fab a custom front bumper and rock sliders. I am also going to do the big 3 upgrade to the electrical system. Any suggestions are greatly appreciated 2 Link to comment Share on other sites More sharing options...
bushnut Posted July 24, 2014 Share Posted July 24, 2014 seams like you've got it covered brother. please explain the big 3.... Link to comment Share on other sites More sharing options...
PJSnow Posted July 24, 2014 Share Posted July 24, 2014 Looks good so far. i have the exact same one, color and all (that is before you plasti dipped it). i added the 02-04 SE oem roof rack, thought it looked good, you might too whats the big 3? Link to comment Share on other sites More sharing options...
AkPrecision Posted July 24, 2014 Author Share Posted July 24, 2014 Thanks for the love guys. And the big 3 consists of going to bigger wire. Most electrical system have 3 main wires The 3 wires are: - Positive from battery to positive from alternator - Negative from battery to ground - Engine block to ground Im going to 1awg. Im also bumping up the battery. With all the lights and stereo it will be easier on the electrical system. People running aftermarket lights and/or a fridge or anything that has a large power draw should possibly think of doing this. Pjsnow do you have the part number for the rack? I was looking into that also. Do the bolt holes line up? Link to comment Share on other sites More sharing options...
AkPrecision Posted July 24, 2014 Author Share Posted July 24, 2014 Thanks for the love guys. And the big 3 consists of going to bigger wire. Most electrical system have 3 main wires The 3 wires are: - Positive from battery to positive from alternator - Negative from battery to ground - Engine block to ground Im going to 1awg. Im also bumping up the battery. With all the lights and stereo it will be easier on the electrical system. People running aftermarket lights and/or a fridge or anything that has a large power draw should possibly think of doing this. Pjsnow do you have the part number for the rack? I was looking into that also. Do the bolt holes line up? Link to comment Share on other sites More sharing options...
Quaintbucket Posted July 24, 2014 Share Posted July 24, 2014 Never thought about doing that before. Everything else you got planned sounds good to me. Nice pathy, looks sharp with the plasti dip. Link to comment Share on other sites More sharing options...
PJSnow Posted July 25, 2014 Share Posted July 25, 2014 sorry i dont know the part number. im in NY so i was calling the few junk yards we have on a weekly basis. Took about a year of calling but i got it finally! its basically the stock roof rack from an SE pathfinder 02,03, and 04 yes the bolt holes line up exactly. all i did was remove the front and rear stoppers (not sure technical name) on the track, slid out the old cross bars, then bolted the new rack with the old track still in place. hard to explain in words but if you want i could take pictures and show you. let me know Link to comment Share on other sites More sharing options...
AkPrecision Posted July 25, 2014 Author Share Posted July 25, 2014 Thanks quaintbucket!!! And ok pjsnow sounds good. So you left the old track and bolted the new side rails directly over the old? So basically where the new tracks mount it replaces the end caps? Link to comment Share on other sites More sharing options...
PJSnow Posted July 25, 2014 Share Posted July 25, 2014 (edited) exactly. it took some time to line up the bolts on the new rack but nothing ridiculous and you are going to have to ditch the old sunroof visor unless you dont want the new faring on the new rack Edited July 25, 2014 by PJSnow Link to comment Share on other sites More sharing options...
Fijipathy Posted July 25, 2014 Share Posted July 25, 2014 (edited) Did you mask the whole car up to plasti-dip it ? or did you strip out all the lights etc to do it ? It looks great by the way. Is that black or dark grey ? Edited July 25, 2014 by Fijipathy Link to comment Share on other sites More sharing options...
AkPrecision Posted July 27, 2014 Author Share Posted July 27, 2014 Ok awesome I actually found a rack at a local junkyard for $150 its missing one of the front caps. And yes I masked the windows and mirrors and lights. Some people spray the lights but it leaves a film on them and I didn't want to buff them. I sprayed the car matte black Link to comment Share on other sites More sharing options...
patqx4 Posted July 27, 2014 Share Posted July 27, 2014 Looks great man, I really like what you've done to your truck. can you post more pics of the plastidip job? and post up pics and info when you do the big 3. I've done that on another car I had in the past and would like to do it again on my pathy. Link to comment Share on other sites More sharing options...
AkPrecision Posted August 3, 2014 Author Share Posted August 3, 2014 Of course I can. I just the pro comp rims in and ill get some pictures up of the pl asti dip. Thanks a lot guys! Link to comment Share on other sites More sharing options...
devonianwalk Posted August 4, 2014 Share Posted August 4, 2014 I too like the plati dip paint job you did. I might consider doing the same to the lower half of mine. Link to comment Share on other sites More sharing options...
AkPrecision Posted August 4, 2014 Author Share Posted August 4, 2014 Here's a pic I took just after I got home with the rims Link to comment Share on other sites More sharing options...
AkPrecision Posted August 4, 2014 Author Share Posted August 4, 2014 And plasti dip is awesome. But ill warm you now. Don't use rattle cans. Buy the dip buy thinner buy a hvlp gun I used the earlex 3500 (worked great). Link to comment Share on other sites More sharing options...
Quaintbucket Posted August 5, 2014 Share Posted August 5, 2014 (edited) I had to quote both because holy crap that's a difference. Looks pretty nasty... makes me want to do that to mine but in orange, dark green, blue, red, or white. How much did that paint job set you back by? Edited August 5, 2014 by Quaintbucket Link to comment Share on other sites More sharing options...
lerch641 Posted August 6, 2014 Share Posted August 6, 2014 Damn good call on quoting both because that's a great looking change! Link to comment Share on other sites More sharing options...
AkPrecision Posted August 6, 2014 Author Share Posted August 6, 2014 Thanks everyone I'm liking all the love this forum gives. Now on to how much and what I used. I used 5 gallons of mixed plastidip total. I am in ca and cannot order the dip pre mixed because commiefornia doesn't allow the chemicals used to thin the dip here. You are suppossed to use toluene or xylene or v m and p naptha. Either works just has different drying rates. I ised a straight 50/50 mix of thinner and dip. I went to local home depot and got all of the supplies. 9 of the 14.5oz cans of dip equals almost exactly 1 gal. So I used 9 cans and 1 gal of thinner which equals two gallons (I used 5 gallons total) the thinner I used is called industrial maintenance coating thinner. Its a generic for xylene and naptha. It works great. I used the earlex 3500 hvlp sprayer. All I needed was a 5 gallon bucket the dip the thinner the sprayer and two rolls of blue tape and some cheap painters plastic that was like $7 for two rolls. Ill try to get pics up of while I was spraying so you can see what I covered. There are many you tube videos and lots of tips on forums on this stuff.If anyone needs tips or anything I can of course help out. Earlex 3500 was $140 Dip is aboit $7 per can Thinner about $20 per can Mixer bucket tape plastic was about $40 So all together roughly $400. I was quoted $800 by a few local guys that do it and decided I can do this myself. Apparently I did well for myfirst try. Cool thing is you can always change color or easily repair a twar or scratch. And it protects the paint!! Link to comment Share on other sites More sharing options...
AkPrecision Posted August 6, 2014 Author Share Posted August 6, 2014 I masked all the windows and lights. I removed the roof rack cross bars and taped the top of the track and taped up the wheels Link to comment Share on other sites More sharing options...
AkPrecision Posted August 6, 2014 Author Share Posted August 6, 2014 The rims are pro comp 7069 I believe. The are alloys with 4 backspace and 16x8. The rims were $600 with mount balance and lug nuts Link to comment Share on other sites More sharing options...
PrestonBurns Posted August 8, 2014 Share Posted August 8, 2014 It's not illegal in Cali to put HID bulbs in non-projector housings? I'm sorry but those like that irritate me beyond belief Link to comment Share on other sites More sharing options...
Recommended Posts
Create an account or sign in to comment
You need to be a member in order to leave a comment
Create an account
Sign up for a new account in our community. It's easy!
Register a new accountSign in
Already have an account? Sign in here.
Sign In Now