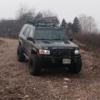
CDN_S4 Posted January 4, 2015 Author Share Posted January 4, 2015 I had to call a buddy to tow me out backwards. I hadn't planned on going wheeling but when I drove by the training area gate I decided to check with the commissionaire to see if the TA was open and if I could get a pass from him without going to Range Control. I had my dad with me and wanted to show him the manoeuvre area as we drove by it on my way to pick up a backup camera for the Pathy that I found on kijiji. Long story short, I wasn't all too well prepared to go out wheelin but luckily did have my tow strap and D-Rings in the truck, which got me out in the end. The top pic with the muddy tires is the one after I got out. Link to comment Share on other sites More sharing options...
CDN_S4 Posted January 5, 2015 Author Share Posted January 5, 2015 Added the review camera that got me stuck lol 1 Link to comment Share on other sites More sharing options...
01Pathmaker Posted January 5, 2015 Share Posted January 5, 2015 Hahaha! Guess that qualifies as a whoops! Don't know how it's been up there, but here it's been waffling so much between warm and cold I get very leary when I come across ice on the trails. I just cringe and hope when I break through it isn't too soupy underneath. Link to comment Share on other sites More sharing options...
CDN_S4 Posted January 6, 2015 Author Share Posted January 6, 2015 Yeah it's been really cold lately, like -22C, -33 with windchill. Most of the ice was solid all the way. Didn't even crack. But I found one that was deep enough to still have a soupy surprise for me. Link to comment Share on other sites More sharing options...
Megaton Posted January 7, 2015 Share Posted January 7, 2015 Great build thread! It has given me some great ideas. What did you use for the tire rack? 2x4 rectangular tubing? What did you use for the hinge? How did you lower your cargo rack? You're right, it does look much better. All in all ,a terrific rig. I hope my build turns as well as yours (when I get the money to do it) . Thanks for the inspiration! Tim Link to comment Share on other sites More sharing options...
CDN_S4 Posted January 7, 2015 Author Share Posted January 7, 2015 Hey Tim thanks for the compliments The tire carrier is made out of a variety of tubing and parts. My brother in law is a welder / fabricator in the army and made this for me on a weekend. I had just given him a picture of one of the ones you can buy and he fabbed it from that. I was pretty impressed. The hinge is just a big "bolt" same as you use to lock a trailer hitch. I'll take close up pics when I get a chance of all the details. He made a locking mechanism for the entire assembly to sit snug and tight inside the hitch, so there is no rattle. As for the rack, I had to sacrifice a little bit of cargo area for style by doing this, but so worth it IMO especially since I no longer carry the spare on the roof. I pulled the dross bars out from underneath the basket and slid them through the side bars of the basket. Then inverted the brackets that tie the bars to the basket. Now I can use the bars to strap things to and all in all it allowed me to mount my light rails without drilling into my basket. IMO a win win. I'll take more close up pics of that too. Link to comment Share on other sites More sharing options...
CDN_S4 Posted January 7, 2015 Author Share Posted January 7, 2015 As promised here are aome close ups of the hinge, handle/lock and roof rack: 1 Link to comment Share on other sites More sharing options...
CDN_S4 Posted January 14, 2015 Author Share Posted January 14, 2015 This is actually very reminiscent of another time I got stuck like this lol, just thought of that when I came across my old Tour picture. 3 Link to comment Share on other sites More sharing options...
kdj Posted January 15, 2015 Share Posted January 15, 2015 Your last two photos... 1st one is worthy of truck of a month. 2nd one is a perfect reason why you never approach the porta-potties from the down hill side. Glad you had a shovel! 1 Link to comment Share on other sites More sharing options...
kdj Posted January 15, 2015 Share Posted January 15, 2015 Forgot to mention that I was at a gas station once with a friend when he tried to get gas in a similar green can and he was told they wouldn't put gas in anything but a red can. Have you had a problem filling yours? Here it's blue for deisel and yellow for kerosine and red for gas. Link to comment Share on other sites More sharing options...
CDN_S4 Posted January 15, 2015 Author Share Posted January 15, 2015 Can't say I've ever had any issues with green cans. I fill it up myself. I have 2 green ones and a whole bunch of red ones but nobody ever said anything. Maybe I just live out in the boonies and nobody cares lol Link to comment Share on other sites More sharing options...
lerch641 Posted January 15, 2015 Share Posted January 15, 2015 You're friend doesn't pump his own gas? Link to comment Share on other sites More sharing options...
CDN_S4 Posted January 15, 2015 Author Share Posted January 15, 2015 This just in... 1 Link to comment Share on other sites More sharing options...
SpecialWarr Posted January 18, 2015 Share Posted January 18, 2015 So that'll be the 4" lift springs then? 2" to take up the weight of the new rack and wheel to get you back to stock height and another 2" to get your 2" lift back!! Link to comment Share on other sites More sharing options...
CDN_S4 Posted January 18, 2015 Author Share Posted January 18, 2015 So that'll be the 4" lift springs then? 2" to take up the weight of the new rack and wheel to get you back to stock height and another 2" to get your 2" lift back!! That's exactly right!! I removed the carrier today to respray it as a bunch of rust spots became visible where the initial spray didn't reach. It's crazy how much higher it sits without it, I forgot how much lift I actually had lol. So the springs will hopefully keep me at this 2" lift height. I found someone looking to trade 32's for 31's. If I like the condition of his tires BFG MT's, then I'll swap up. We'll see... Link to comment Share on other sites More sharing options...
01Pathmaker Posted January 19, 2015 Share Posted January 19, 2015 You'll miss your duratracs, especially in the hardpack/icy snow. Link to comment Share on other sites More sharing options...
lerch641 Posted January 19, 2015 Share Posted January 19, 2015 BFG's aren't that good on ice? Link to comment Share on other sites More sharing options...
bushnut Posted January 19, 2015 Share Posted January 19, 2015 mud terrain tires are for Mud. they get hard when it gets cold. remember the old style army boots in winter? same thing. 2 Link to comment Share on other sites More sharing options...
CDN_S4 Posted January 19, 2015 Author Share Posted January 19, 2015 Good to know!! That might tip the scales to keepin what I got. Link to comment Share on other sites More sharing options...
01Pathmaker Posted January 20, 2015 Share Posted January 20, 2015 MT's are fine for snow if your off road in powder, not good on ice, packed or wet snow, and not too good in the rain either. For typical winter on road driving a simple rule of thumb is the more siping (the little "cuts" or "slices" in the treadblocks) the better. Just look at the "dedicated" winter tires, soft compound and tons of siping, as more biting edges provide better grip in those conditions. This is the reason Duratracs have become so popular, they are more aggressive than a typical AT so they can handle mud quite a bit better, yet have plenty of siping to provide good grip in wet/snow/ice, and also have a moderate compound to balance good traction with decent longevity. I've been plowing snow commercially for 22yrs now, my tires of choice (depending upon how the truck is used in the warm months) are General Grabber AT2 (a great all around AT with a touch on the more aggressive side), Goodyear Wrangler Silent Armor (a great mild AT, excellent in most conditions but terrible in mud and smooth quiet long wearing with great street manners) and the Goodyear Duratrac. 1 Link to comment Share on other sites More sharing options...
Yendor Posted January 22, 2015 Share Posted January 22, 2015 mud terrain tires are for Mud. they get hard when it gets cold. remember the old style army boots in winter? same thing. I still have mine! I hand siped my BFG MTs. It made a huge difference in winter. Mind you, it's not as cold here. Link to comment Share on other sites More sharing options...
CDN_S4 Posted January 31, 2015 Author Share Posted January 31, 2015 I'll be sticking with the Duratracs for the foreseeable future. I finally got around to swapping out my dashboard lights. I went with blue and some red to keep the theme of the red dials throughout. So I opted for a red ashtray light, as I already have a red LED on my roof rack light switch. The only thing is, I used the NicoClub write up for this and ordered the bulbs via the built in links. Worked like a charm....except I must have missed the 2 HVAC bulbs. They are still original colour. I'll replace those too though. And I'll replacing the head unit with an aftermarket to be able to use my phone to play music. I'll ether pick one with customizable backlit colours or one that is blue. I think that will tie it all together nicely and give it a nice updated look. This is actually a real easy DIY and if I get tired I'll get different colours. All in all cost me $40 CAD shipped from super bright LEDs in the states, plus shipping and taxes and our crappy Loonie. Before: After: Shifter and ashtray Overall 1 Link to comment Share on other sites More sharing options...
01Pathmaker Posted February 1, 2015 Share Posted February 1, 2015 YES! THAT LOOKS AMAZING! I've been kicking the idea around for a long while but never got around to digging up the bulb numbers and such, any chance you'll share that info? I've been running bulbs from those guys for years, probably close to 10 yrs in fact, with great results, the first pair I bought (stop/tail in my 01) are still going strong. Thanks for the new inspiration! Link to comment Share on other sites More sharing options...
CDN_S4 Posted February 1, 2015 Author Share Posted February 1, 2015 (edited) Thanks man, yeah go to NicoClub, the LED conversion is a sticky. It has direct links to the right sizes in the guide as well as a DIY. However it is super easy to swap the lights out on the speedo/tachometer. The HVAC and transmission require a bit more cursing.<br /> <br /> Also, I posted the pic of the bags with the stickers on for reference as well. Keep in mind I forgot the 2 HVAC bulbs. Edited February 1, 2015 by CDN_S4 Link to comment Share on other sites More sharing options...
ferrariowner123 Posted February 3, 2015 Share Posted February 3, 2015 (edited) Despite everything in there, it looks nice and tidy, i like tidy installs!! Nice work. But i have a question. What Red LED did you use for the Ashtray(assuming the SB-LED)? I have one in my pathy, and its nowhere near as bright as that. And even though all my ashtray does is hide my aux cord, i'd still like to get some more light in there somehow... Thanks in advance. -Kyle WAIT JUST ONE NEW YORK MINUTE!!!! Is your defroster switch illuminated????? Edited February 3, 2015 by ferrariowner123 Link to comment Share on other sites More sharing options...
Recommended Posts
Create an account or sign in to comment
You need to be a member in order to leave a comment
Create an account
Sign up for a new account in our community. It's easy!
Register a new accountSign in
Already have an account? Sign in here.
Sign In Now