Leaderboard


Popular Content
Showing content with the highest reputation on 11/04/2020 in all areas
-
Looks like its on the top of my list of things to do when i get the engine started. Hopefully everything goes smooth with the startup.1 point
-
Mine was exquisitely cared for but I didn’t know about this. Lost my 5th screw & the 2nd on one of the butterfly valves before it cost me an engine at 15yrs & 102,000. For 2-3* work or labor cost, I wish I would have known.1 point
-
I bought mine at 206k mi and did it around 212k mi but there's been people who've had the issue with the screws falling in the intake way earlier. It's a roll of the dice. You could either be missing screws right now or you could go another 50k before dropping a screw. I'd recommend doing it when you do the IACV gasket. The 2001 and 2002 Pathfinders have a IACV gasket that gets brittle and eventually fails. When it fails, it drips coolant on electronics which shorts them out which has a chain reaction that shorts out the ECU. Power Valve screws won't work themselves loose sitting in a barn, but the 18 year old rubber gasket keeps aging whether it sits or drives. I would recommend buying the cheap gasket and an impact screw driver to change this first. While you're there, you have access to the power valve screws with just a few more turns of the wrench.1 point
-
Does the dash work otherwise? If it's just the lights, try messing with the dimmer control, sometimes they get janky.1 point
-
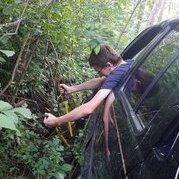
Welcome! This needs to be on your ToDo list: http://www.nissanpathfinders.net/forum/topic/17104-threadlocker-on-power-valve-screws-pics/page-11 point
-
Wireless charging experiment: For whatever reason, my 02 LE doesn't come with that third cupholder the 03 models have. The flat spot has always just been the instinctive place I toss my phone. Its within reach, visible and it doesn't slide or bounce out of that spot. I've always wanted to give wireless charging a shot, so here's what I did. Picked up a tri coil Qi wireless charger from amazon https://www.amazon.com/gp/product/B07176HT5T/ref=ppx_yo_dt_b_asin_title_o01_s00?ie=UTF8&psc=1 Bought a 104F thermal cut off switch https://www.amazon.com/gp/product/B07PK6892Z/ref=ppx_yo_dt_b_asin_title_o07_s00?ie=UTF8&psc=1 Generic 12v USB phone charger Generic wire harness plug Auto/Cancel power seat switch from salvaged LE R50 Wireless coil attached to plastic insert by jb weld Wireless coil fed by modified micro USB wire with thermal cut off switch spliced in. Modified micro USB wire connected to generic wire harness plug The other side of the wire harness plug is tapped into the 12v power socket on the dash in a parallel fashion. Blank plate on the dash has been swapped with the Auto/Cancel power seat switch. (acetone removed some of the seat graphic) Auto/cancel breaks the circuit. My experience with it has been decent so far. I'm using an iPhone Se 2020 edition with a silicone case and the phone is still able to charge. The phone has never had a chance to overheat since the thermal cutoff switch steps in really early. I had apparently made a miscalculation from Celsius for Fahrenheit. I thought initially, it would kill the circuit around 130F. Dry days with temps in the 30 (f) the charger seems to continuously charge unless I'm parked and idling a bunch. It will continuously charge in the 40s (F) on rainy days. It appears the heat is more from the engine/drivetrain and exhaust than from the wireless charging circuit. I can run maps continuously on the phone and the charger seems to be able to keep up with that. Being that winter is coming upon us, I'll leave the thermal cutoff switch in for now, and think about getting a different in the spring.1 point
-
More post bombardement: I have been religiously checking part outs and salvage yards for black leather seats. I have never found one that’s not ripped. As far as other materials and colors go, I can probably count on 1 hand the number of times I’ve seen other driver seats in good condition. After seeing a dozen or so good condition passenger seats I began to wonder if I could swap the material over to the driver’s side. So I bought a black leather passenger seat for this experiement. I stripped the seat down and removed the leather from the cushion using snap ring pliers to pry apart the hog rings. I looked it over to find its about 95% symmetrical on the inside. I did a trial reinstallation with new hog rings to verify I’m handy enough to put it back together. I stripped down the ghetto driver seat and swapped over the passenger seat material. All hog rings line and up and all clips connect together. Some clips are slightly offset and there are a couple millimeters of foam showing at the edge. Also, I had to cut a hole for seat controls and make a patch to cover the old seat control holes but it really wasn’t too hard. I would definitely recommend this if you need to replace a driver cushion but can’t any good ones. I hear some salvage yards sell just the cushions so this could be a very economical fix in the right circumstances. Pt 1 video: pt2 video1 point
-
I did my first transmission swap and knocked out a couple experimental projects along with that. I learned some things from both mistakes and unexpected differences. I thought I’d share the projects and note some differences I discovered along the way. Going back before my transmission had issues, I had pulled a salvage transmission in march intended for my 01 r50 assuming that the 01 trans would be dead by now. I pulled it from a 2004 SE 4x4. It had all the dealership paperwork and insurance paperwork showing that it sold from a Chevrolet dealership at 142,xxx miles and was wrecked with 144,xxx miles. I pulled the pan off the trans to observe normal looking and smelling ATF residue was present. This was my first time ever pulling a trans off anything, but after 11 total hours, I got it home with the torque converter. I would go back out weeks later a nab the engine and flexplate for a “maybe someday” project. Fast forward to July, the 2001 transmission is still quirky but it hasn’t gotten any worse. I wheel my newly lifted 02 about every other weekend. One particular weekend, I was in the local offroad park doing a very long, steep uphill climb on loose rock. Upon reaching the very top of the hill where a flat clearing is, I smell hot atf. I roll forward about 30 feet and stop. A minute later, I put it in D to find I don’t creep forward. (or backward in R). I hop out to look. A dense, wide path of ATF soaked the rocks and dirt from current location to about 30 feet back. Trans case and pan were fine, but the aluminum barb on the lower radiator was bent over sideways with a visible crack at the bend. This was the source of the ATF spray. Really wish I had at bought a plastic dust cover to put there beforehand. I hitched a ride to the parts store and bought a Hayden 679 cooler and some new ATF. Fixed it up and filled it up and drove it home with the stock cooler bypassed. Everything felt and smelled fine. At home, I topped it off with another pint and called it good. So I may have hammered some nails in that coffin, it just wasn’t the very last nail. That came a month later when after driving around all day, I tried to back into the driveway. It never engaged reverse. I sat there a few seconds puzzled before it finally engaged itself and let me back up. I went through the gears in my parking spot and everything seemed normal until the next day. During pizza deliveries, it would randomly decide to delay giving me reverse. Eventually, it would sometimes never grab reverse without me retrying or blipping the throttle. There were no dash lights, smells, noises, slipping or slamming. ATF level was always proper and cherry red. I replaced the radiator and used it with the Hayden cooler and replaced the trans fluid. Not a single difference. So I started researching the project and schedule some PTO to make a 5 day weekend for this. I removed it in about a day and a half, taking my time to avoid making errors. When I got it out, I compared it to the donor trans. This is where I would get hyper-obsessed with year to year differences. Despite the despite the resounding “It’s the same trans, just send it” the internet told me, I would find that no, these are not identical transmissions. The tailshaft housing is different. I think the length is the same and I know the transfer case bolt pattern is the same, but the side is different. There is one variant casting that is milled, drilled and tapped for the ATX14a transfer case linkage and the other casting variant is milled, drilled and tapped for the TX10 transfer case linkage. I assume bolting an atx14a to this could yield a functioning 2wd pathy if somebody wanted to do that. Using both VINs on nissanpartsdeal.com, I cross referenced the parts in the diagram to see that the tailshaft housing and some internal clutches were different between the two years. Thankfully the parking pawl junk inside the tailshaft housing was the same so other than a new gasket, I didn’t have to buy anything to swap tailshaft housings. The particular gasket is not reusable so I had to dig up a replacement. There are no more OEM gaskets left nor does Amazon/ebay/rockauto/auto stores carry them. I had to have a local trans rebuild shop get me in touch with their supplier to order it. It took about two days to get it so I decided, I would make a template. https://1drv.ms/b/s!AsTQm6L1QIoAhOFF-OsSBL5-AZszew For the two particular years I was working with, part “gasket-extension 31338-41x02” is a paper type gasket. The original OEM paper gaskets were blue but the aftermarket was gray. I found this gray material at autozone here: https://www.autozone.com/sealants-glues-adhesives-and-tape/gasket-material/cometic-gasket-fiber-gasket-material/105373_0_0 ( Cometic Fiber Material Sheet product number C15385. ) Now whoever stumbles upon this from a web search can make their own. Also, there aren’t any good videos online regarding RE4R01A teardowns for the pathfinder except that one that’s in 360p. So I did an overly thorough tailshaft swap video in 1080p. So with the tailshaft swapped, I focused next, on my own screwup. Months back in the salvage yard, I had just minutes to finish pulling the trans before they closed so I got sloppy and cut the trans wire harness instead of removing a couple layers of heat shielding below the plugs. I assumed that the harness would detach from the trans case like how engine wire harnesses do with engines. The revolution sensors come out of the case easy enough, but one group of wires does not. I think they control the solenoids or valves. Those can only be removed by pulling the valve body. I’m debating a rebuild attempt on my original trans so I didn’t want to steal it’s harness, so I went back to salvage and retrieved the other half the harness and I cut one from a 2003. I compared the plugs and wires on all 3 years and can confirm they are all the same. I used the 2003 harness since I cut it about 3 inches longer. I stripped, cleaned, soldered, shrink wrapped and heat shielded 23 wires. There are repeating wire colors in the harness, but each of the 4 sub groups of wire don’t have any repeating colors which made things easy. I had also observed that the 2004 flexplate and flexplate washer have a locating hole to line up with a locating dowel pin on the crankshaft. The 2002, flexpalate washer had a locating hole and the crank had the hole for the dowel pin but the flexplate did not. There also was no dowel pin. The 2004 flexplate had a different ring for the engine timing. The notches were less abundant and spaced farther apart than the 2002 flexplate. The sensors that pick up the notches were different too. The 2002 had small sensor with a chisel tip and smaller electrical plug. It was also held in place by a rubber gasket that slides in the bell housing cutout. The 2004 sensor was bigger and looked a camshaft position sensor with a slightly bigger plug. It filled up the bell housing cut out so the gasket wasn’t needed. The gasket can be swapped between bell housings though. So before I started the project, I ordered new pan bolts, input shaft o ring, a filter/gasket kit and crush washers for the trans coolers and a new rear main seal kit. With the trans out, I skimmed through the Haynes manual to find it essentially tells you to pull trans, remove the 3 RMS bolts, pry off the old seal, carefully install the new one and torque down three bolts. Nothing was mentioned about removing upper oil pan. So I pried off the old leaky RMS and began finessing the new one on. I worked every angle I could think of and used every non-sharp tool that I had before gradually upping the force to ultimately total brute force. After 45 minutes, I had broken the tension spring inside the lip seal. Defeated, I check the FSM to find out about the formerly unmentioned rtv needed on the seal corners and the upper oil pan removal and the two days of work required to do that. Two days I didn’t have. I bought a new seal and began practicing installation methods with the broken one. I found that If you sand down the black seal pan gasket, you can wedge it in there. It felt snug but I could see a hairline air gap in a low spot that I sanded. I spent about 20 minutes slowly sanding the new gasket. I sanded some slight tapers on the leading edges to help it enter the groove it sits in. Since I removed less material, It was way harder to install, but using every bit of finger strength I had, I got it in. I put on some rtv around the outside since, well why not? Anyway, video for the hack job here. By the way, the rms is leaking again, but at least I have it installed. I installed a $16 oem input shaft o ring on the shaft and installed the trans. I noted the 2004 pan is missing the two forward facing tabs that support the trans cooler lines but this doesn’t seem critical, but did explain the extra 2 10mm bolts I had laying around. I can also confirm a 2004 torque converter fits on a 2002 flexplate and uses the same bolts. Once installed, I dropped the pan, replaced the strainer, cleaned the pan and magnet. The Duralast kit from Autozone had a rubber pan gasket that didn’t match the pan. Maybe this was because I bought this for the 2001 months earlier? Maybe Duralast screwed up?. I bought a fel-pro paper gasket and installed it with new pan bolts. I dumped a gallon of dexron 3 down the tube and performed the checklist in the FSM for transmission testing. Ended up putting over 6 quarts in. I smelled burning odors off and on for a while. Could have been any of the following. Degreaser residue on back of block, degreaser residue in trans pan, brake cleaner on back of block, Paint marker on torque converter and trans case, pepsi cans used as temp exhuast clamps or greasy hand prints on exhaust tubing. Trans drove fine with no hiccups. I went 20 miles, came back and dumped the trans fluid. I refilled with 5 quarts and got the level pretty much spot on. I’ve done pizza delivery, highway crusing, backroad cruising, hard launches and some super light wheeling. At this point, I’m confident the trans is a keeper.1 point
-
Gonna keep that last set on there? (5th gen 4Runner Trail Edition wheels right? Maybe just SR5 wheels, idk) It looks sharp, kinda blingy but not too much in my opinion. Makes the whole truck look a bit newer.1 point
-
You know the Nissan Pathfinder R50 But have you seen the Nisyota FJ Finder Or the Toysan PathRunner I think my Nissan & Toyota DNA are starting to mix!?! Or at least my girl stepped in something!1 point