Leaderboard

Popular Content
Showing content with the highest reputation on 05/20/2019 in all areas
-
Sent from my iPhone using Tapatalk2 points
-
I picked up an aluminum valve cover from a 2001 LE at the local JY, after finding multiple spark plugs soaked ? . Swapped into my 2002 SE after wire brushing and a new gasket. Runs and fits perfectly and ties in nicely with the manifold! Not sure about changing the cylinder 1 coil pack, it was pretty much plug and play.1 point
-
Initial plan was to just change the gear shift mechanism. Got into it and ended up doing a deep clean on the entire passenger part of the cabin. Who knew the shift mechanism plugs are different? Purchased one from a 2000 2wd and the plug is completely different. The rest of the unit is identical as far as I could tell. Didn't think it would have mattered with the manual transfer case shifter. Went even further since everything was already out and removed some trim pieces from the dash and doors and painted them red. Ripped out the carpet and have black vinyl on order as a replacement. Some before and after pics of the floor, painted pieces and the different plugs for the shifter. Sent from my SAMSUNG-SM-G930A using Tapatalk1 point
-
i have yet to take pictures but have managed to blow my struts completely finally. at least driverside left. so it’s time to change them out and after consulting[mention=40517]Bax03SE[/mention] on their front setup i’ve decided to do the same and net my lift from the springs instead of spacers. i think i’m taking both one inch spacers out because the spring set up i’m going with should give me 2.5” lift just as i do now but on fresh struts and much heavier duty springs. speedywaymotors.com for the non amazon order Sent from my iPhone using Tapatalk edit to remind that his set up utilized the top spacers as well and he needed a sfd to counter the angles. i’m keeping my spacers off the top until the rear is worn and i want to go higher and do the sfd. bc of-course gotta do that at some point- just not yet. i want to see how happy i am after i get not blown struts and coils up front. would also appreciate input on bracket designs for front and rear bumpers. sometime around my birthday in june i’m trading stick welder for my fathers mig that i’m better at using as he is better with the stick. lol1 point
-
That link is awesome so thanks for that!1 point
-
The not pulling coolant back from the overflow bottle back into the radiator is usually a failed radiator cap. If not that, there is a leak in the hose. The door actuators on the HVAC system are all externally mounted and are just simple motors with reduction gears. The gears tend to break when old preventing operation.1 point
-
hitch and d ring adapter!1 point
-
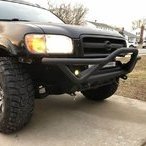
I know it’s not the same as the stresses from a winch pulling, but for a basic strength test I’m happy to see the bumper has no problem supporting the weight of the truck (at least the front of it). This is just lifting from the round tube on the front of the bumper. I took it slow, but it lifted both wheels with no complaints. It’s hard to tell in the picture, but the drivers wheel was off the ground just enough to spin it by hand. Sent from my iPhone using Tapatalk1 point
-
With the welding all out of the way last night, I got the winch finished up this morning. I had to cut out the center section of the grill to clear the winch. It left a bit more open space above the winch than I liked and I wasn’t sure what i was going to do about it, but then I figured out my light bar would fill in the space just about perfect! I hadn’t quite figured out where I was going to put the light bar since It used to go where the winch is now, so that took care of two problems at once! Sent from my iPhone using Tapatalk1 point
-
Sent from my iPhone using Tapatalk1 point
-
I made good headway on getting the bumper ready to mount the winch tonight. Along with fabbing up a winch mount out of 1/4 inch steel, I also welded a section of 1/4 inch steel across the radiator support. It’s tied into the frame rails at each end as well as stitch welded to the radiator support across the front. I’ve heard stories of the rad support buckling a bit under winch loads, so I figured this would help beef up the stock thin sheet metal it is made up of. With this, plus the supports I welded on to the radiator support a couple years ago while doing some rust repair, my radiator support is significantly stronger than the stock piece ever was. Sent from my iPhone using Tapatalk1 point
-
Before and after's The photos need to be swapped, but you get the picture Sent from my SM-S737TL using Tapatalk1 point