Leaderboard


Popular Content
Showing content with the highest reputation on 05/12/2019 in all areas
-
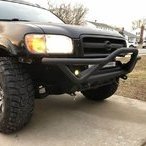
Well, after giving the feedback/criticism some thought, I decided to pull the winch back off and add some reinforcement to the winch and fairlead mount. I’m sure it still isn’t the best design, but I do feel a lot better about this being able to spread the load out across more of the bumper. I was going for a minimalist design at first, but I agree it was a bit too minimalist.... Sent from my iPhone using Tapatalk3 points
-
Sent from my iPhone using Tapatalk3 points
-
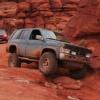
Nice photos! Looks like a blast! Im really digging the geology you guys have over there. Kind of reminiscent of the High Sierras. I gotta get up there soon! In this one pic it looks like you might be bottoming out on your driver side shock. Hard to tell but you might want to get extended bumpstops to save your shocks from damage due to over-compression.2 points
-
With the welding all out of the way last night, I got the winch finished up this morning. I had to cut out the center section of the grill to clear the winch. It left a bit more open space above the winch than I liked and I wasn’t sure what i was going to do about it, but then I figured out my light bar would fill in the space just about perfect! I hadn’t quite figured out where I was going to put the light bar since It used to go where the winch is now, so that took care of two problems at once! Sent from my iPhone using Tapatalk2 points
-
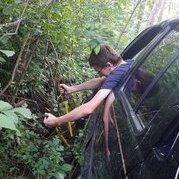
The answer is yes Aaaand a little something to remember the trail. There’s now a random boulder with a nice red stripe on it in the middle of the woods now. Time to build some sliders! Sent from my iPhone using Tapatalk2 points
-
Haven’t been on here in a bit, so I figured I’d throw up some pics from the last couple weekends. Also I don’t think I mentioned it on here yet but I switched to AC’s up front and am running Land Rover 9448’s in the back now with a pretty long travel bilstein shock. Long enough that I can swap springs on the trail [emoji23][emoji1598] Anyway, here’s the pics. I think I’ll split them up in a few different posts for each trip Here’s my car camping setup. Don’t judge the flowers, it was free haha Sent from my iPhone using Tapatalk2 points
-
Another mission success! I got this on a little bit ago, but haven't had a chance to post pics. You can find way more pics/info in my build thread here.2 points
-
I'm going to echo @hawairish's concerns by suggesting that you are gentle on the first couple uses to see how it goes. Looks like some good progress overall, rig is totally coming along!1 point
-
It’s custom. [emoji23] Sent from my iPhone using Tapatalk1 point
-
It has an external cooler, but I think I am going to put a little larger one on it because the one on it now is real small like 3 in wide by about 10 inches long.1 point
-
Looks awesome, getting some ideas for my build.1 point
-
Constructive criticism here, of course, but I have concerns about the simplicity of the winch mounting you went with. While 1/4" is an appropriate thickness, construction from bar like that will not suffice. For one, the separation of pieces lacks rigidity and greatly limits contact points, and that applies to both the winch mount and the fairlead mount. Two, the bumper doesn't appear to be designed for direct winch use. The manufacturer indicates that it's "winch-ready" and "designed to accommodate a winch plate," but Jeeps use a winch plate/channel that spans the truck's frame horns; these bumpers are simply designed to not interfere with usage a plate, and don't bear the load. I'd be surprised if the tube was 1/8"-wall; even so, not suitable for direct winch mounting. At this point, I would strongly consider determining if a universal winch channel, like the one that HF sells, can be integrated instead. You could narrow and shape it as needed, and it would provide a continuous length to put far more welds on to distribute load across the bumper, which would also add far more rigidity to the support tubes. I'd still have concerns about where the next weak point would be without knowing how customized the mounts are, though. But as-is, I think your first real-world pull destroy the bumper.1 point
-
I'd agree; not common but plausible. If vibration is the primary issue, I'd check for driveshaft run-out, and play/resistance on the u-joints. Also, how bad would you rate the vibrations, and do they seem to originate from the front or rear of the vehicle? Can you feel it in the steering wheel? If noise is the issue, then I'd look at the diff, but only after isolating parts of the equation (such as removing the driveshaft, keeping one tire on the ground, and lifting the other tire and rotating it to check wheel and diff bearings; or rotating the pinion flange to feel for pinion bearing play). The color of the fluid might only depend on the brand/color used; i.e., the Valvoline oil I use always has the honey/green tint, but the murkiness changes over time. It's probably not abnormal for the diff to get hot, but hot is subjective without a number. My diff gets into the 150°-175° range, measured with a pyrometer in a few spots. If you have any concerns that it's the diff, I'd drain the oil and check for metal as Slartibarfast suggested.1 point
-
Went to my local Pull-A-Part today and stocked up on some much-needed r50 supplies. Also grabbed some Hella Saab relays some Nissan's as well. Didn't know Hella made relays for Saab do now. Got some switches out of a 97 Mitsubishi Montero. Exact same switches Nissan uses(Niles) just slight differences. They fit perfectly. Also picked up some rear glass hinges and the rubber that sits on the bottom. Boost sensor, and 2 other emission sensors(cant think of the names) ashtray light,clock, cam sensor, diode and rear hatch bumpers. All in all a great trip. Sent from my SM-S737TL using Tapatalk1 point
-
These are from Saturday last weekend. Notice something out of place here? I let my friend drive it so I could make sure the springs seated back in properly haha We got back kinda mid afternoon and hung out in the hammocks the rest of the day. No trees? No problem. The next day we went shooting and did some more wheeling and my buddy rode his dirt bike behind me once we were up in the mountains. Bilsteins doin work [emoji1377] And I’ve reached the picture limit so I’ll continue in another post Sent from my iPhone using Tapatalk1 point
-
I pulled all the metal part from the truck for painting/bedlining (the parts, not the truck). Everything weighs over 460 lbs! No wonder my MPG has been crap for years... Also have my new Kia Telluride and the project FJ80 creeping in the background. Carnage from the sliders. Will likely modify them to avoid further damage. And finally got some lights mocked up on the bumper before removing it.1 point
-
The 2wd has a different tail shaft housing that is longer than the 4wd. It would not hurt to give the 2wd trans the same treatment though. I had an 85 300zx that had input shaft bearing problems just like the trucks did.1 point
-
Before and after's The photos need to be swapped, but you get the picture Sent from my SM-S737TL using Tapatalk1 point
-
Had a look at the TSB and it does specify 4WD only. Given the difference in fluid capacity, I assume the 2WD trans has a different case--hopefully Nissan got the fluid capacity right on that gearbox the first time.1 point
-
Rear end failures aren't common in these but it is possible. I'd want to confirm the noise (rear axle jacked up, front wheels chocked, turn the driveshaft by hand and listen) before digging into it, or just drain the oil and see if it's got metal in it. I'd expect the oil to be darker if a bearing is trying to cook itself, unless it was changed recently by someone looking to quiet the noise. You could try rotating the tires to see if the vibration moves around, but I'm not sure how an out-of-balance wheel would heat up the diff. IIRC the rear third member from an '01 Xterra had a tighter LSD than what's in the R50. Might be a good upgrade if you can find one with the right gear ratio. Later Xterras had very weak LSDs, as did later R50s.1 point
-
Alright folks, I finally got around to installing my tire carrier. Special thanks to everyone in the R50 Tire Carrier Mod: Lets Settle This! post. I thoroughly went through that and studied everything in preparation for this. Special tools I picked up include the following: M10 Rivet Nut 95105A199 (hinges) M10 bolts 91280A636 (hinge bolts) M8 Rivet Nuts 95105A191 (lower latch) Astro Rivet Nut Kit Rivet Tool (lower hatch plate) 1.5 x 1.5" x 1/8" thick angle aluminum First step was to mock up the carrier to get an idea of where the lower mounting hardware needed to be bolted. Then I took off the bumper to check to see if there were the OEM cutout locations- Indeed there were cutouts! I used a hot X-acto blade to easily trim out the holes. At this point I wanted to get the lower latch hardware finished first so I can use it to hold the carrier while I do the hinge portion. I trimmed 1" off one side of the 1.5" angle aluminum, that way it can tuck under toward the vehicle a bit. I tested the rivnuts, seem to work well! I transferred my hardware marks from the metal bumper to my aluminum and used a step bit to drill out the holes, then finished them to the rivnut size of 13.5mm (17/32") using a hard-to-find bit. Both the M8 and M10 required the same hole size. I drilled two small holes to temporarily rivet the aluminum to the vehicle, then used the holes I drilled in the aluminum to drill the holes in the bumper for the rivnuts. The aluminum was then removed and the rivnuts were installed- Then the aluminum went back on. The rivnuts have a washer-head that's larger than the hole, so when you put the aluminum back on it sandwiches the rivnut. I drilled out a bunch of holes and installed rivets to hold it in place. Took no time at all. From here it was as simple as bolting on all the lower hardware. Note: unlike some, I did not have the swing gate door ajar sensor wiring left in the bumper. Hinge time. I put some protective tape down and removed the inner plastic trim to get access to behind the vehicle skin- With the carrier mounted up, locked into the lower latch, I marked out my hole locations. Using pilot holes, I started with the ones I could reach with the carrier closed. Lots of removing, testing, drilling, removing, looking, etc. Eventually I got enough holes in to start the rivnuts. The most aft two holes on each hinge are in very difficult to reach locations, I opted to just rivnut those. The side holes are accessable relatively easily from the inside so I fished nylocks with washers onto those. Fully assembled! I have a license plate bracket + light combo in the mail. I think I'll use the rivnut gun again and mount it on the hatch to the driver's side of the tire carrier. And of course, a tribute to the ruster that I pulled the carrier from: Junkyard bonus stuff- Got these 5' long Yakima crossbars with mounts that work on the OEM Pathfinder rails. Here I am testing them on a junker: Also scored me one of them fancy string dampers for the glove box.1 point
-
If you're running an auto trans, put a cooler on it.1 point
-
You’ll be fine with that load. I use mine for towing a lot and it’s very solid.1 point
-
My bad, I posted in the wrong spot. I posted from my phone instead from my computer where I can actually see what I am doing. As far as towing, I don't intend to pull anywhere near the max. Travel trailer I am designing should only be in the neighborhood of 3500 pounds.1 point