Leaderboard


Popular Content
Showing content with the highest reputation on 03/21/2019 in all areas
-
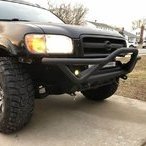
FINALLY!!! Managed to get some serious work done on my custom low profile winch bumper!! Happy will the result. Now I have to bend some tubes for the corners and finish the front skid plate AND paint it! (And fix my very messy wiring haha) Sent from my SM-A520W using Tapatalk6 points
-
Assuming the year in your profile is correct and it's still the factory engine, then the interval for a '94 is 100,000 miles... Technically 105,000 miles (per the '94 FSM), for the timing belt. As long as you're somewhat mechanically inclined, it's a pretty easy job especially with @5523Pathfinder's How To in The Garage3 points
-
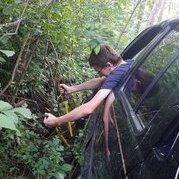
I too was lucky enough to get on the PNW swinggate fest. Just like what@Stpickens said install was straight forward and that kits from Pines to Spines will make it a common mod for post face lifted R50's. Also different configurations for a license plate as well.@Stpickens had his mounted underneath the Jerry can holder and I had mine mounted off to the side with a plate relocation bracket that fits perfectly with the body lines of the R50. Also with the swinggate it helps makes things easier to haul and add on to a trip. Sent from my SM-G960U using Tapatalk3 points
-
It’s the same job. Believe me I’ve done like 12 of them, probably more. On pathfinders, xterras, etc. And redpath is right, it’s 100k on the 94 and up.2 points
-
I rolled around with the same license plate bracket for a few weeks before@Towndawgr50 hooked me up with my custom plate bracket. The one I had was the prototype bracket and it worked flawlessly. No rattling of any kind honestly if you put a nice powder coat or anodized finish on it, it would look really great . It is a perfect way on mounting your plate and really easily running a light to it. Sent from my iPhone using Tapatalk2 points
-
How handy are you? Timing belt isn't a particularly challenging job, just takes some time. If you do it yourslef you could save a ton of money. Motor swap would be cool, but heaps more expensive, so keep that in mind if the money is concerning you. Same deal with the SAS, if you have to pay somebody else to do it it'll probably cost quite a bit to get it done well.2 points
-
Thank you for your patience everyone! We're excited to make a few important announcements... First, our company name: Pines to Spines Off Road. Affectionately "PSO" in our regular discussions, the name refers to the regions we call home and the challenges in between that inspire us to design and build our rigs to tackle all terrains. Our primary goal is to provide a comprehensive line of products that focuses on design, function, and quality. Since our product line will come from two locations depending on our fabrication processes, we also couldn't proceed without proper facility names: the "Tiger Mountain Test Lab" in WA, and the "Spines Fab Lab" in AZ. By both combining and splitting the production, we're able to make solid use of our respective areas of expertise and assets. Second, our SFD components. Let's step backwards for a moment, though: we know there are "kits" (pieces?) out there. Everything we've seen is based on antiquated prints that have been floating around the internet for years, with very basic designs, zero improvement, limited tooling access, and little assurance that the alignment issues are addressed. The design got folks down the road, but many have experienced problems with fabrication quality or alignment issues. The original kits were also intended for a specific outcome (either 4" to 6" of lift), and potentially required removal of prior upgrades; even that company got out of the game for some reason. Fast-forward to now, and we're addressing all those points. Our SFD solution is modular and bolt-on, backed by CAD and CNC equipment to produce consistent and efficient results. Our SFD "kit" is actually multiple kits, including a non-SFD lift option! We'll be offering 1.75", 3", and 4" strut spacers, all of which feature camber adjustment, and pairing those with 3" and 4" SFD kits. This allows us to cater to practically any desired setup! The 1.75" base spacer can be used without a subframe drop, or combined with OME or AC springs and 3" SFD to produce something more moderate. The base spacer is also the heart of our 3" and 4" strut spacers, so upgrading later is easy. None of the spacers require strut disassembly, and because they are two-piece spacers, installation is as simple as attaching one part to the strut, the other part to the chassis, and then bringing the two together. All materials meet or exceed OE specs with grade 10.9 metric hardware, 1/4" plate for the strut components and subframe risers with 3/16" plate for the motor mounts. Shown above are the unfinished prototype 3" and 4" motor mount spacers, the 4" strut spacer demonstrating full camber offset, and the upper mounting plate for use as a 1.75" spacers. These are fresh from the plasma table and press break processes this past weekend with a quick mock-up to validate core assembly so they have not been welded yet. We are still prototyping, using our personal rigs and a 3rd vehicle--an 03 Pathfinder LE (a.k.a., The Gambler) that @ferrariowner123 graciously sent our way! This rig will be fitted with all of our gear and serve as demo vehicle and eventually participate in the Washington State Gambler 500! Soon after, we'll be working with several local NPORA members (our "Piners & Spiners" Team) to personally install the first batch, among other things we've already been field testing. We are very grateful to these folks for the support and a chance to provide real-world feedback to further improve our products. We have also been eagerly developing other products we hope to offer in the near future: · static and adjustable rear control arms and panhard bars · polyurethane motor mounts · swing-gate installation kits · roof-rail mounting system for roof baskets, lighting, storage, etc. We are excited for the coming months as things roll out and our products get put to the test. Going forward we ask that all posts to this thread stay on topic with questions and comments pertaining only to our offered products and services. Stay tuned for up to date progress and product release dates!2 points
-
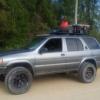
For convenience sake, I'll start putting all of my projects and pertinent pathfinder information in this thread, as well as retroactively putting some of my project in this thread, for starters, here's the car the day we got it. Rebuilt title, a front end wreck had taken out the front bumper cover, nothing else. The covers cheaply painted, but oh well. 151k miles when we bought it (October 2018) Very First thing to get done was a sound system. I swapped my twin 12" subwoofers from the 4runner along with the amp. I added a Kenwood Double Din Stereo, and Rockford Fosgate Component Speakers. I'm not quite an audiophile, but I don't like putting up with stock sound systems on older vehicles. Next thing that happened was the pathfinder got lifted: 2" spacer for 2.5" of lift, 3" spacer in the back. No new moog springs added. Running Boards removed Next: Led Headlights-they're better than cheap halogens, but they took forever to aim properly. Not my smartest or most necessary purchase. @RainGoat was right about the headlights not melting Ice, I had some slush stick to them once while driving. Original thread below. I also Spray tinted my fog light's yellow with Krylon Stained glass spray paint. Also added LED interior lighting. Here's my simple Missing Link-3/4" EMT with the ends crushed, using the existing LCA bolts. Then My Approach Lighting Project- 2 KC Cyclone LED Rock Lights bolted into the old running board holes, and a KC C2 Scene/Area light attached to the bumper. The lights can be all off, or manually on at any time, or set in an auto position that triggers when I'm in reverse or when I open any door, or come on when I unlock with my key fob. Straightforward idea that probably took too long original thread, wiring diagram at the top of post 84 (page 3): Wheels and Tires: 32x11.5r15 Falken Wildpeak AT3w's on 15x8 DX4 Gear Wheels. Love the look of the rims, and the tires more than do their job. Very happy with their performance thus far Manual Hubs: Mile Marker 435's. I broke a stud trying to get them on. That was a fun night I have an ongoing roof rack idea. I know a guy who is about to buy a welder, but if that takes too long maybe I'll just bolt it all together in a ghetto DIY kind of way. Original thread: Added a WD21 Skid Plate for the Transfer case, direct bolt on. Lately I've been messing around with the lack of black on white contrast, so the last week I've been doing some plasti-dipping. I also pulled a honeycomb grill and fuel door off of a black pathfinder. Did the fenders and the body below the doors in black. Still not sure what to do with the tabs under the headlights, I like the black a bit better. I would've kept the original grille, but it was in terrible shape. White on the honeycomb is gonna have to go, and the hood decal if kept needs to be redone in vinyl wrap. The black makes the vehicle look a little tougher and taller, so I was happy with that. White lettering on the fairing is a keeper. That's as far as I've made it so far, I've really appreciated the community and the help I've received thus far. Within the next week I'm hoping to start over on my suspension. OME HD coils and LR 9449's are hopefully in my future, along with finally replacing my shocks. Thanks for taking a look!1 point
-
Clogged fuel filter?? Just throwing it out there!1 point
-
Mid '93 they switched from square-tooth to round-tooth belt/sprockets, and increased the interval from 60k to 100k. It's been a while but I'm pretty sure 5523's writeup was what I used on my '93, plus the service manual for torque specs.1 point
-
I must be colorblind cause what I thought was red spray paint turned out to be burnt orange, but that’s not anything $6 can’t fix.1 point
-
I’ve ordered springs from them twice and both times the shipping has been super quick! I think you’ll really like the 9449’s.1 point
-
Same as @02_Pathy as soon as the next paycheck comes lol. Might be a few weeks1 point
-
It is form fitting, clean & lets you run the illumination for the plate from the existing plate lights. Also, you can remove your swingate temporarily without having to redo the plate lighting.1 point
-
Well it works well lol Sent from my SM-G960U using Tapatalk1 point
-
That was fast. Not sure when I can get these on, but at least I have em1 point
-
I was not expecting your license plate bracket to look like that lol1 point
-
Crank time. Pistons and rings. Crank. Sent from my iPhone using Tapatalk1 point
-
Almost don’t stripping the block. Found some compression leak and as suspected blown head gasket. Sent from my iPhone using Tapatalk1 point
-
Going deep Sent from my iPhone using Tapatalk1 point
-
Torque alone (even with thread locker) is insufficient for that application, especially with the incorrect fastener arrangement you've got. You've put a standard nut over a hole without a lock and flat washer; you have no locking method and have significantly reduced contact area on a fastener that demands it. Expect subframe shift, the edges of the nuts wallowing out the spacer holes, and a loose contact area over time. Proper—and properly installed—hardware is cheap insurance for safety. I'd be worried about it.1 point
-
Parts are looking awesome guys! I really appreciate your real-world approach to R&D and the time an effort you (and the guinea pigs) are putting into testing these before you go to market. Hope things progress quickly at this stage and you get all the bugs and details sorted. I especially like the modular approach, giving the ability to add on as you go along, Brilliant! Big Thumbs up! and looking forward to becoming a future customer.1 point
-
I was lucky enough to get in on the swinggate fest nw edition at@Towndawgr50 ’s compound a few weeks ago. Here has been my review on it thus far. While these are not common in any 2003 pathfinders I found that the installation was very straight forward. Like any swing gate they will make some sort of sound going over large bumps but I can assure you this thing is solidly mounted. You will want some heavy duty springs due to the fact that the factory tire carrier is pretty beefy. This is definitely not a one person job. I did have a jerry mount welded onto the carrier as well as a custom plate mount. This is a pretty cheap mod considering what the Toyota guys pay for a swing gate. With the kit that Pines to Spines will be producing I am sure it will make this a very common addition to the post face lift r50’s. Sent from my iPhone using Tapatalk1 point
-
Thanks! Stories wise...well, nothing's caught fire and all fingers are still attached, so that's a good start. The fun part is probably when we're tossing ideas around then trying to "construct" an idea on the fly with any crap we happen to have laying around us. But honestly, we've been back-and-forth on numerous ideas, seemingly CADing them up for weeks, and maybe months for the strut spacers. Nothing was really tangible until just the other day. The motor mount spacers were the first thing to get cut, and it was probably more of an experiment for the bend process. They turned out well, needing only a minor tweak or two. The ones shown in the picture are our 2nd attempt, and that's looking like a winner for the final design. The strut spacers...man, we've iterated on so many ideas. They've already seen a slight redesign since our announcement today. All the strut spacer parts in that pic (not shown was another bent piece for the 3" spacer) are actually the very first prototypes for each part, and they turned out great for a first pass! The assembly process that day led to other simple improvements, mainly for manufacturing and installation. Beyond tweaks here and there, it's awesome see things come out as expected.1 point
-
1 point
-
I've had the AC heavy duty 2 inch spring lift for the past 10 years. At the same time I changed the shocks and struts and put in manual hubs. I've had larger tires the whole time, right now 265/70R16s. I've had zero extra problems related to it. It rides really rough, but the handling is much better than stock. Just in the last 6 months I have a minor clunking in the front suspension when turning hard over a bump at slow speed. But at 260k miles and as hard as I drive it in the city, I think it is due to be a little tired. At this point with the youngest R50 being 15 years old, the last thing I would be worried about is resale value. I'd be more worried about spending a bunch of money on it and it not lasting long. Sent from my SM-N950U using Tapatalk1 point