Leaderboard
Popular Content
Showing content with the highest reputation on 02/04/2019 in all areas
-
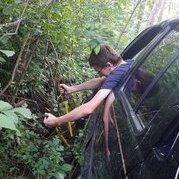
Hey everyone I haven't made a post in like 7 years, the ex crashed my pathfinder on an icy morning and slid into a trailer. So it sat in a field for a good long while until I decided it was time to bring it back to life. Someone had come along and cut out my amps and stole my sub. So my first order was to rebuild the stereo. I swapped out the speakers, deck, replaced sub and amp. Deck: Kenwood Double Din DPX503BT Amp: Kenwood 5 Channel amp XR901-5 Speakers: C2- 570x JL Audio Now onto the Dynomatting after upgrading the stereo it was quite evident that there was a lot of resonance between the body panels and the interior pieces especially when the base drops hit. This in turn took away from the music clarity with all the rattling, vibrations. It was the worst inside the front doors and the roof. Dynomat is a sound deadening material that keeps the road noise out, keeps the stereo sound inside. It makes a stock stereo sound great and an upgraded system sound phenomenal. I removed all interior panels, roof pieces (steam cleaned them once they were out) and went to town. I finished the cargo area, roof, pillars. Also to note I rolled up chunks of Dynomat and squeezed them inside the doors to eliminate the annoying buzzing sound in there. Its not a complete project there's a product they make called Dynopad and its thicker and specially designed to be placed on your floors under your carpet/vinyl. It was out of my budget at the time and eventually I will get around to it. This project cost me about $580 Canadian for just the dynomat. Its not cheap but if your serious about music its worth every penny. Also music aside it makes driving much more pleasurable when you take it on the highway the road noise is almost completely cancelled out, let me put it this way its the difference between driving a tin can and driving a Vault. There are other products similar to it but this was what was available to me in the area Hauling it home after it sitting in an impound for over a year. Before that It sat in a field for nearly 5 years The start of my quest to clean the underbody and frame began with dropping the fuel tank After several hours removing all the grit I had discovered some nasty little pinholes I sealed them up with JB steel stick that plugged the holes hopefully forever. 3 coats of Por-15 later and it was looking a hell of a lot better. Later on the Cap for the fuel pump was cleaned up and painted and wires all saudered wrapped The old calipers were looking rough so I replaced them and painted the new ones with some blue caliper paint ( little did I know I would start to paint everything in sight this electric blue scheme) Old springs vs. New comparison Since I had upgraded my shifter to a leather wrap and put a leather knob on my transfer case shifter. I cut this wrap off a BMW in the pick n pull yard. I had to drill out some of the internals to make it fit then I just slapped some contact cement on there and there you have it Been storing some spray cans of tint around for awhiles so decided to black out the tail lights and 3rd brake like, with the leds in there it looks very sharp Every single bolt, nut washers, locknut I removed was caked in rust, I methodically used my wire wheel cleaned everything up and painted with primer and 3 coats of a gloss black rust paint. After I reassembled the front end I realized that my knuckle, lower and upper control arms looked awful bolted to those freshly painted pieces so I continued on dismantling the rest of it. This is a comparison shot of lower control arms before and after primer I figured why not carry on with the blue so I used this raptor box liner paint to coat my upper and lower control arms, transmission support brackets, torsion bars, panhard bar, the torsion bar bracket, I tinted it "Electric Blue" Rear stabalizer bar, that dog bone piece off the front end. this pic I believe is of the first coat, I ended up applying 2 Im still putting it together here is some of the driver side assembled Since the front corner was crumpled I had to order a new radiator support, still in the process of removing the old one I cut out the heating pads and wiring out of some luxury suv at the pick n pull yard and installed them in my seats. Always wanted heated seats Since I was painting the entire frame and underbody with the por-15 black gloss (afterwards I painted over top of that with ashphalt undercoating)there were areas I could not reach, so I dropped the transmission out and ensure nothing was left uncoated from the rear all the way up the firewall Ordered some pacesetters, cleaned all the shipping paint (a real pain in the ass) and gave them 3 coats of por-20 high temp paint. I intend to wrap them with header wrap afterwards. will upload pics once I get around to it There are a few other things I am bouncing around on ( bodywork mostly) but this old girl has come a long way, and I dont intend of stopping here! Hope you guys enjoy this update! It certainly has been awhile!4 points
-
To expand on what @XPLORx4 is saying here for clarity, longer struts for R50's do not exist. As such, no matter what lift kit you go with, your front suspension will have exactly the same range of motion. Whether you lift 2" with coils or spacers, when you're rolling down the road the road your CV's are at exactly the same angle. However, when you're offroad and unload the front suspension on one side (flexing), the CV's will have a different experience with a spacer vs coil lift. With a coil lift the suspension can still only droop as much as it could when it was factory-stock, so your CV's will be A-OK guaranteed. However, if you have a spacer lift you run the risk of having full suspension droop be outside the range of motion of the CV's (since a spacer lift moves the entire strut assembly downward), something you may not notice until you've driven your R50 someplace where it would be especially unpleasant to deal with a CV breakage. Spacer lifts can work, and work well, just keep in mind if you go too high you're pushing your CV's beyond their limits in some situations.3 points
-
+1 on both of above. Frankly, you’d be amazed at what stock will do. The rear OEM springs needed support when new (I used air lifts). LR springs in the rear are extremely cost effective-probably best combined with ARB OME front springs & spacers to level.3 points
-
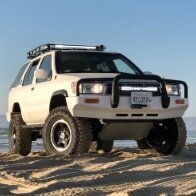
If you do any kind of off-roading, I would recommend 2” lift springs all the way around. A 2” subframe drop is extremely costly and complicated for the potential benefit. I ran a 2” coil spring lift for almost 20 years on my 97, and it worked great. Here’s an action shot. Sent from my iPad using Tapatalk3 points
-
Wow, looks like you've got some dedication to restoring this rig! Glad to see it's getting fixed up instead of scrapped. Those new coils look beefier than stock, are you lifting it along with the rebuild?2 points
-
If you’re concerned about CV angles, don’t get spacers. Get springs. Spacers are cheaper, but they introduce the potential to overextend the CV joints when the front wheels are in the air. The photo I posted above shows my 97 LE with a 2” coil spring lift and 265/75R16 (32”) tires on 16x8 wheels. As I said previously, I ran 2” springs for almost 20 years, and ran 32” tires for almost 15. (The first few years of ownership, I ran 30” and 31” tires.) In case you’re wondering, about a year ago, I installed a 4” subframe drop in addition to the 2” springs in front. In the rear, I have 6” coil springs.2 points
-
Basically yes, you have the concepts down. Keep in mind, the stock R50 springs are pretty soft so it may be desirable to go with aftermarket springs to avoid bottoming out if you intend to offroad; once aftermarket springs are broken in, topping out isn't much of an issue. If you do choose to go the spacer route, while it's more fabrication work, I'd suggest making custom strut spacers that correct for the camber so you don't have to use aftermarket camber bolts to get a proper alignment. If you tow at all or carry lots of gear in the back you'll notice that the rear springs are pretty soft too, so you'd really be best off upgrading the springs all the way around, just my 2c worth.2 points
-
Honestly what everyone is saying is true, but only partly. It all depends on how you mount your rack. For a long time I had that dinky little Walmart roof rack (which is now on the Subaru), and I broke a total of 3 crossbars while that was one. That rack was great for carrying about 1 kayak, but I broke a crossbar when I tossed my spare into it a little to hard. I also broke a crossbar on my 1000+ mile trip to a bunch of national parks in Montana and in Alberta with 2 kayaks on it. The final time I broke one was by sitting in my kayak on top of it lol. The reason that it broke so easily and so often was because of where the narrow rack mounted on the bars. The crossbars are made of 3 pieces: a center section and 2 corners that attach to the roof. With all your weight on just the center section, it stresses the seam where the center meets the corners and snaps easily. With my new rack, it's wide enough that I was able to attach all for mounting point to the actual corners of the crossbars, which transfers the load right onto the roof. I've had 3 kayaks mounted on it with no problem and can stand on it and even jump on it without anything breaking. Sooooo to wrap it up, those crossbars will give you no problems whatsoever as long as you distribute your load evenly on the corners instead of the center. Plus they're way better looking IMO. OH and side note: if you mount a roof rack on those edges instead of the center it will sit even lower. Way easier than mounting the rack right to the roof. I'll throw up a pic in a second here1 point
-
Those non-elevated “bars” are just roof protectors. Not a bad idea & easily transferrable. I didn’t need them as I put a Yakima Basket case spanning my rails between my load bars. Also, as an FYI, Yakima bars adapters work easily for mounting a Hi-Lift on your bars (just be careful putting it up there-that nose will crack your windows in a split second)1 point
-
As far as I know those just give you someplace to set items so you aren't scraping the roof itself; they certainly seem too flimsy to add any extra support worth noting. I tried the pre-facelift crossbars on mine at one point because I liked the lower-profile look but I have to agree with @RainGoat, they are quite flimsy by comparison to the post-facelift crossbars, and really you're only getting the bars about 1.25" lower if I remember right, so if you have a basket and carry weight up there I certainly wouldn't recommend them.1 point
-
By Notorious Valve Cover, I assume you mean the Power Valves-here are some notes: POWER VALVES http://www.nissanpathfinders.net/forum/topic/17104-threadlocker-on-power-valve-screws-pics/page-1 Power Valve (Butterfly Valve) Screws on Intake Plenum They are power/swirl valves...the swirl valve actuator is what opens and closes them 6 butterfly valves in the upper manifold held in with 2 screws each tiny phillips screws, size and thread pattern is m3x.50 10mm length Remove each screw & Loctite red threadlocker=permanent 2-3hrs, just a lot of bits and pieces to take off/put back on page EM-10 for torque specs for all of the removed hardware, and EM-12 for the upper intake manifold bolts. Intake Manifold torque-all 12mm bolts and nuts at 20lbs. Gaskets (4) ordered from dealer 16175-4w000 (throttle body) 14033-4w000 (right side, between upper and lower intake plenum also called 14010A*) 14033-4w010 (left side, between upper and lower intake plenum also called 14010AA*) 14033-4w00A replaces 14032-4 (between lower intake plenum and intake manifold also called 14040E*) * (part numbers as shown on exploded view in the print-out given to me by dealership, dunno why they don't match the p/n on the packages... all gaskets fit perfect.) Power Valve Butterfly Valve Screws Altima Part#14511-8J00B they come with washers on them which are kind of a pain to remove but need to come off. Three Bond 1375B, Nissan Part#14511-8J01B.1 point
-
Just as an FYI, while they’re lower profile & better looking in my opinion as well, they are notably less stout & some have failed.1 point
-
WOW!! Thanks. That was the issue. You nailed it instantly. I'm impressed. Most of my contacts had some black sort of build up. I think the issue is that they aren't actuating properly to make contact, as opposed to the build-up being the problem. I never would have guessed this. Now I know the issue and can snag a new one from the JY.1 point
-
"Dumb"? Thnak you for the input Mr. Zan, pulling the light may be dumb to some, but, if something is wrong i wouldnt know as I cant use the light as reference since it was on constantly anyways. As arrogant as this may sound, a lot of people in here as well as I dont need the truck to tell them something is wrong via dummy light to assume something is up. I will check for codes if something doesnt feel right. To each his own though right?1 point
-
I noticed a gain in power if anything on my truck. I am also running a vg33e with intake headers and 2.5 exhaust. No egr, I have a 93 and I have zero issues and no codes or check engine light. Starts within 1-2 cranks every time. Runs and drives like a bat out of hell. I'm convinced the egr is useless other than maybe to help emissions a bit... they don't even use them on most jdm Nissan motors.1 point
-
I have my egr tube pluged and the entire evap system out. Made a good spot for my spare battery!1 point