All Activity
- Today
-
How do I straighten out the core support lol?
-
What gears do you have, and not have? IIRC on mine the neutral safety switch (range sensor as nissan calls it) was broken and the tcm didn't know what position the shifter was in. It caused me to have 1-3 and 4 only when a certain amount of throttle was applied. Torque converter lock up didn't work at all. I may be misremembering the gears because this was over a decade ago now.
-

KNOW that the valve cover gaskets are leaking?
adamzan replied to peejay's topic in 90-95 WD21 Pathfinders
I had to redo it on mine because I over tightened and ruined the gasket. It still leaked so an old friend said to just put a light coat of RTV on the gasket, I know you're not supposed to but it doesn't friggin leak anymore. -
For 400 bucks I would gamble on it. Pull some wrecking yard panels (might get lucky with the same colour), and straighten out the core support.
-
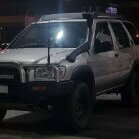
I have some new pictures, this part that is heavily bent, is it the frame? Also how fixable is it?? https://imgur.com/a/uYlTuFf
-
 x2 to what he said. I've unfortunately done this a bit too many times, and always seem to get the unlucky 50/50 odds. lol. Not a huge deal if it's not right. Just pull it back off and line up to the actual TDC.
 - Yesterday
-
 PhilB joined the community
 -
The parts that would be hard to fix aren't the parts you can see in the pictures. It obviously needs a bumper, a fender, and some work on the core support. Can't tell if the suspension, inner fender/strut tower, cooling system, or subframe are messed up. Check the alignment. Engine bay looks clean. Worth checking when the timing belt was done last. If it was done at the recommended mileage, it's about ready for another one.
-
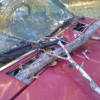
That's gonna need some welding. Dbot had similar rust on his, and was planning to rebuild it, but it doesn't look like there's gonna be an update on that one sadly. There was more of his left, though, so his pictures may give you a better idea of what it's supposed to look like--and his measurements are a good example for what you'll need to do to make sure it goes back together afterwards. Take a bunch of measurements and make cardboard templates before cutting into it. Both will be good to have when you've got a bunch of rot cut out (there's always more than you think there is) and you realize you're building something important, from scratch, in empty space, and if it's not in the right place, other things won't fit right. The layered construction will make it a bit annoying, but at least the thinner metal's easier to bend. Rebuild with fresh steel of the same thickness as the original (measured where it's not rotten). Looks like you'll need a new bolt as well, and it would be a good time to do the bushings in the panhard rod if they need it.
-
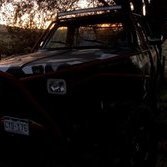
I am considering buying a 1997 Nissan Pathfinder with 190k miles as my first car for 400 bucks from my friend. This vehicle has been involved in an accident. I plan on taking it to a mechanic's shop to see what work does it need. Do you guys think I should get this also how bad do you think the repair job would be based on the pictures? Thanks again. https://imgur.com/a/qRq0L1x
-
leclerc16 joined the community
-
 NawNaw changed their profile photo
 -
Car struggles to start intermittently
19eddies replied to vanuatoo's topic in 96-2004 R50 Pathfinders
I had the same issue with mine and after 7 hours of diagnosing it turned out to be the neutral safety switch. Replaced that and problem solved -
I saw that on Instagram a few days ago as well, super sad. I actually came here for some unrelated suspension info and this was the first thread to pop up in my search so I figured I owe it to Andrew to contribute to this mega thread of his. He was making such great progress on his rust removal project. If his family or anyone here decides to raise some money to get his project finished or just to help his family out, let me know. I don't have that much to give but I'd love to help do something nice. Condolences to his family, he'll be missed by his R50 family here too.
- Last week
-
scooterb51 joined the community
-
SierraSteve joined the community
-
KNOW that the valve cover gaskets are leaking?
peejay replied to peejay's topic in 90-95 WD21 Pathfinders
Excellent! -

KNOW that the valve cover gaskets are leaking?
Slartibartfast replied to peejay's topic in 90-95 WD21 Pathfinders
You shouldn't need to pull the covers to do the belt, unless you're doing a cam swap or something. The timing's all outboard. -
demagoguery joined the community
-

Time to SAS Hawairish's truck
hawairish replied to hawairish's topic in Solid Axle Swaps, Hardcore Custom Fab
Progress has been very slow. Kids' sports in full swing and I started a new job at the beginning of April. New focus had been getting my Frontier back into commuter mode. I'm dropping off a set of LE wheels for refinishing and powder coating in the morning, and new rubber by the end of the week. It should look fantastic...it better be for what I'll be paying. Since last update, I built a new bracket and re-slung the engine. I didn't like that I could only use one bolt on it due to space limitations, but it creates a cantilever that holds fine. The intermediate piece is bar stock from the WJ steering shaft after I cut it down. View from the bottom... Engine hasn't fallen to the floor yet, so it must be good enough. I also mulled considerably on the radius arm brackets. Wanted to get caster adjustment since the optimal angle varies depending on who you ask. OE caster is 3°±0.75°, but the straight axle community says 4°-8°. So, I'm targeting 5°, and the caster adjustment I did gives me ±2° range. The final brackets... My craptastic welding. Old Blue in the background to distract you. And finally, actual results... Finding the right caster (or really, camber bolts turned 90°) was a pain. The front FJ bushings use 16mm bolts, and the only 16mm caster/camber bolts I could find were the lobe style we use for camber adjustment on our struts, but they were all just a little too short. Anything else I could find that used a cam washer was 14mm and too long, except ones for a late-80's to early-00's GMC/Chevy trucks and vans which were a good length but still 14mm bolts. I ended up using 14mm ID x 16mm OD sleeve bushings to fill the void. Took some effort to get the slotting sorted to make the adjustment work, but they work great. Other hardware being used is OE Toyota. I did not do a very good job of maintaining spacing on the brackets for the bushings. I had scrap bushings from a prior job to swapping out bushings on FJ arms, and used them as spacers, but the welding still tightened up on them. I was able to coax them to width without angling them out, except for the lower panhard mount. Just needed to grind down the sleeve for a few seconds and it's good to go, though. -
KNOW that the valve cover gaskets are leaking?
peejay replied to peejay's topic in 90-95 WD21 Pathfinders
Touché! The JIS thing never even crossed my mind until after removal, like you said, not seized and low torque spec. In hindsight, I'm willing to bet those injector cap screws ARE JIS, they were torqued down, and I wallowed out many of 'em on removal. Will report back with what Fel-Pro says, but leaning towards aftermarket cushion + cup and roll with it, valve covers shouldn't need to come off again unless I decide to change the timing belt, discussion for another day! -
dgiffo joined the community
-
KNOW that the valve cover gaskets are leaking?
Slartibartfast replied to peejay's topic in 90-95 WD21 Pathfinders
It wasn't my idea to make three flavors of cross-head that look identical but aren't! Given they're not seized and the torque spec is low, standard Phillips should do just fine regardless. I'm sure that's what I used when I did mine. I'd expect that rubber to squish out a bit when you tighten the screw. Even if it doesn't fill the cup entirely, the cup should still be spreading the load about the same. -
Thank you I will search now.
-
Anecdotally, I run KYB struts with OME springs and the ride is really nice.
-
That will be KYB struts
-
Thank you for your response. Do you know of any other quality brands that are being sold as an equivalent ? Just enjoy working on this one my 4 yr old loves it!
-
KNOW that the valve cover gaskets are leaking?
peejay replied to peejay's topic in 90-95 WD21 Pathfinders
Aw, Slart, why'd ya hafta open up the JIS can of worms??? That came up in another discussion, the member there said "usually" there is a dimple on the screwhead indicating it's JIS, I didn't see one, but at any rate, the #3 phillips "seems" to be an ok fit...for now! "One more" question about this, the aftermarket (Fel-Pro) "Washer Assembly" is of a smaller diameter than the OEM "Washer Assembly", and therefore does not entirely fill the OEM "Tray-Rocker Cover" (what I am calling a "cup washer"). Is that cause for concern? (A reviewer of the aftermarket gasket set stated that they did not use the "Tray-Rocker Cover" when using the aftermarket "Washer Assembly", and I don't feel confident in doing that). I would like to find a "cup washer" that fits the aftermarket "Washer Assembly", but probably doesn't exist, and I should probably not worry about it and reuse the OEM "Tray-Rocker Cover", right? Or do you all only use OEM gaskets? At $9 a pop for the "Washer Assembly", methinks no for me! (Edit: Or, why not place a washer (the same size diameter as the new "Washer Assembly") underneath the new "Washer Assembly", if even that is "required"? What is the "advantage" of the OEM cup-style washer?) (Edit #2: Seems like from other discussions (jeeps), that "Tray-Rocker Cover" is to limit torque, maybe the "cup" portion of it (as opposed to a flat washer) is just to speed up alignment on the assembly line/keep the "Washer Assembly" from moving around...I've emailed Fel-Pro to see what they recommend.) -
Update: I found the drivers side part with the flare hole on ebay. ihttps://www.ebay.com/itm/185147885526?mkcid=16&mkevt=1&mkrid=711-127632-2357-0&ssspo=nLfobrrwTwy&sssrc=2047675&ssuid=4yHEB6iNRXG&widget_ver=artemis&media=COPY It looks like ebay only has the driver side and rockauto only the passenger (with flare holes), so maybe it'll work out lol. I ordered the rockauto drivers side without flare holes too before I found this so I'll let you know if its the same other than lack of fender hole when I get it (before I return)
-
Unfortunately they have been discontinued completely and cannot be found anywhere. You can replace them with KYB.
-
Good morning. I am having the same issue . I purchased a 2001 Pathfinder SE , it has the OME 145's, 146's on it that need to be replaced am new to this forum and need to source something any help..?
-
Sorry to hear, and sorry to his family. I was just looking for this thread to see how the rust work was going.

.thumb.jpg.3b55d9a307419d052e117782307fc17d.jpg)